はじめに
このガイドを使って、Motorola Moto G5 Plusのダメージの入ったマザーボードを交換します。
必要な工具と部品
-
-
温めたiOpenerをデバイスの正面の左側端に約2分間載せます。熱くて触れない程度までの加減です。この作業により、ディスプレイに留められた接着剤を柔らかくできます。
Heat not only along the phone’s left edge, right?
I used two suction cups on the screen. Just above the finger print reader and the other near the top. Then used my heatgun set at 390 degrees. Low speed and had the wide, flat blade attachment so the heat spread to a narrow/wide area. Heated the left edge from corner to corner, then pulled up on the suction cups until I could work in a plastic triangle guitar-like-pic under the screen. Continued to heat and add another pick around the screen . Do not rush and take your time. Got the screen off and didn’t damage the adhesive too bad. Was able to reuse it. Once reassembled, I heated the screen around the edge and rubbed with a plastic tool to make sure the adhesive was working. So far so good with the adhesive. Good Luck!
strtrekbuf - 返信
-
-
-
2番目と3番目の画像を参照して、ディスプレイ周辺の接着剤の幅がどれぐらいあるか確認してください。
2mm ONLY on the SIDES of the display. The top can have adhesive as far as 10mm from the edge, and at the bottom as much as 12mm. And there’s no way to cut this adhesive with the tools at 45 degrees. Once the left side is open, carefully insert the tool a little further at a time on the top and bottom, whilst attempting to keep a little pull force on the suction cup. Hard to do, and almost inevitably the on-off button will be hit at some point unless you’re really careful. The adhesive pieces are quite tough, and I used a tiny scissors to cut some of the adhesive “ropes” when the case was far enough open. A highly detailed photo of the adhesive locations top and bottom (and on both parts) would help here. This is likely the most difficult step (well, don’t know for certain, ‘cause I haven’t got further yet…), and warrants better photos and explanation IMO.
-
-
-
続けて、デバイスの上部と右側の接着剤を切開します。
Pues se me fastidia la pantalla al hacer esto
This is a great guide except for one thing. My screen works fine but it is separating from the phone on both sides. I need to remove it just enough to clean up the old adhesive and reattach. The instructions on repeating the steps in reverse order to replace the screen doesn't help with getting the regluing right, what kind of glue or double sided tape to use, etc …
-
-
-
イヤホンの下に留められた黒いプラスネジを2本覆っている、黄色いステッカーを外します。
Attention must be paid not to lose the small rubber gasket around the proximity sensor - I found it best to collect it with all the screws of the midframe and reinstall it at the end during re-assembly.
-
-
-
ミッドフレームから次のネジを外します。
-
3.8 mm黒いネジー16本
-
2.4 mmシルバーネジー3本
Esa placa se levanta por el otro lado, por donde estan los botones de volumen por ahi se puede levantar de una mejor manera.
-
-
-
-
スパッジャー平坦側を、ミッドフレームとデバイス左端の間に差し込み、ミッドフレームを所定の位置に固定している2つのクリップを慎重に取り外します。
-
-
-
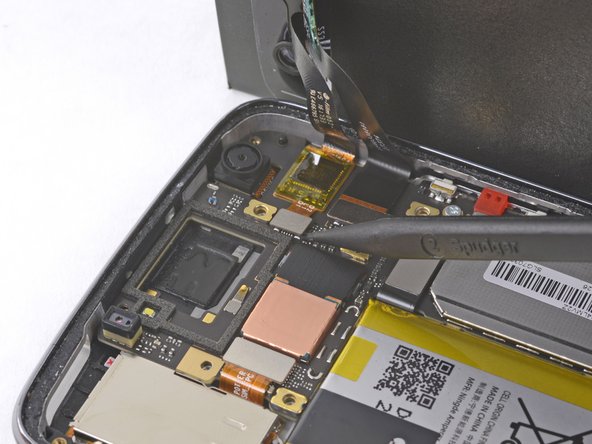
デバイスからディスプレイアセンブリを外します。
-
交換用のディスプレイにタッチ機能が付いていない場合、また付いているかどうかわからない場合は、データーをバックアップ保存して、ファクトリーリセットをしてください。
If your digitizer appears to be "dead", power down the phone (which you can't because the digitizer is dead) and disconnect the battery connector by prying the connector up out of its socket (with something NONE conductive like your spudge tool) for few seconds. (It does not "slide" out, but pries straight up.) This will FORCE a cold boot and initialize the digitizer WITHOUT a factory reset, preserving all setups and all your files. :-)
-
-
-
バッテリー 上部から黒いプルタブを剥がして、しっかりと一定の力でまっすぐ引っ張り、バッテリー を固定している接着剤から解放します。
You don't even need to remove the battery! You can just leave it glued in and pop out the motherboard from around it.
-
-
-
プルタブが切断したり、接着剤が強すぎて取り出せない場合は、開口ピックを使って、ケースからバッテリー を慎重にこじ開けます。
In my case the battery was very securely attached to the case. The only way I managed to get it out was by inserting one of the picks pointy-edge in on the same side where the pull tab is located. Even then, I bent the battery slightly and fully agree with the suggestion of not reusing it.
-
-
-
バッテリー が緩まったら、デバイスから取り出します。
-
デバイスから残っている接着剤を全て取り除いてください。イソプロピルアルコールでバッテリー の下のエリアを綺麗に拭き取ります。
-
プレカットされた接着剤もしくはTesaテープの新しく塗布してください。
-
新しいバッテリー を約5–10秒間しっかりと押さえて固定します。
It would be nice to have some instructions on how to use the adhesive sticker. I finally just kluged it on, then saw there was a double part to the blue shield, with part of the adhesive cut so that it can go behind the ribbon cables.
Hi Robert,
Thanks for the suggestion! I’ll add some more instructions on how to apply the battery adhesive.
Why won't anyone show a back door removal? Yes it's difficult, but you won't damage the display and other components between you and the battery. I did this procedure and I damaged the display, and when it was all put back together the proximity and fingerprint sensors didn't work, and the phone has a big bulge in it where before there was none. Yes it was operator error (me), but I'm not retarded and I had the proper tools. It could save much frustration and money if someone would show a back door removal for battery replacement on these phones (moto g5 plus, moto g6, moto g7). Thanks!
That’s an interesting idea! I’m not certain if the you can get in from the back panel, as it is attached to the frame and seemingly screwed in from underneath the display. But, I may be wrong!
Hmm, no mention of:
1. take the (black on mine) battery-removal/grab-able tape section off the old battery and install it on the new one in the appropriate place. Otherwise gonna be much harder to remove the battery next time. Too late for me.
2. what to do about the little foam-tape sections around the top and bottom of the phone between the screen and the interior cover plate. I’m just gonna leave ‘em in place, as I can’t see how you could effectively mimic the original factory stuff with the tesa tape.
3. how to install the perimeter seal. I saw on a you-tube that you should cut the “cable” side of the perimeter strip off of the rest of the sheet and to install that piece (must align very carefully with tape guides) before attempting to install the screen and its cables.
OK, correction on the perimeter seal; here’s how it should be done (don’t cut anything; ignore my comment item 3. above):
1. The perimeter seal is a sandwich of 4 layers, the translucent white release sheet, the adhesive layer (black), a removable release layer (turquoise) that matches almost exactly the shape and configuration of the adhesive layer, and then the positioning sheet (also turquoise). 2. BEFORE the internal frame/cover/whatever-it-is to be installed, BEFORE the screen ribbon cables are installed, the perimeter seal must be installed.
3. Remove the translucent white release sheet. VERY carefully align the entire rest of the sandwich over the open rear frame ledge (with battery already installed). Notice that where the frame ledge is a bit fatter at the upper corner, so is the seal width. The entire positioning sheet can fit just inside the edges of the rear frame when it is positioned properly. Start at the bottom and fit it very lightly into position (too hard—>it will be stuck). cont.
continued from above:
4. when the whole thing is fit properly into place, you can remove the entire positioning sheet—just peel it up. Note that it’s a bit tricky at the top where the rear camera and light protrude. But there is a tab in this area in the positioning sheet to pull up the positioning sheet and better allow for fitting the seal into place along the top.
5. At this point the seal should be properly positioned around the entire perimeter. Note that there is still the final release part of the sandwich still on top. Woo-hoo! You can now press that down with a tool so the seal is well-attached to the rear frame. Leave this in place until you’re ready to install the screen permanently.
6. When you’re ready to install the screen, THEN remove this final release and carefully fit the screen into position. And, yes, I’ve left out a LOT of steps between item 5. and 6. in this list. Those things are more straightforward and are just reversing what you did to disassemble. You’re welcome.
-


デバイスを再組立する際は、これらのインストラクションを逆の順番に従って作業を進めてください。
デバイスを再組立する際は、これらのインストラクションを逆の順番に従って作業を進めてください。
10 の人々がこのガイドを完成させました。
以下の翻訳者の皆さんにお礼を申し上げます:
100%

Midori Doiさんは世界中で修理する私たちを助けてくれています! あなたも貢献してみませんか?
翻訳を始める ›
チーム

USF Tampa, Team S1-G6, Leahy Fall 2017 USF Tampa, Team S1-G6, Leahy Fall 2017人のメンバー
USFT-LEAHY-F17S1G6
5 メンバー
21のガイドは作成済み
11 件のコメント
The power button broke off the motherboard on my G5 plus, so I would like to solder it back into place. I think I need a large, high magnification lens to see the details during the process. Any suggestions?
My phone get into the water so its now dead. i would like to chnage the motherboard. SO could you please share the website from there i can get the whole motherboard in lowest price. I had contact to service centre but they are asking a 80% of the phone cast. Please give me a detail on below email id- ankitkulhade123@gmail.com
Is your problem solved now? I’m also facing same problem, they are asking 80% of mobile cost.. what to do now?
I am facing the same issue with my Moto G5 Plus. The mobile was drawn into water and instantly I pulled it back. I tried drying the phone with raw rice and sunlight. After 3-4 days the phone started working. I used it a whole day but as the better was discharged, the phone was switched off and unlimately dead. The moto service center declared that the motherboard is dead now. Please suggest if it can be fixed?
Sir my moto g5s plus mother board damage due to water and it's only 6 month old so what I do.
Service centre says that repairing not posible because it is not in warranty.
How I get new mother at affordable price.
Mera phone damage bhi nai hua chalte chahte off hua Aur mai service center gya unhone kaha Anderson mother band hai … service center wale chor hai bhulkar bhi Motorola ha phone apni life mei kabhi nai lene wala
Cheap company mai toh trust bhi nai kar sakta is company par answer diya gya approval hi nai mila cheap service cence indrapuram
Inserted SIM card fell out of carrier stuck inside managed to get but caused damage to contact line
.not working now.any suggestions
In Step 22 the screw is shown in the wrong hole. The hole above right is the correct hole. The hole shown is use to secure the cover.
Can you tell me the location of test pins that can be short-circuited to unlock the bootloader in a bricked phone?
There is an error on "***Step 22*** Motherboard Disassembly" which shows the screw for the motherboard going into the wrong hole. That hole is used for the mid frame cover. Just a note for anyone doing work on this system