メインコンテンツにスキップ

Motorola Moto G Stylus (2020) Charging Port Board Replacement

必要な工具と部品

  1. Motorola Moto G Stylus (2020) Charging Port Board Replacement, Back Removal: 手順 1、 2の画像 1 Motorola Moto G Stylus (2020) Charging Port Board Replacement, Back Removal: 手順 1、 2の画像 2
    • Make sure the phone is powered off.

    • Apply heat to the back of the phone to loosen the adhesive. We use a blue heat mat but the heated iOpener works as well.

  2. Motorola Moto G Stylus (2020) Charging Port Board Replacement: 手順 2、 3の画像 1 Motorola Moto G Stylus (2020) Charging Port Board Replacement: 手順 2、 3の画像 2 Motorola Moto G Stylus (2020) Charging Port Board Replacement: 手順 2、 3の画像 3
    この手順で使用する道具:
    Plastic Cards
    $2.99
    購入する
    • Start along the long edge of the phone and work a strong plastic card or opening pick underneath the back panel. A suction cup can be used to provide a little spacing to make it easier.

    • Carefully work the plastic card or pick along the edges of the phone. I recommend wearing gloves because the edge of the back panel are sharp and can cut a finger.

    • Apply pressure to the fingerprint reader while lifting slightly on the back panel. Once the adhesive starts to break loose you can use the plastic card to separate it from the back panel.

  3. Motorola Moto G Stylus (2020) Charging Port Board Replacement: 手順 3、 2の画像 1 Motorola Moto G Stylus (2020) Charging Port Board Replacement: 手順 3、 2の画像 2
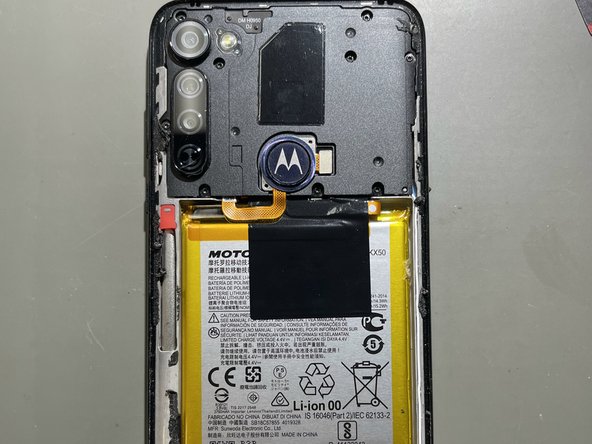
    • Remove the back panel taking care not to tear the fingerprint reader flex cable.

    • There will be adhesive on the back panel and the phone frame that will need to be removed.

    • I recommend applying tesa tape in the same pattern when reassembling the phone (if you don't have the precut back panel adhesive).

  4. Motorola Moto G Stylus (2020) Charging Port Board Replacement: 手順 4、 3の画像 1 Motorola Moto G Stylus (2020) Charging Port Board Replacement: 手順 4、 3の画像 2 Motorola Moto G Stylus (2020) Charging Port Board Replacement: 手順 4、 3の画像 3
    • There are 9 T3 screws that have to be removed to gain access to the battery connector.

    • Once the screws are removed, use a plastic spudger to remove the logic board shield.

    • Lift up the black film and use a plastic tool to disconnect the battery flex from the logic board.

  5. Motorola Moto G Stylus (2020) Charging Port Board Replacement: 手順 5、 2の画像 1 Motorola Moto G Stylus (2020) Charging Port Board Replacement: 手順 5、 2の画像 2
    • There are 6 T3 screws that need to be removed.

    • Once the screws are removed, use a plastic spudger to lift up the loud speaker assembly.

  6. Motorola Moto G Stylus (2020) Charging Port Board Replacement: 手順 6、 2の画像 1 Motorola Moto G Stylus (2020) Charging Port Board Replacement: 手順 6、 2の画像 2
    • Disconnect the 2 antenna wires by gently lifting at the connection point.

    • Lift up on the charing port board from the top and gently press down on the flex cable that is sitting under it. Remove from the phone frame.

終わりに

To reassemble your device, follow these instructions in reverse order.

2 の人々がこのガイドを完成させました。

作成者

2人の作成者と共同で作成されました。

Clayton Moorman

メンバー登録日: 11/07/16

202 ポイント

1ガイドが承認済み

チーム

newAGAIN Phone Repair newAGAIN Phone Repair人のメンバー

Business

1 メンバー

1のガイドは作成済み

0 件のコメント

コメントを追加

統計データ:

過去 24時間: 4

過去 7 日: 8

過去 30 日: 51

今までの合計 581