メインコンテンツにスキップ

Motorola Moto E 2nd Generation Rear Facing Camera Replacement

必要な工具と部品

  1. Motorola Moto E 2nd Generation Rear Facing Camera Replacement, Display Assembly: 手順 1、 1の画像 1
    • Turn off the device before beginning your repair.

    • Using a heat gun, carefully apply heat around the edges of the display to soften the glue. Heat should be applied to the point where the phone isn't too hot to touch, but close enough.

  2. Motorola Moto E 2nd Generation Rear Facing Camera Replacement: 手順 2、 3の画像 1 Motorola Moto E 2nd Generation Rear Facing Camera Replacement: 手順 2、 3の画像 2 Motorola Moto E 2nd Generation Rear Facing Camera Replacement: 手順 2、 3の画像 3
    • Using the small plastic opening tool, pry and slide all the way around the phone while carefully lifting up on the display.

    • The screen is secured by two-sided tape located on the edge.

  3. Motorola Moto E 2nd Generation Rear Facing Camera Replacement: 手順 3、 3の画像 1 Motorola Moto E 2nd Generation Rear Facing Camera Replacement: 手順 3、 3の画像 2 Motorola Moto E 2nd Generation Rear Facing Camera Replacement: 手順 3、 3の画像 3
    • Once display is fully unglued from the frame, carefully lift it up and locate the display connector.

    • Using the same small plastic tool, carefully remove the yellow tape off the connector.

    • Now carefully undo the black connector lock by lifting it up in the direction of the red arrow.

    • Do not pry on the gray part of the connector.

    • Lastly slide the display cable off the connector. It should easily slide off, if not make sure the black lock is fully unlatched.

  4. Motorola Moto E 2nd Generation Rear Facing Camera Replacement, Earpiece Speaker: 手順 4、 3の画像 1 Motorola Moto E 2nd Generation Rear Facing Camera Replacement, Earpiece Speaker: 手順 4、 3の画像 2 Motorola Moto E 2nd Generation Rear Facing Camera Replacement, Earpiece Speaker: 手順 4、 3の画像 3
    • Now that the display is out, remove the aluminum shield off the motherboard.

    • Unscrew the single 4mm screw located on the top using a T4 Torx bit.

    • After screw is out, gently remove the aluminum shield off the motherboard.

    • Working on a magnet board is recommended as the screws are small and can be easily misplaced.

  5. Motorola Moto E 2nd Generation Rear Facing Camera Replacement: 手順 5、 2の画像 1 Motorola Moto E 2nd Generation Rear Facing Camera Replacement: 手順 5、 2の画像 2
    • Using the metal spudger tool, very carefully remove the speaker by first gently prying up on the right side and then the bottom.

    • The ear piece is held by double sided tape and clips to the motherboard so be very careful.

  6. Motorola Moto E 2nd Generation Rear Facing Camera Replacement, Motherboard: 手順 6、 1の画像 1
    • Unscrew the remaining 16- 4mm screws using a T4 Torx bit.

    • Using a magnet board is recommended as the screws are small and can be easily misplaced.

  7. Motorola Moto E 2nd Generation Rear Facing Camera Replacement: 手順 7、 3の画像 1 Motorola Moto E 2nd Generation Rear Facing Camera Replacement: 手順 7、 3の画像 2 Motorola Moto E 2nd Generation Rear Facing Camera Replacement: 手順 7、 3の画像 3
    • Next remove the plastic C-shaped black plastic frame.

    • Using the metal spudger tool, gently pull up the right corner as indicated and work your way around until it's off the motherboard.

  8. Motorola Moto E 2nd Generation Rear Facing Camera Replacement: 手順 8、 2の画像 1 Motorola Moto E 2nd Generation Rear Facing Camera Replacement: 手順 8、 2の画像 2
    • Gently lift up the battery cable connector, it should come out very easy.

  9. Motorola Moto E 2nd Generation Rear Facing Camera Replacement: 手順 9、 3の画像 1 Motorola Moto E 2nd Generation Rear Facing Camera Replacement: 手順 9、 3の画像 2 Motorola Moto E 2nd Generation Rear Facing Camera Replacement: 手順 9、 3の画像 3
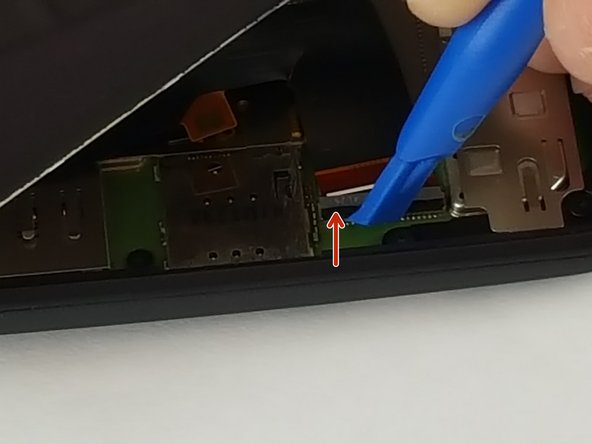
    • After the battery cable is disconnected from the motherboard, use the metal spudger tool and carefully insert it in the small opening by the speaker and pry the motherboard up enough to fit your finger in between the motherboard and the phone frame.

    • Now just pull the motherboard starting from the top to bottom off the phone case.

  10. Motorola Moto E 2nd Generation Rear Facing Camera Replacement, Rear Facing Camera: 手順 10、 2の画像 1 Motorola Moto E 2nd Generation Rear Facing Camera Replacement, Rear Facing Camera: 手順 10、 2の画像 2
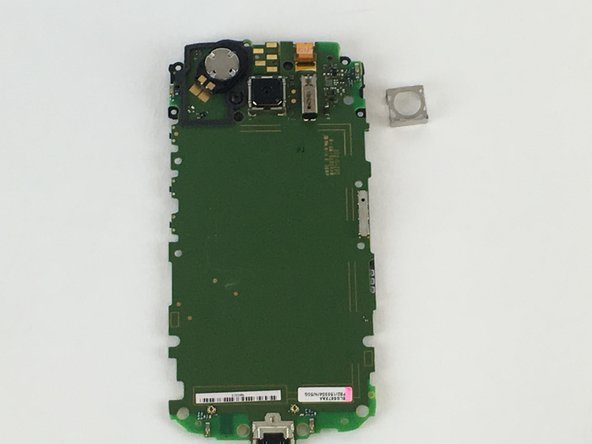
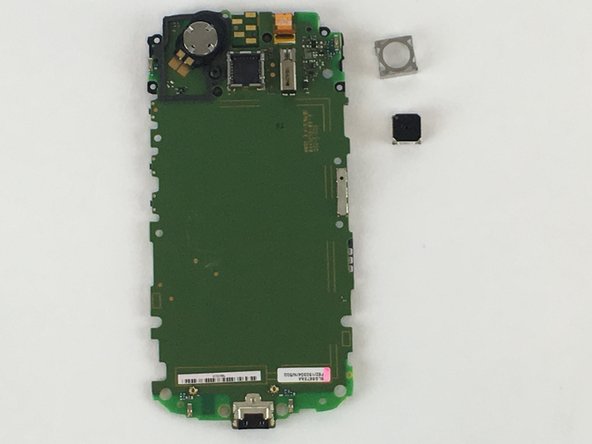
    • Using a spudger (ignore the pictured screwdriver), pry up the metal square frame on each side until it comes off.

  11. Motorola Moto E 2nd Generation Rear Facing Camera Replacement: 手順 11、 2の画像 1 Motorola Moto E 2nd Generation Rear Facing Camera Replacement: 手順 11、 2の画像 2
    • Once the metal square frame is out, use the same tool to pry up the camera by gently pulling on each side until it comes off

終わりに

To reassemble your device, follow these instructions in reverse order.

4 の人々がこのガイドを完成させました。

作成者

2人の作成者と共同で作成されました。

Andre Romualdo

メンバー登録日: 02/08/16

3,765 ポイント

5のガイドは作成済み

チーム

USF Tampa, Team 12-3, Eyestone Spring 2016 USF Tampa, Team 12-3, Eyestone Spring 2016人のメンバー

USFT-EYESTONE-S16S12G3

3 メンバー

14のガイドは作成済み

0 件のコメント

コメントを追加

統計データ:

過去 24時間: 0

過去 7 日: 0

過去 30 日: 2

今までの合計 1,339