メインコンテンツにスキップ

Motorola Droid RAZR Maxx Antenna/Headphone Jack Replacement

必要な工具と部品

  1. Motorola Droid RAZR Maxx Antenna/Headphone Jack Replacement, Antenna/Headphone Jack: 手順 1、 2の画像 1 Motorola Droid RAZR Maxx Antenna/Headphone Jack Replacement, Antenna/Headphone Jack: 手順 1、 2の画像 2
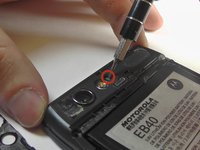
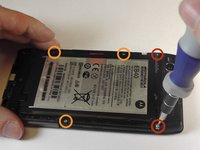
    • Remove the SIM card.

    • Remove the microSD card.

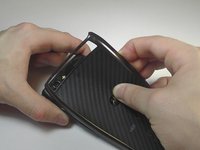
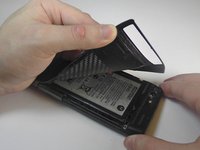
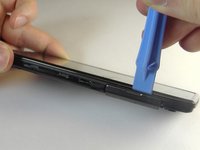
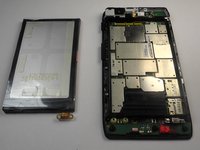
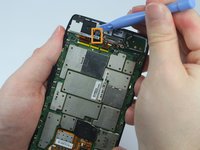
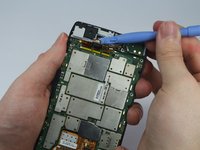
    • Insert the plastic opening tool between the back cover and the front piece of the case, freeing the plastic clips between the phone.

    • Do this along the back right side of the phone cover until you reach the top.

  2. Motorola Droid RAZR Maxx Antenna/Headphone Jack Replacement: 手順 2、 2の画像 1 Motorola Droid RAZR Maxx Antenna/Headphone Jack Replacement: 手順 2、 2の画像 2
    • Use the plastic opening tool to carefully work your way around the top of the phone, freeing the plastic clips.

    • Be cautious when using the tool around the top of the device because the plastic case is very thin and could easily be cracked or snapped.

    • After this continue using the tool and pry down the remaining side and the bottom of the phone.

  3. Motorola Droid RAZR Maxx Antenna/Headphone Jack Replacement: 手順 3、 3の画像 1 Motorola Droid RAZR Maxx Antenna/Headphone Jack Replacement: 手順 3、 3の画像 2 Motorola Droid RAZR Maxx Antenna/Headphone Jack Replacement: 手順 3、 3の画像 3
    • With all the plastic clips released, pull away the back cover from the phone to remove it.

    • The back cover is attached to the battery with a large amount of adhesive. Some force may be required to pull the back cover from the phone.

    • The back cover is very durable and will not break from some bending or pulling.

  4. Motorola Droid RAZR Maxx Antenna/Headphone Jack Replacement: 手順 4、 1の画像 1
    • Looking at the top rectangular hump where the camera is located, you will now use the plastic opening tool to remove the camera cover.

    • With the plastic opening tool, apply pressure into any surrounding crease of the camera cover to remove it.

  5. Motorola Droid RAZR Maxx Antenna/Headphone Jack Replacement: 手順 5、 3の画像 1 Motorola Droid RAZR Maxx Antenna/Headphone Jack Replacement: 手順 5、 3の画像 2 Motorola Droid RAZR Maxx Antenna/Headphone Jack Replacement: 手順 5、 3の画像 3
    • Using the T5 and T4 bit pieces, remove the silver screws located around the rear case of the phone.

    • Remove the three 6.7 mm silver T4 screws that are located at the top of the phone.

    • Remove the five 4.0 mm silver T5 screws that are located near the middle of the phone.

  6. Motorola Droid RAZR Maxx Antenna/Headphone Jack Replacement: 手順 6、 1の画像 1
    • Using the T4 bit piece remove the three black 4.5 mm screws that are located at the bottom of the phone.

  7. Motorola Droid RAZR Maxx Antenna/Headphone Jack Replacement: 手順 7、 3の画像 1 Motorola Droid RAZR Maxx Antenna/Headphone Jack Replacement: 手順 7、 3の画像 2 Motorola Droid RAZR Maxx Antenna/Headphone Jack Replacement: 手順 7、 3の画像 3
    • Insert the plastic opening tool between the rear case and motherboard assembly.

    • Using the plastic opening tool, carefully work your way around the phone, freeing the plastic clips.

    • Carefully pull the rear case off the motherboard assembly.

  8. Motorola Droid RAZR Maxx Antenna/Headphone Jack Replacement: 手順 8、 2の画像 1 Motorola Droid RAZR Maxx Antenna/Headphone Jack Replacement: 手順 8、 2の画像 2
    • Use the tip of the spudger, lift the red silicone cover off the battery terminal screws.

    • Remove the two 3.3mm T5 Torx battery terminal screws.

    • Grab the red battery removal tab and pull the battery out.

    • There might be some adhesive between the battery and motherboard assembly.

  9. Motorola Droid RAZR Maxx Antenna/Headphone Jack Replacement: 手順 9、 2の画像 1 Motorola Droid RAZR Maxx Antenna/Headphone Jack Replacement: 手順 9、 2の画像 2
    • Using the T5 bit pieces, remove the silver screws located around the metal chassis.

    • Remove the three 3.5 mm silver T5 screws that are located near the middle of the phone.

  10. Motorola Droid RAZR Maxx Antenna/Headphone Jack Replacement: 手順 10、 3の画像 1 Motorola Droid RAZR Maxx Antenna/Headphone Jack Replacement: 手順 10、 3の画像 2 Motorola Droid RAZR Maxx Antenna/Headphone Jack Replacement: 手順 10、 3の画像 3
    • Using the plastic opening tool gently lift the microphone out of its resting place.

    • Using the plastic opening tool gently lift the front-facing camera out of its resting place.

    • Be careful not to pull and disconnect these devices.

  11. Motorola Droid RAZR Maxx Antenna/Headphone Jack Replacement: 手順 11、 3の画像 1 Motorola Droid RAZR Maxx Antenna/Headphone Jack Replacement: 手順 11、 3の画像 2 Motorola Droid RAZR Maxx Antenna/Headphone Jack Replacement: 手順 11、 3の画像 3
    • There are four clips that must be released at the top and sides of the phone before the Antenna/Headphone Jack can come completely off.

    • Using the plastic opening tool, carefully pry the Antenna/Headphone Jack piece off the motherboard assembly.

終わりに

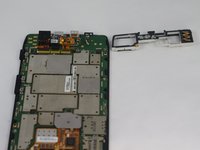
To reassemble your device, follow these instructions in reverse order.

2 の人々がこのガイドを完成させました。

作成者

3人の作成者と共同で作成されました。

Nick Kraese

メンバー登録日: 10/08/14

657 ポイント

2のガイドは作成済み

チーム

USF Tampa, Team 14-6, Leahy Fall 2014 USF Tampa, Team 14-6, Leahy Fall 2014人のメンバー

USFT-LEAHY-F14S14G6

4 メンバー

10のガイドは作成済み

0 件のコメント

コメントを追加

統計データ:

過去 24時間: 0

過去 7 日: 0

過去 30 日: 0

今までの合計 1,539