メインコンテンツにスキップ

Motorola Droid RAZR M Headphone Jack Replacement

必要な工具と部品

  1. Motorola Droid RAZR M Headphone Jack Replacement, Front Assembly: 手順 1、 3の画像 1 Motorola Droid RAZR M Headphone Jack Replacement, Front Assembly: 手順 1、 3の画像 2 Motorola Droid RAZR M Headphone Jack Replacement, Front Assembly: 手順 1、 3の画像 3
    • Open the small latch on the left side of the device by lifting gently with your finger, exposing the SIM card and microSD card slots.

    • If either of these cards are present, remove them to prevent damaging them while taking apart the phone. Our device does not have either.

    • Close the latch once the two cards are removed.

  2. Motorola Droid RAZR M Headphone Jack Replacement: 手順 2、 3の画像 1 Motorola Droid RAZR M Headphone Jack Replacement: 手順 2、 3の画像 2 Motorola Droid RAZR M Headphone Jack Replacement: 手順 2、 3の画像 3
    • Remove the six 4mm T3 Torx screws. There are 3 on each side of the device.

  3. Motorola Droid RAZR M Headphone Jack Replacement: 手順 3、 3の画像 1 Motorola Droid RAZR M Headphone Jack Replacement: 手順 3、 3の画像 2 Motorola Droid RAZR M Headphone Jack Replacement: 手順 3、 3の画像 3
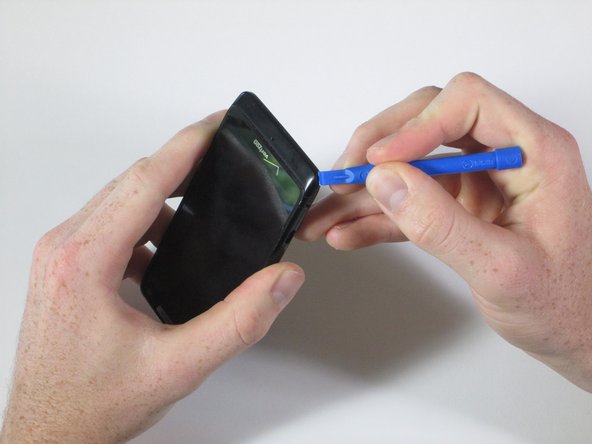
    • Run the plastic opening tool under the bottom edge of the phone to detach the small plastic cover below the Verizon logo.

    • It will take some force to remove this piece. Work around the bottom corners to unlatch the two hooks holding the piece in place.

    • The small plastic hooks can break during removal. Be careful that you don't damage them, but it will take some force to get them undone.

    • Once the plastic cover is detached, pull the piece away with your fingers.

  4. Motorola Droid RAZR M Headphone Jack Replacement: 手順 4、 2の画像 1 Motorola Droid RAZR M Headphone Jack Replacement: 手順 4、 2の画像 2
    • Remove the three T4 Torx screws. There are three at the bottom of the device.

  5. Motorola Droid RAZR M Headphone Jack Replacement: 手順 5、 3の画像 1 Motorola Droid RAZR M Headphone Jack Replacement: 手順 5、 3の画像 2 Motorola Droid RAZR M Headphone Jack Replacement: 手順 5、 3の画像 3
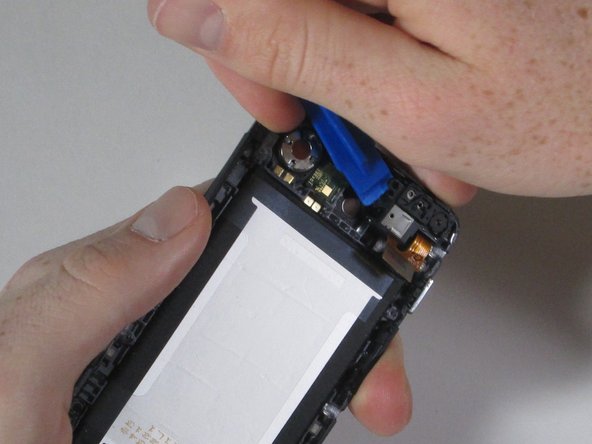
    • Using the plastic opening tool, peel away the silver Motorola plate at the top of the phone. There is a fair amount of adhesive underneath, so you may have to pry it from a few different angles.

    • As soon as you can get your finger underneath, pull away the silver plate.

  6. Motorola Droid RAZR M Headphone Jack Replacement: 手順 6、 2の画像 1 Motorola Droid RAZR M Headphone Jack Replacement: 手順 6、 2の画像 2
    • Remove the two 7mm T4 Torx screws at the top of the device.

  7. Motorola Droid RAZR M Headphone Jack Replacement: 手順 7、 3の画像 1 Motorola Droid RAZR M Headphone Jack Replacement: 手順 7、 3の画像 2 Motorola Droid RAZR M Headphone Jack Replacement: 手順 7、 3の画像 3
    • When you detach the front from the back, don't pull the two pieces entirely apart. There is a flat orange wire that connects the two pieces that will be disconnected in the next step.

    • Snap apart the two internal clips located on the top corners of the device, and the two clips in the bottom corners.

    • Run the plastic opening tool around the edge of the entire device to pry apart the front of the phone from the back.

    • There is a small black plastic piece located at the bottom of the front assembly. Do not worry if the strip falls off; just simply snap it back on and proceed.

  8. Motorola Droid RAZR M Headphone Jack Replacement: 手順 8、 3の画像 1 Motorola Droid RAZR M Headphone Jack Replacement: 手順 8、 3の画像 2 Motorola Droid RAZR M Headphone Jack Replacement: 手順 8、 3の画像 3
    • Like a clamshell, slowly open the device from the top. Open the remainder of the device slowly while being mindful of the flat orange wire that connects the motherboard to the front assembly.

    • Undo the snap connection in the lower left corner by inserting the plastic opening tool under the end of the orange wire connected to the motherboard. Lift gently.

    • Once the snap connection is undone, pull apart the front assembly from the rest of the phone.

  9. Motorola Droid RAZR M Headphone Jack Replacement, Motherboard: 手順 9、 2の画像 1 Motorola Droid RAZR M Headphone Jack Replacement, Motherboard: 手順 9、 2の画像 2
    • Remove the six 4mm T5 Torx screws located along the outer edge of the motherboard.

  10. Motorola Droid RAZR M Headphone Jack Replacement: 手順 10、 2の画像 1 Motorola Droid RAZR M Headphone Jack Replacement: 手順 10、 2の画像 2
    • Disconnect the snap connection in the lower left corner by prying underneath using the plastic opening tool.

  11. Motorola Droid RAZR M Headphone Jack Replacement: 手順 11、 2の画像 1 Motorola Droid RAZR M Headphone Jack Replacement: 手順 11、 2の画像 2
    • Disconnect the snap connection in the upper left corner by prying underneath using the plastic opening tool.

    • As you undo the snap connection, pull the rear facing camera off completely. It will slide out of its slot in the motherboard.

  12. Motorola Droid RAZR M Headphone Jack Replacement: 手順 12、 2の画像 1 Motorola Droid RAZR M Headphone Jack Replacement: 手順 12、 2の画像 2
    • Disconnect the snap connection in the upper right corner by prying underneath using the plastic opening tool.

  13. Motorola Droid RAZR M Headphone Jack Replacement: 手順 13、 3の画像 1 Motorola Droid RAZR M Headphone Jack Replacement: 手順 13、 3の画像 2 Motorola Droid RAZR M Headphone Jack Replacement: 手順 13、 3の画像 3
    • By inserting the plastic opening tool between the motherboard and rear casing, lift the bottom of the motherboard from the rear casing.

    • Use your fingers to gently pull the motherboard down and out of the rear casing.

  14. Motorola Droid RAZR M Headphone Jack Replacement, Headphone Jack: 手順 14、 2の画像 1 Motorola Droid RAZR M Headphone Jack Replacement, Headphone Jack: 手順 14、 2の画像 2
    • Wedge the plastic opening tool between the front-facing camera’s casing and the rear assembly. Pry until the camera snaps off.

  15. Motorola Droid RAZR M Headphone Jack Replacement: 手順 15、 1の画像 1
    • Wedge a small plastic opening tool between the top edge of the headphone jack and the rear assembly casing. There is adhesive securing the headphone jack so you may need to use a decent amount of force to pry away the headphone jack from its clear plastic casing.

終わりに

To reassemble your device, follow these instructions in reverse order.

ある他の人がこのガイドを完成しました。

作成者

2人の作成者と共同で作成されました。

Ethan Look

メンバー登録日: 04/21/15

498 ポイント

3のガイドは作成済み

チーム

Cal Poly, Team 15-1, Amido Spring 2015 Cal Poly, Team 15-1, Amido Spring 2015人のメンバー

CPSU-AMIDO-S15S15G1

4 メンバー

14のガイドは作成済み

0 件のコメント

コメントを追加

統計データ:

過去 24時間: 0

過去 7 日: 1

過去 30 日: 2

今までの合計 541