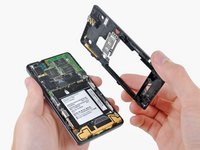
メインコンテンツにスキップ

Motorola Droid 2 Rear Case Replacement

必要な工具と部品

  1. Motorola Droid 2 Rear Case Replacement, Battery: 手順 1、 3の画像 1 Motorola Droid 2 Rear Case Replacement, Battery: 手順 1、 3の画像 2 Motorola Droid 2 Rear Case Replacement, Battery: 手順 1、 3の画像 3
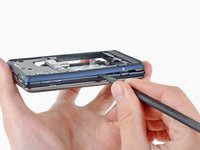
    • Slide the battery cover toward the bottom edge of the phone.

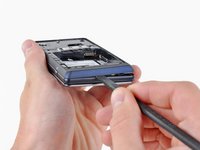
    • Remove the battery cover from the rear of the phone.

  2. Motorola Droid 2 Rear Case Replacement: 手順 2、 2の画像 1 Motorola Droid 2 Rear Case Replacement: 手順 2、 2の画像 2
    • Lift the battery out of the Droid 2 from the edge closest to the bottom of the phone.

    • Remove the battery from the Droid 2.

  3. Motorola Droid 2 Rear Case Replacement, Rear Case: 手順 3、 2の画像 1 Motorola Droid 2 Rear Case Replacement, Rear Case: 手順 3、 2の画像 2
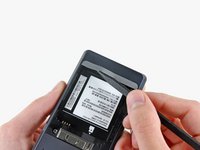
    • Using the tip of a spudger, peel up one corner of the silver ribbon below the battery compartment.

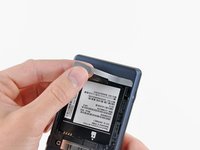
    • Peel the ribbon off the phone.

  4. Motorola Droid 2 Rear Case Replacement: 手順 4、 1の画像 1
    • Insert the flat end of a spudger and pry the plastic camera cover up off the phone.

    • The thin plastic cover is attached to the phone with an adhesive. Work slowly and carefully.

  5. Motorola Droid 2 Rear Case Replacement: 手順 5、 1の画像 1
    • Use the tip of a spudger to remove the camera bezel stuck to the rear case.

  6. Motorola Droid 2 Rear Case Replacement: 手順 6、 1の画像 1
    • Remove the seven 5.5 mm T5 Torx screws securing the rear case to the inner case.

  7. Motorola Droid 2 Rear Case Replacement: 手順 7、 1の画像 1
    • Insert the flat end of a spudger and pry downwards to release the plastic tab holding the rear case to the motherboard screw.

  8. Motorola Droid 2 Rear Case Replacement: 手順 8、 1の画像 1
    • Gently insert a spudger between the rear case and front case at the top of the phone, near the audio jack.

    • Carefully pry the top edge of the rear case up from the rest of the phone.

  9. Motorola Droid 2 Rear Case Replacement: 手順 9、 2の画像 1 Motorola Droid 2 Rear Case Replacement: 手順 9、 2の画像 2
    • With the spudger still inserted between the rear case and front case, slide the spudger along the right edge of the device, moving toward the bottom, prying as you go.

    • Continue prying along the bottom edge of the device from right to left, freeing it from the front panel.

  10. Motorola Droid 2 Rear Case Replacement: 手順 10、 2の画像 1 Motorola Droid 2 Rear Case Replacement: 手順 10、 2の画像 2
    • Continue prying the rear case from the front case along the left side, moving from bottom to top.

    • Lift the rear case up out of the phone.

    • At this point, the button covers on the side of the phone are free and may fall out if you tip the phone upside down.

終わりに

To reassemble your device, follow these instructions in reverse order.

3 の人々がこのガイドを完成させました。

作成者

3人の作成者と共同で作成されました。

Andrew Bookholt

586,139 ポイント

619のガイドは作成済み

0 件のコメント

コメントを追加

統計データ:

過去 24時間: 0

過去 7 日: 1

過去 30 日: 1

今までの合計 6,154