メインコンテンツにスキップ

Moto G4 Front-facing Camera Replacement

必要な工具と部品

  1. Moto G4 Front-facing Camera Replacement, Back Cover: 手順 1、 3の画像 1 Moto G4 Front-facing Camera Replacement, Back Cover: 手順 1、 3の画像 2 Moto G4 Front-facing Camera Replacement, Back Cover: 手順 1、 3の画像 3
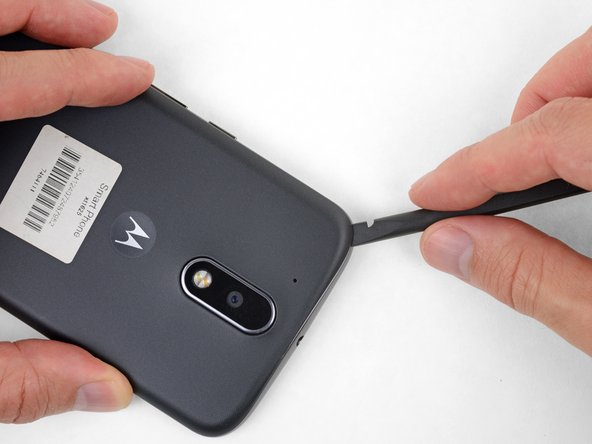
    • Insert a fingernail or a spudger into the notch on the bottom edge of the phone, near the charge port.

    • Gently twist or pry to open a small gap between the back cover and the body of the phone.

    • While keeping your tool (or fingernail) inserted into the gap between the back cover and the body of the phone, slide it around the corner to begin loosening the plastic clips holding the cover in place.

  2. Moto G4 Front-facing Camera Replacement: 手順 2、 2の画像 1 Moto G4 Front-facing Camera Replacement: 手順 2、 2の画像 2
    • Slide your tool all along the side of the phone to separate more of the clips securing the back cover.

  3. Moto G4 Front-facing Camera Replacement: 手順 3、 3の画像 1 Moto G4 Front-facing Camera Replacement: 手順 3、 3の画像 2 Moto G4 Front-facing Camera Replacement: 手順 3、 3の画像 3
    • Keep your tool inserted slightly under the back cover, and slide it around the top corner.

    • If necessary, continue prying around the remaining edges of the phone until the back cover comes free.

  4. Moto G4 Front-facing Camera Replacement: 手順 4、 2の画像 1 Moto G4 Front-facing Camera Replacement: 手順 4、 2の画像 2
    • Remove the back cover.

    • To install the back cover, carefully position it over the phone and then press gently all around the edges until you feel the clips snap into place.

  5. Moto G4 Front-facing Camera Replacement, Midframe: 手順 5、 3の画像 1 Moto G4 Front-facing Camera Replacement, Midframe: 手順 5、 3の画像 2 Moto G4 Front-facing Camera Replacement, Midframe: 手順 5、 3の画像 3
    • Push to eject and remove the MicroSD and SIM cards (if installed).

  6. Moto G4 Front-facing Camera Replacement: 手順 6、 2の画像 1 Moto G4 Front-facing Camera Replacement: 手順 6、 2の画像 2
    • Use a spudger to pry up the rubber cover for the camera flash connector.

  7. Moto G4 Front-facing Camera Replacement: 手順 7、 1の画像 1
    • Remove the rubber cover.

  8. Moto G4 Front-facing Camera Replacement: 手順 8、 2の画像 1 Moto G4 Front-facing Camera Replacement: 手順 8、 2の画像 2
    • Use a spudger to disconnect the camera flash connector by prying it straight up.

  9. Moto G4 Front-facing Camera Replacement: 手順 9、 1の画像 1
    • Use a T3 Torx driver to remove the nineteen identical 3.1 mm screws securing the midframe.

  10. Moto G4 Front-facing Camera Replacement: 手順 10、 1の画像 1
    • Insert a spudger under the midframe at the top left corner, and gently twist to separate it from the body of the phone.

  11. Moto G4 Front-facing Camera Replacement: 手順 11、 1の画像 1
    • Remove the midframe.

  12. Moto G4 Front-facing Camera Replacement, Battery Disconnection: 手順 12、 2の画像 1 Moto G4 Front-facing Camera Replacement, Battery Disconnection: 手順 12、 2の画像 2
    • Insert a thin tool (such as one of your tweezer tips) under the red and black battery wires, and slide it underneath the battery connector.

    • Gently pry straight up to disconnect the battery.

    • Pry only from the side where the wires attach to the connector—if you pry anywhere else, you may break the socket.

    • During reassembly, align the connector in its socket and then press straight down to reconnect it, wiggling slightly as you press to help it seat correctly.

  13. Moto G4 Front-facing Camera Replacement, Front-facing Camera: 手順 13、 3の画像 1 Moto G4 Front-facing Camera Replacement, Front-facing Camera: 手順 13、 3の画像 2 Moto G4 Front-facing Camera Replacement, Front-facing Camera: 手順 13、 3の画像 3
    • It's not necessary to remove the battery in order to replace the front-facing camera; you can safely ignore the fact that the battery is missing in these images.

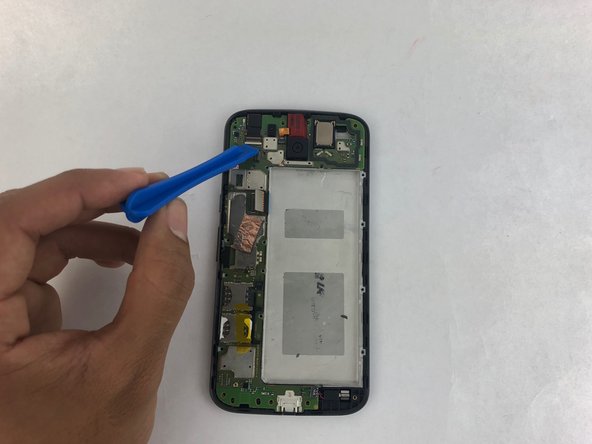
    • Use your spudger to pry up the front-facing camera and make sure it separates safely from the frame.

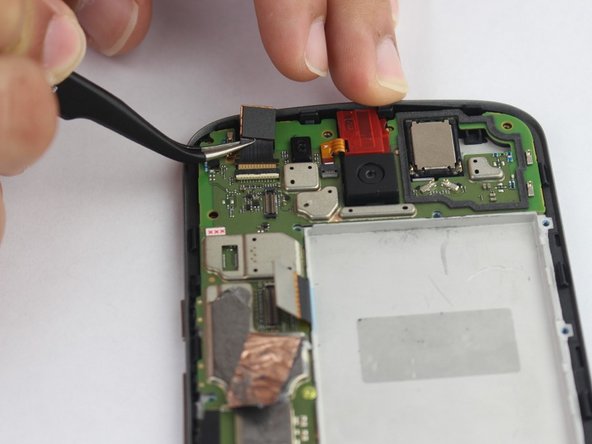
    • Peel back and remove any tape covering the front-facing camera's flex cable connector.

    • Pry up with your spudger or other ESD-safe tool to flip open the locking flap on the front-facing camera's ZIF connector.

    • Gently pull the camera's flex cable free from the ZIF socket.

  14. Moto G4 Front-facing Camera Replacement: 手順 14、 1の画像 1
    • Remove the front camera.

終わりに

To reassemble your device, follow these instructions in reverse order.

作成者

5人の作成者と共同で作成されました。

Kieran Basheer

メンバー登録日: 02/12/18

122 ポイント

1ガイドが承認済み

チーム

USF Tampa, Team S15-G3, Boczar Spring 2018 USF Tampa, Team S15-G3, Boczar Spring 2018人のメンバー

USFT-BOCZAR-S18S15G3

4 メンバー

12のガイドは作成済み

コメント 1 件

Merci pour ce tutoriel très simple qui m'a permis (à 76 ans) de facilement remplacer la camera avant qui ne fonctionnait plus suite à une chute.... Prix de la camera trouvée sur Ebay 6€

Jean-Charles

facebook - 返信

コメントを追加

統計データ:

過去 24時間: 1

過去 7 日: 1

過去 30 日: 3

今までの合計 768