はじめに
This guide will show you how to do a screen-only replacement on your Motorola E5 Plus or Supra. Buying a screen with attached frame is highly recommended.
Before you begin, download the Rescue and Smart Assistant app to backup your device and diagnose whether your problem is software or hardware related.
必要な工具と部品
-
-
Apply heat, then use a suction cup to lift the back enough to fit an opening pick underneath.
-
Proceed to separate the adhesive around the edges of the phone, reapplying heat as needed.
-
-
この手順で使用する道具:Halberd Spudger$2.99
-
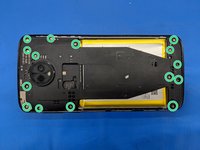
Gently pull the back of the phone towards the charging port to reveal the shielding plate.
-
Remove the screws and the metal plate.
-
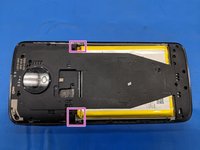
Disconnect the fingerprint sensor cable using a Halberd spudger or opening pick and remove the back of the phone.
-
-
-
-
Use an opening pick or spudger to disconnect the display ribbon cable.
-
Gently peel the display ribbon cable away from the phone frame as shown. It will remain attached to the display assembly.
-
-
-
Gently heat the top of the phone to soften the adhesive. Use a suction cup to lift the display and insert opening picks.
-
Starting from the top, separate the display from the frame.
-
There is a thin flexible plastic frame between the main phone frame and the glass. Check if the replacement part has this frame included.
-
For reassembly, B7000 adhesive is recommended over TESA adhesive tape due to the tight tolerances .
-


To reassemble your device, follow these instructions in reverse order. B7000 adhesive is highly recommended to attach the replacement screen to the frame.
16 の人々がこのガイドを完成させました。
