はじめに
When testing air-tight systems like vacuum lines on an vehicle, you need an air-tight pump. Not to mention, a leaking pump makes pumping automotive fluids much more difficult.
With time, the o-ring seals in your pump will flatten, stiffen, and lose their lubrication. This may cause them to leak allowing air back in to the pump.
The leaking vacuum can lead to confusion when trying to diagnose vacuum systems.
Learn to take apart your hand pump and replace the o-rings.
必要な工具と部品
-
-
Remove the silver cotter pin that holds the gauge to the body of the pump.
-
With the cotter pin removed, simply pull the gauge straight up and away from the body; it does NOT screw in but instead is a friction fit. The cotter pin is what prevents it from coming out. Be sure not to lose the small wave washer between the gauge and the body.
-
-
-
With the gauge removed from the body you can now carefully use a flat blade screw driver, or a small hook, to remove the black o-ring from the brass stem on the gauge.
-
Match the size of this o-ring with one from your kit. Likely, the new o-ring will have a slightly thicker "section" or thickness but should have the same inner diameter. In this application the best choice was a 2mm section, 4.4mm inner diamater o-ring.
-
Rub a small amount of synthetic, preferably silicone based grease on the o-ring.
-
Set aside the gauge until reassembly.
-
-
-
-
At this point, with the front cover removed, the final component is the rear portion of the pump. This contains the pump piston, which is round and visible on the opposite side of the handle.
-
Remove the two #0 screws holding the rear cover on over the back of the pump; it's between the rear of the pump and the handle.
-
Use your fore-finger to push in on the piston; the spring inside is fairly strong, get a helpful second set of hands if necessary.
-
The piston must be pushed far enough back to expose the shaft past the handle. Once the shaft is fully exposed, the retaining pin will slip out (not pictured). The pin goes in to the whole pictured.
-
With the shaft retaining pin removed, the piston will now push out of the rear body of the pump due to the spring tension.
-
-
-
Once the piston is protruding from the body, you are ready to replace this final o-ring. You can choose to leave the piston in the body, or remove it, the shaft, and the spring. The choice is yours.
-
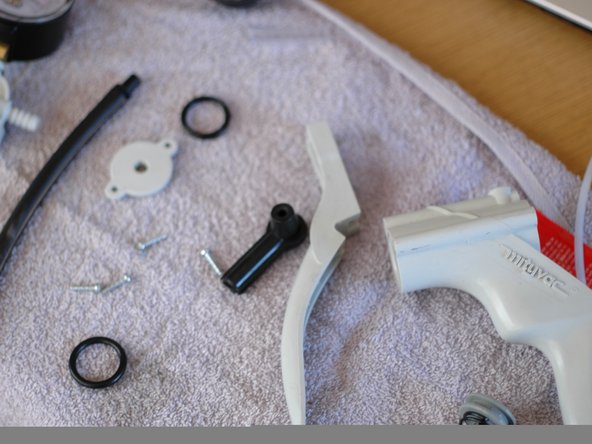
Pictured here is the pump completely disassembled, with the piston removed, for reference.
-
Remove the o-ring on the piston like you did the others. Find a suitable replacement.
-
Lubricate both the o-ring and the inside of the piston cylinder with a light coating of synthetic grease.
-


Reassembly of the device is the opposite of dis-assembly.
Reassembly of the device is the opposite of dis-assembly.
ある他の人がこのガイドを完成しました。

チーム

コメント 1 件
Great article. Here are some O Rings that I found I could use for this repair:
A.) The small one used at the base of the vacuum gauge: 3/16” x 5/16” x 1/16” (No.: #008)
B.) The O ring around the front cap: 3/4” x 1” x 1/8” ( No.: #210 )
C.) The O ring around the piston: Not able to find a replacement. Possibly a #211 or a #313 or 3x19 metric?