メインコンテンツにスキップ

Mitsubishi WD57734 Input/Output Board Replacement

必要な工具と部品

  1. Mitsubishi WD57734 Input/Output Board Replacement, Lamp: 手順 1、 1の画像 1
    • Before disassembling your television, be sure it is powered off and unplugged.

    • Remove the single 18 mm Phillips #1 screw on the lamp access panel.

  2. Mitsubishi WD57734 Input/Output Board Replacement: 手順 2、 1の画像 1
    • Pull the lamp access panel off of the back panel of the television by pulling straight back on the left side of the panel near the screw then pulling to the left.

  3. Mitsubishi WD57734 Input/Output Board Replacement: 手順 3、 1の画像 1
    • Loosen the two Phillips #2 screws securing the lamp housing to the television until the screws will swivel vertically.

    • These two screws are permanently attached to the lamp housing and cannot be removed completely.

  4. Mitsubishi WD57734 Input/Output Board Replacement: 手順 4、 1の画像 1
    • Using the handle, pull the lamp housing straight back out of the television.

    • Do not touch the glass of the lamp with your bare hands. The oil from your fingers can distort the TV image and lead to other issues.

  5. Mitsubishi WD57734 Input/Output Board Replacement, Back Panel: 手順 5、 2の画像 1 Mitsubishi WD57734 Input/Output Board Replacement, Back Panel: 手順 5、 2の画像 2
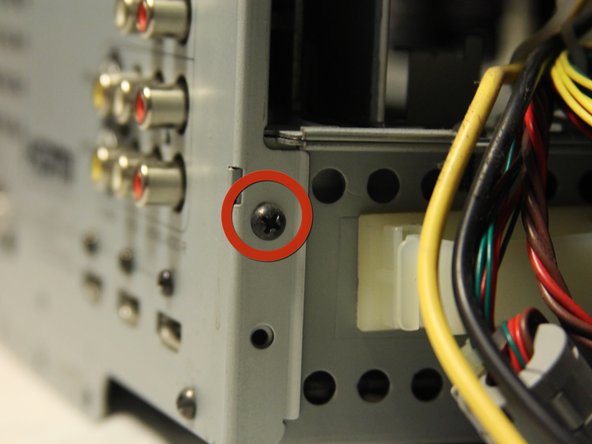
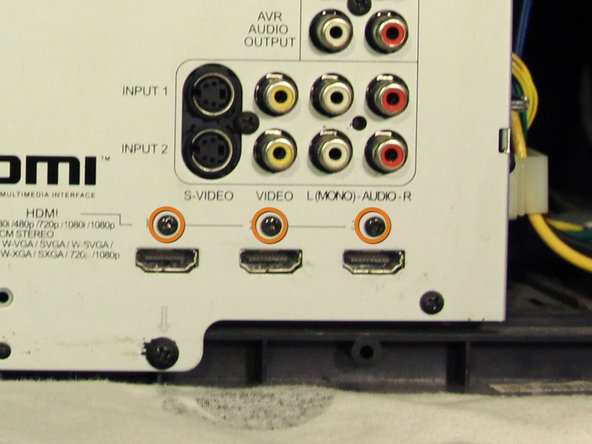
    • Remove the following 8 Phillips #1 screws:

    • One 22 mm Phillips #1 in the bottom right corner of the back panel.

    • One 18 mm Phillips #1 in the top middle of the back panel.

    • Six 18 mm Phillips #1 in the rest of the back panel.

  6. Mitsubishi WD57734 Input/Output Board Replacement: 手順 6、 1の画像 1
    • Pull the back panel off of the television by gripping the sides and rotating it down.

  7. Mitsubishi WD57734 Input/Output Board Replacement, Input/Output Board: 手順 7、 1の画像 1
    • Removing the back panel exposes the input/output board cover plate.

  8. Mitsubishi WD57734 Input/Output Board Replacement: 手順 8、 1の画像 1
    • Disconnect the back panel detection sensor by pressing down the white tab and pulling out the connection.

  9. Mitsubishi WD57734 Input/Output Board Replacement: 手順 9、 1の画像 1
    • Remove the four 10 mm black Phillips #1 screws with fine thread that attach the protective case to the TV.

  10. Mitsubishi WD57734 Input/Output Board Replacement: 手順 10、 1の画像 1
    • Undo the white cable clasp holding the wires together.

    • Remove the wires from the cable organizer by carefully twisting the white loops and removing the wires from the clasp.

  11. Mitsubishi WD57734 Input/Output Board Replacement: 手順 11、 3の画像 1 Mitsubishi WD57734 Input/Output Board Replacement: 手順 11、 3の画像 2 Mitsubishi WD57734 Input/Output Board Replacement: 手順 11、 3の画像 3
    • Remove the following 11 screws from input/output panel.

    • Eight 12 mm Phillips #1 (one screw on each side and six screws on the front panel).

    • Three 10 mm black, fine thread Phillips #0 screws above the HDMI ports.

  12. Mitsubishi WD57734 Input/Output Board Replacement: 手順 12、 1の画像 1
    • Use pliers to grasp the two washers around the coaxial inputs and rotate counterclockwise until they are removed.

    • The washers are the flat silver pieces that twist around the silver cylindrical elements (these are the coaxial inputs).

  13. Mitsubishi WD57734 Input/Output Board Replacement: 手順 13、 1の画像 1
    • Pull the front cover plate straight back off and move it out of the way, exposing the input/output/ board.

    • There are still connections on the input/output plate, so be careful.

  14. Mitsubishi WD57734 Input/Output Board Replacement: 手順 14、 1の画像 1
    • Remove three 10 mm silver, coarse thread Phillips #1 screws holding the input/output board to the case.

  15. Mitsubishi WD57734 Input/Output Board Replacement: 手順 15、 1の画像 1
    • Remove the connection to the front input/output wires by pressing down the white tab and gently pulling up.

  16. Mitsubishi WD57734 Input/Output Board Replacement: 手順 16、 1の画像 1
    • Disconnect the input/output board from the port in the main board by gently lifting upward and pull it out from the casing.

終わりに

To reassemble your device, follow these instructions in reverse order.

作成者

3人の作成者と共同で作成されました。

Kylin

メンバー登録日: 10/02/12

17 ポイント

1ガイドが承認済み

チーム

Cal Poly, Team 18-39, Regan Fall 2012 Cal Poly, Team 18-39, Regan Fall 2012人のメンバー

CPSU-REGAN-F12S18G39

4 メンバー

6のガイドは作成済み

0 件のコメント

コメントを追加

統計データ:

過去 24時間: 0

過去 7 日: 0

過去 30 日: 1

今までの合計 1,750