メインコンテンツにスキップ

Miroir M631 LED Mini Projector Disassembly

必要な工具と部品

  1. Miroir M631 LED Mini Projector Disassembly, Front and rear bezel removal: 手順 1、 2の画像 1 Miroir M631 LED Mini Projector Disassembly, Front and rear bezel removal: 手順 1、 2の画像 2
    • Ensure that the lens cover is fully closed.

    • Using the iFixit Jimmy (or similar tool), pry off the front bezel, starting at the opposite end to the lens.

    • Turn the projector over and remove the rear bezel in thesame way. (You can start at either end.)

  2. Miroir M631 LED Mini Projector Disassembly, Case retaining screws: 手順 2、 2の画像 1 Miroir M631 LED Mini Projector Disassembly, Case retaining screws: 手順 2、 2の画像 2
    • Remove 7 screws from the front.

    • Remove 5 screws from the back.

  3. Miroir M631 LED Mini Projector Disassembly, Opening the case: 手順 3、 2の画像 1 Miroir M631 LED Mini Projector Disassembly, Opening the case: 手順 3、 2の画像 2
    • Using the jimmy (or similar) release the clips retaining the top cover, starting at the front on the lens side (as shown).

    • Repeat on the other side, starting at the front or the back, whichever accepts the jimmy most easily.

    • Lift off the cover, gently releasing a remaining clip behind the buttons, if it's still engaged.

  4. Miroir M631 LED Mini Projector Disassembly, Disconnecting connectors - 1: 手順 4、 3の画像 1 Miroir M631 LED Mini Projector Disassembly, Disconnecting connectors - 1: 手順 4、 3の画像 2 Miroir M631 LED Mini Projector Disassembly, Disconnecting connectors - 1: 手順 4、 3の画像 3
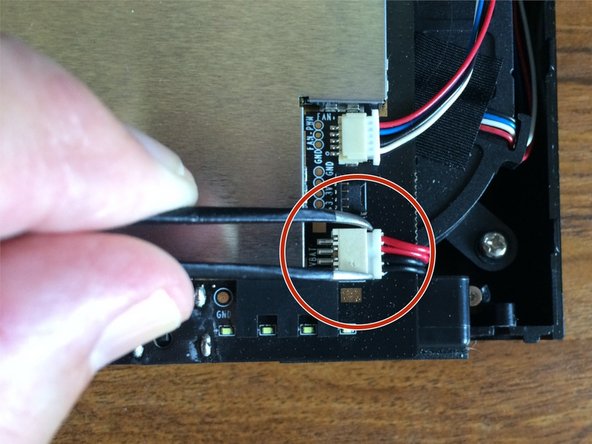
    • Before doing anything else, release the battery connector, easing it with a pair of tweezers so as not to strain the wires.

    • In the same way, release four connectors with red, green, blue and black wires

    • Similarly, release the fan connector, two connectors to the focus motor and an adjacent sensor board, and the two speaker connectors.

  5. Miroir M631 LED Mini Projector Disassembly, Disconnecting connectors - 2: 手順 5、 2の画像 1 Miroir M631 LED Mini Projector Disassembly, Disconnecting connectors - 2: 手順 5、 2の画像 2
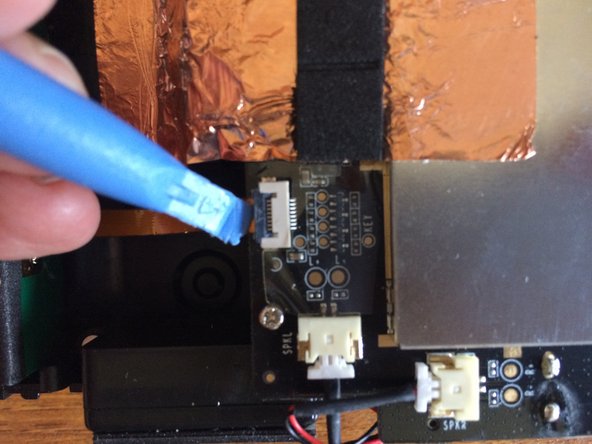
    • Very gently lift the locking tabs on three ribbon connectors. A plastic prying tool is good for this. Withdraw the ribbons.

    • On reconnecting the ribbons, make sure they are fully inserted into their connectors before gently pushing down the locking tabs. This can be a little fiddly.

  6. Miroir M631 LED Mini Projector Disassembly, Disconnecting the video ribbon: 手順 6、 2の画像 1 Miroir M631 LED Mini Projector Disassembly, Disconnecting the video ribbon: 手順 6、 2の画像 2
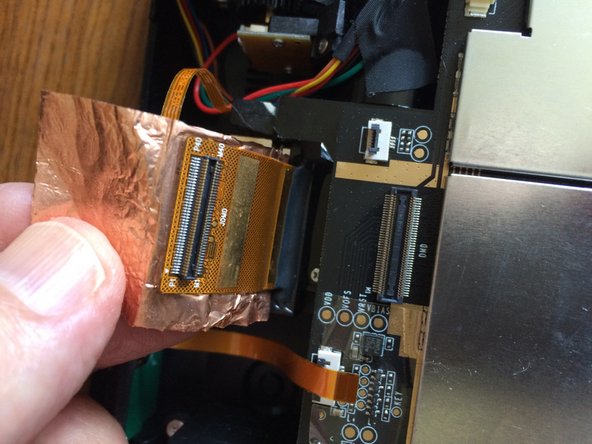
    • Carefully peel back the copper foil covering the video connector until you can unmate it. Try not to tear the foil.

    • On reassembly, make sure the video connector is properly mated before pressing down the copper foil. You should feel a definite click as it mates. Ensure that both ends are mated.

  7. Miroir M631 LED Mini Projector Disassembly, Motherboard removal: 手順 7、 2の画像 1 Miroir M631 LED Mini Projector Disassembly, Motherboard removal: 手順 7、 2の画像 2
    • Remove 4 screws securing the motherboard.

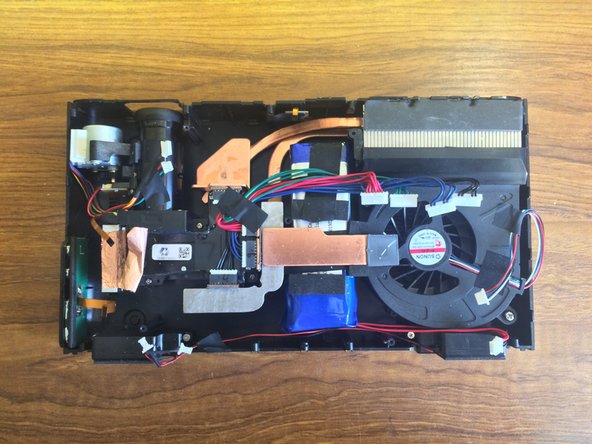
    • You should now be able to lift the motherboard clear, moving disconnected cables out of the way as you do so.

    • On reassembly, ensure that no cables or ribbons are trapped under the motherboard before replacing the 4 screws.

  8. Miroir M631 LED Mini Projector Disassembly, Ancilliary components: 手順 8、 1の画像 1
    • If required, you can now easily remove:

    • the buttons board

    • the speakers

    • or the lens cover sensor.

  9. Miroir M631 LED Mini Projector Disassembly, Removing the optical assembly - 1: 手順 9、 2の画像 1 Miroir M631 LED Mini Projector Disassembly, Removing the optical assembly - 1: 手順 9、 2の画像 2
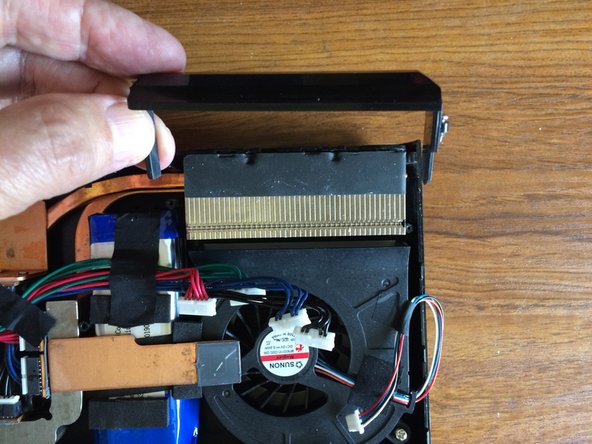
    • Remove a screw at the right hand end of the cover between the fan and the grill. (The screw at the other end was removed in removing the motherboard.)

    • Lift off this cover. Note that it's a snug fit. On refitting, ensure that the screw holes are correctly aligned with the pillars the screws scew into.

    • On reassembly, if you have removed the optical assembly and/or the fan, don't finally tighten the screws on these until you've refitted the fan/grill cover.

  10. Miroir M631 LED Mini Projector Disassembly, Removing the optical assembly - 2: 手順 10、 3の画像 1 Miroir M631 LED Mini Projector Disassembly, Removing the optical assembly - 2: 手順 10、 3の画像 2 Miroir M631 LED Mini Projector Disassembly, Removing the optical assembly - 2: 手順 10、 3の画像 3
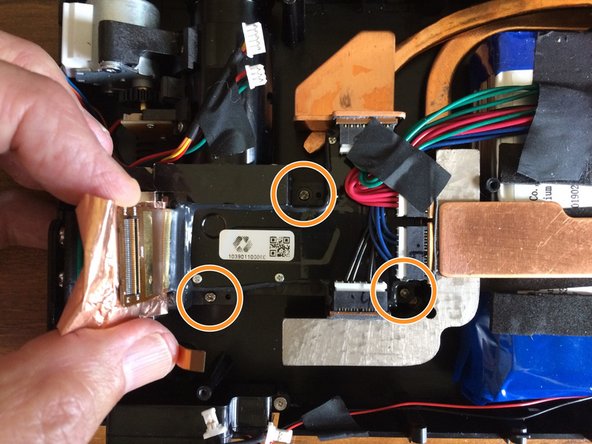
    • Lift the tape securing the red, green, blue and black wires to the battery so as to free those wires.

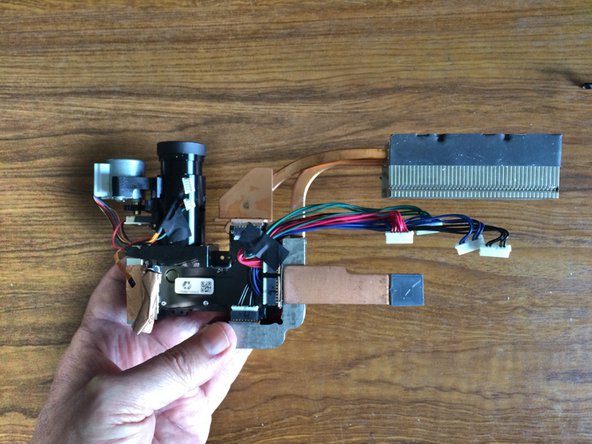
    • Remove 3 screws retaining the optical assembly. The entire assembly can now be lifted out.

  11. Miroir M631 LED Mini Projector Disassembly, Removing the fan: 手順 11、 1の画像 1
    • Remove 2 screws securing the fan. This can now be lifted out allowing any dust build-up on th grill to be cleaned out.

  12. Miroir M631 LED Mini Projector Disassembly, Battery removal: 手順 12、 1の画像 1
    • The battery is securely glued to the base of the projector. If you need to remove it, take great care not to damage it as you do so.

    • As you apply a continual upwards force the adhesice should very slowly give. Gentle warmth should aid the process but on no account rush it. Insert packing underneed as it lifts to prevent the adhesive taking hold again.

終わりに

To reassemble your device, follow these instructions in reverse order.

ある他の人がこのガイドを完成しました。

作成者

2人の作成者と共同で作成されました。

Philip Le Riche

メンバー登録日: 02/18/14

30,083 ポイント

47のガイドは作成済み

チーム

Restart Project Restart Project人のメンバー

Community

18 メンバー

498のガイドは作成済み

0 件のコメント

コメントを追加

統計データ:

過去 24時間: 0

過去 7 日: 6

過去 30 日: 22

今までの合計 1,461