メインコンテンツにスキップ

Microsoft Zune HD Battery & Logic Board Replacement

必要な工具と部品

  1. Microsoft Zune HD Battery & Logic Board Replacement, Upper Rear Panel: 手順 1、 1の画像 1
    • Remove the four Tri-Wing screws securing the upper rear panel to the inner chassis.

  2. Microsoft Zune HD Battery & Logic Board Replacement: 手順 2、 2の画像 1 Microsoft Zune HD Battery & Logic Board Replacement: 手順 2、 2の画像 2
    • Slightly rotate the top edge of the upper rear panel away from the Zune.

    • Lift the upper rear panel straight up off the black plastic lower rear panel.

  3. Microsoft Zune HD Battery & Logic Board Replacement, Lower Rear Panel: 手順 3、 2の画像 1 Microsoft Zune HD Battery & Logic Board Replacement, Lower Rear Panel: 手順 3、 2の画像 2
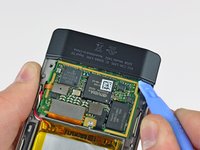
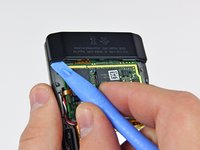
    • Insert a small Zune opening tool into the gap between the logic board and one side of the black plastic lower rear panel.

    • Carefully twist the Zune opening tool to pop the lower rear panel off the clips attaching it to the Zune.

    • Repeat this process for the other side of the lower rear panel.

  4. Microsoft Zune HD Battery & Logic Board Replacement: 手順 4、 1の画像 1
    • Carefully slide the lower rear panel away from the Zune.

  5. Microsoft Zune HD Battery & Logic Board Replacement, Battery & Logic Board: 手順 5、 1の画像 1
    • Use a Zune opening tool to pry the digitizer ribbon cable connector up off the logic board.

  6. Microsoft Zune HD Battery & Logic Board Replacement: 手順 6、 1の画像 1
    • Use a Zune opening tool to pry the OLED display ribbon cable connector up off the logic board.

  7. Microsoft Zune HD Battery & Logic Board Replacement: 手順 7、 1の画像 1
    • Use a Zune opening tool to pry the control ribbon cable up off the logic board.

  8. Microsoft Zune HD Battery & Logic Board Replacement: 手順 8、 1の画像 1
    • Remove the following Torx screws securing the logic board assembly to the inner chassis:

    • Three T5 Torx screws.

    • One T6 Torx screw.

  9. Microsoft Zune HD Battery & Logic Board Replacement: 手順 9、 1の画像 1
    • Use a Zune opening tool to carefully pry the battery off the adhesive securing it to the inner chassis.

    • Do not attempt to completely remove the battery from the inner chassis as it is still attached to the the logic board.

  10. Microsoft Zune HD Battery & Logic Board Replacement: 手順 10、 2の画像 1 Microsoft Zune HD Battery & Logic Board Replacement: 手順 10、 2の画像 2
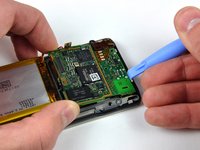
    • Use a Zune opening tool to push the small plastic clip securing the logic board near its lower left edge toward the headphone jack while gently lifting the upper edge of the logic board.

    • Use a Zune opening tool to pull the plastic clip away from the logic board while gently pulling the board away from the bottom edge of the Zune.

  11. Microsoft Zune HD Battery & Logic Board Replacement: 手順 11、 1の画像 1
    • For this step, it is recommended to cautiously hold the battery and logic board assembly with one hand while holding the inner chassis with the other.

    • Pull the logic board away from the lower bezel and remove it from the inner chassis, minding any cables that may get caught.

終わりに

To reassemble your device, follow these instructions in reverse order.

9 の人々がこのガイドを完成させました。

作成者

8人の作成者と共同で作成されました。

Walter Galan

693,685 ポイント

1,203のガイドは作成済み

2 件のコメント

thanks, dude, that was really helpful

Mebradhen mere - 返信

Last step is missing to show how to disconnect the battery from the board.. is it soldered ?

Beat Bucher - 返信

コメントを追加

統計データ:

過去 24時間: 3

過去 7 日: 26

過去 30 日: 65

今までの合計 17,601