はじめに
この修理ガイドを参照して、Microsoft Surface Pro7のスクリーンを交換します。
補強されていないデリケートなディスプレイパネルを壊してしまう可能性が大きいので、ご注意ください。充分な熱を加え、細心の注意を払って接着剤を切開してください。またガラスが飛散した場合に備えて、保護メガネを着用してください。
必要な工具と部品
-
-
ディスプレイのガラスが破損している場合は、状態を悪化させて、作業中怪我をしないように、ガラス表面上にテープを貼ります。
-
透明の梱包テープをSurfaceのディスプレイ上に貼ります。全体をテープでカバーしてください。
-
できる限り、このガイドに従って作業を行なってください。 しかし、一度割れたガラスは、作業している間にも割れ続ける可能性が高く、メタル製のこじ開けツールでガラスをすくい取る必要があるかもしれません。
-
-
-
続行する前に、スクリーンの接着剤のレイアウトに注意してください。
-
これらの領域には接着剤のみが含まれており、安全に切断できます。
-
ディスプレイボードとフレックスケーブルは、ここの端の近くにあります。慎重に接着剤をカットし、ピックを3mm以上挿入しないでください。
-
壊れやすいアンテナケーブルは、スクリーンのこの部分の下にあります。それらを損傷しないように注意深く手順13に従ってください。接着剤もこの部分が一番厚いです。
Be prepared; the bluetooth/wifi antennas are adhered to the glass with this very strong tape. You WILL 98% of the time damage them; have another module available that includes the antennas before you attempt this repair as you will damage them if you've never done this repair before. Ive done dozens of these and damage most of them.
For tablets without swollen batteries you can use one of these: https://www.amazon.com/gp/product/B019PX...
For tablets with swollen batteries, you can use one of these: https://www.amazon.com/220V-300W-Tool-Bl...
Just be careful that you don't damage the touchscreen by heating one spot too much. Also, the trick is to get the pick against the back of the display above the adhesive.
David S. -
I managed to remove the screen successfully without breaking the glass, but I found out I completely sliced through cables underneath the lower portion of the display as I used a razor blade, so be careful!
Muhammad, if you are still looking at this, what do the antennas connect to> I can't find the antennas on my glass, nor where they would connect to the frame?
-
-
-
スクリーン上のスピーカー開口部にオープニングピックを挿入し、ガラスとスピーカーグリルの間をスライドします。
Note carefully where they start. It is the only place with any sort of access. Razor blade is best. Use picks to hold the top open. Do NOT insert more than a quarter inch ever.
-
-
-
ピックをSurface右端にスライドさせて、スクリーン下の接着剤をスライスします。
-
接着剤が再装着するのを防ぐために、この開口部ピックを右端に残します。
-
-
-
-
カット作業を止めたディスプレイの下にピックの先端を挿入します。ベゼルの端以上に深くピックを挿入しないでください。
-
ピックを慎重に右に回転させ、ピックの長辺をベゼルの下のスクリーン接着剤に押し込み、接着剤を切断します。ピックをサーフェスの端に沿ってスライドさせないでください。
-
ピックがSurface右端から64 mmになるまで、ピックの先端を先ほどカットした場所に挿入し、Surface上端に沿って右側を回転する動作を繰り返します。
-
-
-
スクリーンアセンブリをSurfaceケースからゆっくりと持ち上げます。抵抗が発生した場合は、停止してすべての接着剤が分離していることを確認してください。
-
オープニングピックを使用して、残っている接着剤を切り取ります。
-
-
-
スパッジャーの先端を使って、バッテリーコネクタの両側をゆっくりと押し出します。
-
片側から反対側に向けてゆっくり、スパッジャーを左右に歩かせるようにして、ソケットからコネクタを外します。
-
-
-
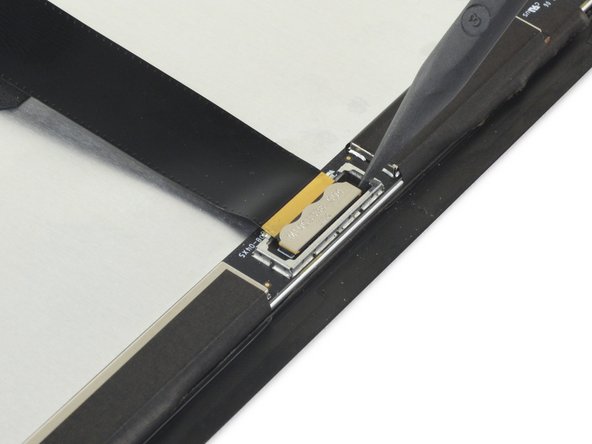
ピンセットを使って、左側ディスプレイケーブルコネクタを覆っているシルバーのテープを剥がします。
-
スパッジャーの平面側先端をテープの下に差し込み、マザーボードからコネクタをこじ開けて、接続を外します。
I found that the replacement screen cable does not run the same way as the previous screen and it actually doubles over. Is there a reason for this? Can I get a cable that matches the new screen anywhere?
Greg Child - 返信
-
-
-
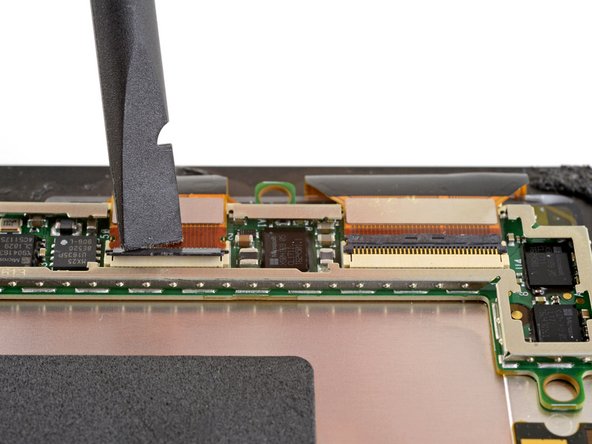
ディスプレイボードを外します。
Que tipo de adesivo se recomienda? Se necesita que conduzca la electricidad?
-
-
-
スクリーンのみが残ります。
Hallo das Display auf der Rückseite hat ca. 4 kreisförmige schwarze runde matten/gumipolster und vier große.
rund herum ist auf der kanne ebenfalls ein Klebestreifen angebracht. wo bekomme ich diese teile oder Klebestreifen?
Welche auswirkungen kann es haben wenn das Display hinten dies nicht aufweist?
Ein Link wäre sehr hilfreich.
Danke
Panagiotis - 返信
-


デバイスを再組み立てする際は、これらの手順を逆の順番に従って作業を進めてください。
e-wasteを処理する場合は、認可済みリサイクルセンターR2を通じて廃棄してください。
修理がうまく進みませんか?ベーシックな トラブルシューティングを試して見るか、このモデルのアンサーコミュニティに尋ねてみましょう
デバイスを再組み立てする際は、これらの手順を逆の順番に従って作業を進めてください。
e-wasteを処理する場合は、認可済みリサイクルセンターR2を通じて廃棄してください。
修理がうまく進みませんか?ベーシックな トラブルシューティングを試して見るか、このモデルのアンサーコミュニティに尋ねてみましょう
30 の人々がこのガイドを完成させました。
以下の翻訳者の皆さんにお礼を申し上げます:
100%

Midori Doiさんは世界中で修理する私たちを助けてくれています! あなたも貢献してみませんか?
翻訳を始める ›

24 件のコメント
Thank you very much!
What type of glue for reassembly? What temperature of heat setting do you recommend?
I managed to remove the old screen, clean off the old adhesive, apply new adhesive but not remove the backing yet. I connected the new screen and cables back the original way. I then uninstalled the touch drivers and restarted the surface. The touch function on the screen is still not working, any furthur suggestions?
Probably you have issues with board.
Matjaž -
@bryce Stevenson tries connections also the ribbon cable connecting digitizer and LCD. I would assume the screen is faulty defective if that doesn’t work!
Note that pictures here do not include a portion of the "Antenna Wireless WiFi Cover Trim Flex Cable" at the top on either side of the Surface's cameras underneath the screen. There are two thin soft layers that can be pulled away from that assembly during screen removal.
There are warnings about this, but it is difficult to do well. Especially without good reference photos to know what to expect.
Also, the iOpener method doesn't personally seem feasible having attempted it. Would suggest heating pad. (Or heat gun as recommended, but beware as edges of case are easily tarnished by prolonged or high heat.)
Just a heads up, this is so much more difficult when the entire screen is cracked. Instead of being able to just separate the screen by sliding the opening pick, you will have to scrape off each small piece of glass from the adhesive along the edge. The one section of my screen that wasn't cracked was super easy to separate from the adhesive with a heat gun. That being said, I have installed the new screen, and everything does seem to be in good working order.
One more tip, if you broke your screen with a drop, inspect the frame and make sure it isn't bent in and would otherwise not allow the new screen to sit inside flush. My top right corner that had damage from impact has the frame bent in so that the screen corner sits on top of the frame instead of within it. No good way to bend the metal out with the screen stuck to the new adhesive. Just double check and fix it before installing the new screen!
successfully remove and implemented another screen
I removed the old screen and cleaned off the adhesive. Plugged in the new screen's ribbon cables and attempted to power it back on. I get the Windows logo to appear and it quickly returns to black screen. However the system continues to boot and I am even able to log in when I plug it into an external monitor. Do you have any suggestions for how to troubleshoot it further?
I had to re-seat the ZIF connectors (step 26) 3 times before it worked
Ben -
What device is used for this tutorial?
I ask because of a couple of factors;
1) the screen in the tutorial has a silver block to the left (looking at back of LCD) of the LCD ribbon connector; however the original LCD for the Surface Pro 7 (and the photos of the replacement you sell) does not have that.
-- This causes the LCD flex cable to be too short to replace the screen--
Looking at the tutorial it appeared that I had the correct replacement screen, but in fact, I did not. not your fault, but it does make it difficult to rely on your guide to be accurate if it is not of the actual device you say it is for.
I did a lot of digging into this; it appears Microsoft made two versions of their LCD (LP123WQ1 & LP123WQ2) the one in this Guide is version 1 (Q1 of the two options) but Version 2 uses a smaller Cable and has the connector farther to the left than Version 1
Just saying to let people know that you need to be aware of this going into it; unfortunately, there is no way to know which version you have unless you open it up and remove the old one before you order the new one.
I bought wrong model of display too (LP123WQ2 from iFixit)
But after that I ordered cable for this display (LCD Flex Cable for Microsoft Surface Pro 7 1866 ) - and could attach display.
So, not it works good!
Bonjour, j'ai fait le changement de l'écran mais je n'ai pas gardé l'adhésif comme indiqué (je n'ai pas bien lu). Savez-vous ou je peux me procurer un adhésif similaire?
Avec mes meilleures salutations.
Hello, I changed the screen but I didn't keep the adhesive as indicated (I didn't read it correctly). Do you know where I can get a similar adhesive?
With my best regards.
https://www.ebay.co.uk/itm/115477361245?...
cheapest i could find
Ben -
ive replaced surace pro 7 screens in the past using i fix it procedures. im in the process of fixing another screen and was browsing screens and found screens that stated "no frame". ive never seen the term beforeand wanted clarification. is the frame the metal board that supports the lcd/digitizer?
Hi! The version for sale on iFixit (https://www.ifixit.com/products/surface-...) is not specified.
There are two versions of this screen. Version 1 and Version 2. They are incompatible based on their connectors. Completely indistinguishable from the outside (because Microsoft has to make it even harder to repair it by making sure you can't order the screen before disassembly). Physically the connector is the same, but it is in a different place, so the screen will not align properly if you get the wrong version replacement.
What version is it for sale on the iFixit page?
Comments did not load when I originally made this comment, but was answered by Thomas Niegisch and Виктор Ганелес above; iFixit sells the V2 of the screen only, so if you need V1 you should find somewhere else to purchase.