メインコンテンツにスキップ

Microsoft Surface Pro 5 Heat Sink Replacement

必要な工具と部品

  1. Microsoft Surface Pro 5 Heat Sink Replacement, Disconnect the display board: 手順 1、 3の画像 1 Microsoft Surface Pro 5 Heat Sink Replacement, Disconnect the display board: 手順 1、 3の画像 2 Microsoft Surface Pro 5 Heat Sink Replacement, Disconnect the display board: 手順 1、 3の画像 3
    • Use a spudger to flip up the small locking flaps on the display cable ZIF connectors.

  2. Microsoft Surface Pro 5 Heat Sink Replacement: 手順 2、 3の画像 1 Microsoft Surface Pro 5 Heat Sink Replacement: 手順 2、 3の画像 2 Microsoft Surface Pro 5 Heat Sink Replacement: 手順 2、 3の画像 3
    • Use tweezers to slide the display cables straight out of their sockets on the display board.

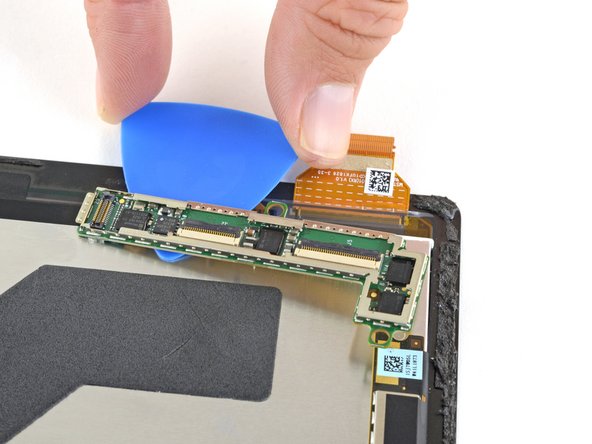
  3. Microsoft Surface Pro 5 Heat Sink Replacement, Remove the display board: 手順 3、 3の画像 1 Microsoft Surface Pro 5 Heat Sink Replacement, Remove the display board: 手順 3、 3の画像 2 Microsoft Surface Pro 5 Heat Sink Replacement, Remove the display board: 手順 3、 3の画像 3
    • Slide an opening pick under the display board to separate the adhesive holding it onto the back of the screen.

  4. Microsoft Surface Pro 5 Heat Sink Replacement: 手順 4、 1の画像 1
    この手順で使用する道具:
    Tesa 61395 Tape
    $5.99
    購入する
    • Remove the display board.

    • During reassembly, use a strong double-sided tape or a precut adhesive card to secure the display board. Clean off the old adhesive before applying new adhesive.

    • To ensure correct positioning, plug in both display connectors before adhering the board to the display.

  5. Microsoft Surface Pro 5 Heat Sink Replacement: 手順 5、 1の画像 1
    • Only the screen remains.

  6. Microsoft Surface Pro 5 Heat Sink Replacement, Heat Sink: 手順 6、 1の画像 1
    • Pry off the protective metal shield covering the main processor using either the nylon spudger or the plastic opening tool.

  7. Microsoft Surface Pro 5 Heat Sink Replacement: 手順 7、 1の画像 1
    • Remove the four silver Torx T5 x 3mm screws holding the heat sink onto the main processor.

  8. Microsoft Surface Pro 5 Heat Sink Replacement: 手順 8、 2の画像 1 Microsoft Surface Pro 5 Heat Sink Replacement: 手順 8、 2の画像 2
    • Remove the remaining five black Torx T4 x 3mm screws holding down the heat sink assembly.

  9. Microsoft Surface Pro 5 Heat Sink Replacement: 手順 9、 1の画像 1
    • Remove the heat sink from the device by grabbing one of the copper bars with your fingers and lifting straight up.

    • Avoid touching the thermal paste that is on the back of the heat sink and on the front of the CPU. If you get thermal paste on your hands, wash it off with mild soap and water.

終わりに

To reassemble your device, follow these instructions in reverse order.

2 の人々がこのガイドを完成させました。

作成者

6人の作成者と共同で作成されました。

Paul Manzer

メンバー登録日: 10/02/17

746 ポイント

4のガイドは作成済み

チーム

Cal Poly, Team S15-G3, Livingston Fall 2017 Cal Poly, Team S15-G3, Livingston Fall 2017人のメンバー

CPSU-LIVINGSTON-F17S15G3

3 メンバー

17のガイドは作成済み

0 件のコメント

コメントを追加

統計データ:

過去 24時間: 0

過去 7 日: 8

過去 30 日: 59

今までの合計 3,357