メインコンテンツにスキップ

Microsoft Surface 3 Display Replacement

必要な工具と部品

  1. Microsoft Surface 3 Display Replacement, Casing: 手順 1、 2の画像 1 Microsoft Surface 3 Display Replacement, Casing: 手順 1、 2の画像 2
    • Warm up an iOpener following the instructions found in the iOpener guide.

    • Place the warm iOpener on top of the edges of the screen. This heat will weaken the strength of the adhesive between the display and body.

  2. Microsoft Surface 3 Display Replacement: 手順 2、 2の画像 1 Microsoft Surface 3 Display Replacement: 手順 2、 2の画像 2
    • Use iFixit opening picks to wedge under the edge of the screen at the speaker port.

    • This may take significant force. A fingernail might work better for the initial lift

    • If you push straight down near the edge you will go through the speaker mesh and possibly end up damaging your speaker; try to push the pick in at a shallow angle.

  3. Microsoft Surface 3 Display Replacement: 手順 3、 2の画像 1 Microsoft Surface 3 Display Replacement: 手順 3、 2の画像 2
    • Carefully try to work your way around the device using the picks, reapplications of the heated iOpener, and luck.

    • If you break the glass on one side you might want to try again starting from the other side so that you have a clean, unbroken, edge on that side.

    • While the glass on this display is not particularly sharp when broken, it is still broken glass and you should be careful with it.

  4. Microsoft Surface 3 Display Replacement: 手順 4、 1の画像 1
    • Flip the display over so that parts underneath it are easily accessible.

    • Do not pull out the display as it is still attached to the motherboard.

    • If you are replacing the display, or want it out of the way, continue with the display replacement guide steps.

  5. Microsoft Surface 3 Display Replacement, Display: 手順 5、 3の画像 1 Microsoft Surface 3 Display Replacement, Display: 手順 5、 3の画像 2 Microsoft Surface 3 Display Replacement, Display: 手順 5、 3の画像 3
    • The RF shield that you are about to remove will be damaged in the process. you may be able to bend it back into shape once you remove it.

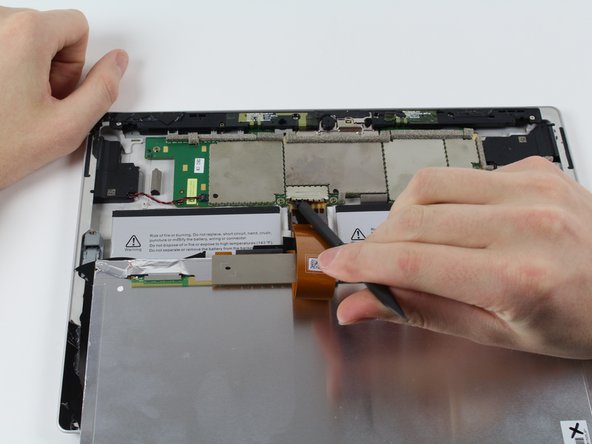
    • Locate the point where the display is still attached to the motherboard.

    • Use a flat spudger to pry off the RF shielding/bracket retainer.

    • Use a thin guitar pick to release the snap pin from the display to the motherboard.

    • The little black piece (the latch for the ZIF connector) that you have just flipped up is no longer held in place by anything due to Microsoft trying to make the device slimmer. It will fall out and be lost for all eternity unless you carefully keep track of it.

終わりに

To reassemble your device, follow these instructions in reverse order.

35 の人々がこのガイドを完成させました。

作成者

4人の作成者と共同で作成されました。

Harold Hall

メンバー登録日: 10/08/15

1,320 ポイント

3のガイドは作成済み

チーム

Cal Poly, Team 5-12, Maness Fall 2015 Cal Poly, Team 5-12, Maness Fall 2015人のメンバー

CPSU-MANESS-F15S5G12

4 メンバー

18のガイドは作成済み

15 件のコメント

Where can you get replacement screens from?

Gareth - 返信

They sell them on this website

Saul Rocha -

is the adhesive that is needed available on this site?

Jaime Grismer - 返信

What would happen if that little RF shielding part was not reinstalled?

meric robb - 返信

The RF shield both helps prevent the closely packed together components from interfering with each other and also holds in the ZIF connector latch (the little black piece that I warn you not to lose) for the display cable. The results could vary between screen flickering with inconsistent touchscreen performance and the display cable possibly coming lose inside the device and needing to open it up and reattach it. I didn't find it too difficult to bend the RF shield back on, but you may have a harder or easier time.

Harold Hall -

コメントを追加

統計データ:

過去 24時間: 4

過去 7 日: 46

過去 30 日: 192

今までの合計 59,457