メインコンテンツにスキップ

Merch Source Projector Entertainment II Motherboard

必要な工具と部品

  1. Merch Source Projector Entertainment II Motherboard, Outer Casing: 手順 1、 2の画像 1 Merch Source Projector Entertainment II Motherboard, Outer Casing: 手順 1、 2の画像 2
    • Flip the projector onto its back and unscrew the nine 15mm screws using the Phillips #0 screw driver.

  2. Merch Source Projector Entertainment II Motherboard: 手順 2、 1の画像 1
    • Flip the projector right side up and unscrew the two 12mm screws on the light bulb panel located at the rear of the projector with a Phillips #0 screw head.

    • The bottom right panel screw does not come completely out the panel door.

  3. Merch Source Projector Entertainment II Motherboard: 手順 3、 2の画像 1 Merch Source Projector Entertainment II Motherboard: 手順 3、 2の画像 2
    • Using your hands, gently pry the top and bottom of the projector casing apart.

  4. Merch Source Projector Entertainment II Motherboard, Motherboard: 手順 4、 2の画像 1 Merch Source Projector Entertainment II Motherboard, Motherboard: 手順 4、 2の画像 2
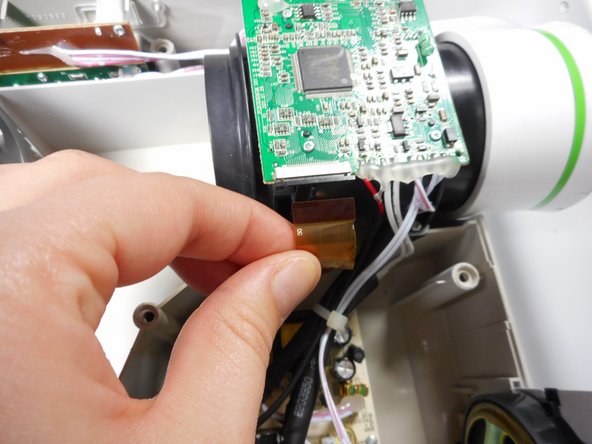
    • Use the plastic opening tool to gently disengage the ribbon cable from its back housing.

    • Once the ribbon cable is disengaged gently pull the cable off the motherboard.

    • Once the housing is disengaged, the ribbon cable should slide out easy. Do not pull too hard on the ribbon cable as it is very fragile.

  5. Merch Source Projector Entertainment II Motherboard: 手順 5、 2の画像 1 Merch Source Projector Entertainment II Motherboard: 手順 5、 2の画像 2
    • Unscrew the three 6 mm screws from the motherboard with the Phillips #0 screwdriver.

    • Be sure not to damage any of the wires atached to the motherboard.

  6. Merch Source Projector Entertainment II Motherboard: 手順 6、 2の画像 1 Merch Source Projector Entertainment II Motherboard: 手順 6、 2の画像 2
    • Solder off all of the connections on the motherboard with a soldering iron.

    • Once connections are soldered off, the motherboard should be detached and ready for replacement.

    • Need some help? Follow this guide to learn soldering basics.

    • While soldering the metal connections can get very hot. Never touch the iron with your hand. also make sure that the projector is fully turned off and not plugged in.

    • If there is hot glue on top on the connection with the motherboard, you will need to peel it off using your fingers.

終わりに

To reassemble your device, follow these instructions in reverse order.

作成者

5人の作成者と共同で作成されました。

Michael Tan

メンバー登録日: 01/08/15

587 ポイント

3のガイドは作成済み

チーム

Cal Poly, Team 30-3, Green Spring 2015 Cal Poly, Team 30-3, Green Spring 2015人のメンバー

CPSU-GREEN-S15S30G3

4 メンバー

10のガイドは作成済み

3 件のコメント

Was wondering if you could help me identify a microchip on the board by the speaker?

Brad Langland - 返信

Where can I get parts for the projector? I think my board is cooked.

Delgtm - 返信

mine acts like it does not recognize the rca cords. help

Kamela Mitchell - 返信

コメントを追加

統計データ:

過去 24時間: 0

過去 7 日: 0

過去 30 日: 1

今までの合計 1,811