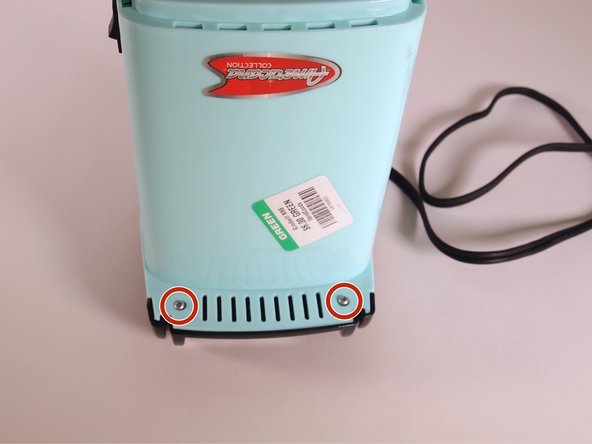
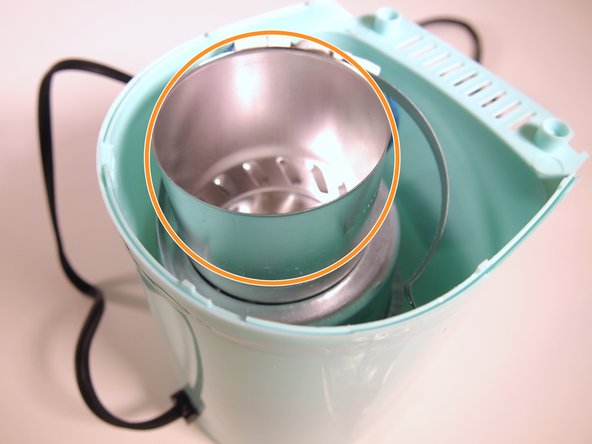
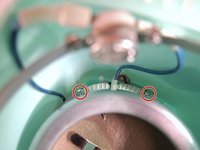
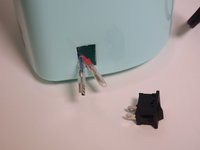
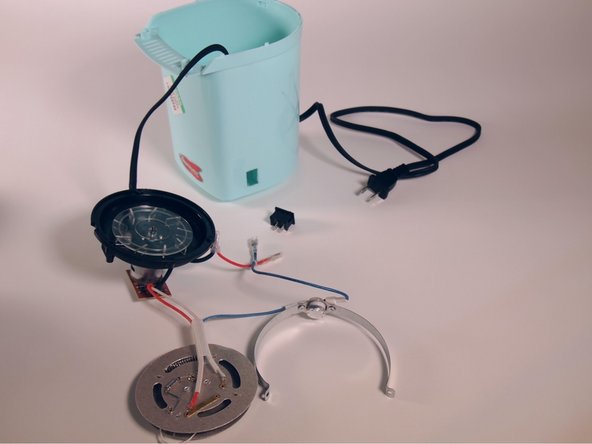
メインコンテンツにスキップ

Maxi-Matic Intertek Popcorn Maker Replacement Disassembly Guide

必要な工具と部品

  1. Maxi-Matic Intertek Popcorn Maker Replacement Disassembly Guide, Popcorn Maker: 手順 1、 1の画像 1
    • How This Device is Supposed to Work

    • Once the device is plugged in, there is a small switch on the side that will make it turn on. While on, the device will get hot, popping the popcorn kernels inside. When the kernels are done popping, the user must turn off the device using the switch.

  2. Maxi-Matic Intertek Popcorn Maker Replacement Disassembly Guide: 手順 2、 1の画像 1
    • Turn the air popper upside down.

    • There are two different kinds of screws, so you will need different screw drivers.

    • Remove the screw above the label with a #2x4" screwdriver.

    • This screw is about 11 mm long.

  3. Maxi-Matic Intertek Popcorn Maker Replacement Disassembly Guide: 手順 3、 1の画像 1
    • Remove the screw under the label with the Y1 screwdriver head from the iFixit ProTechToolkit.

    • This screw is about 11 mm long.

  4. Maxi-Matic Intertek Popcorn Maker Replacement Disassembly Guide: 手順 4、 3の画像 1 Maxi-Matic Intertek Popcorn Maker Replacement Disassembly Guide: 手順 4、 3の画像 2 Maxi-Matic Intertek Popcorn Maker Replacement Disassembly Guide: 手順 4、 3の画像 3
    • Turn the air popper back over (right side up). Remove the plastic protection piece from the top of the air popper.

    • There are two screws on the front connecting the base to the lid, each approximately 9 mm long.

    • Remove the two screws using a #2x4" screwdriver.

    • Remove the black lid.

    • There are latches along the edges that release when the lid is pulled.

  5. Maxi-Matic Intertek Popcorn Maker Replacement Disassembly Guide: 手順 5、 3の画像 1 Maxi-Matic Intertek Popcorn Maker Replacement Disassembly Guide: 手順 5、 3の画像 2 Maxi-Matic Intertek Popcorn Maker Replacement Disassembly Guide: 手順 5、 3の画像 3
    • Unscrew the ring around the central cylinder using the Phillips #2 screwdriver and a wrench or pliers to hold the bolt in place.

    • The screw is about 14 mm long.

    • Remove the central cylinder by pulling it out straight upwards.

  6. Maxi-Matic Intertek Popcorn Maker Replacement Disassembly Guide: 手順 6、 1の画像 1
    • Around the edge of the remaining wider, shorter cylinder, there are four screws.

    • The two most easily accessible screws, opposite the blue wires, are approximately 9 mm long.

    • Remove these two screws using a #2x4" screwdriver.

  7. Maxi-Matic Intertek Popcorn Maker Replacement Disassembly Guide: 手順 7、 2の画像 1 Maxi-Matic Intertek Popcorn Maker Replacement Disassembly Guide: 手順 7、 2の画像 2
    • Of the remaining two screws near the blue wires, the one on the left is approximately 11 mm long, and the one on the right is approximately 19 mm long.

    • Remove these two screws using a #2x4" screwdriver.

    • Remove the wide, short cylinder from the interior by pulling and separating it from the disk inside it, taking the cylinder fully out.

  8. Maxi-Matic Intertek Popcorn Maker Replacement Disassembly Guide: 手順 8、 2の画像 1 Maxi-Matic Intertek Popcorn Maker Replacement Disassembly Guide: 手順 8、 2の画像 2
    • Use a plastic iFixit prying tool to remove the switch from the main body.

    • Disconnect the blue and red wires from the switch.

  9. Maxi-Matic Intertek Popcorn Maker Replacement Disassembly Guide: 手順 9、 3の画像 1 Maxi-Matic Intertek Popcorn Maker Replacement Disassembly Guide: 手順 9、 3の画像 2 Maxi-Matic Intertek Popcorn Maker Replacement Disassembly Guide: 手順 9、 3の画像 3
    • Use a plastic iFixit prying tool to remove the cord attachment from the main body of the air popper.

    • Remove the entire circuit from the device.

    • The circuit will come out easily.

  10. Maxi-Matic Intertek Popcorn Maker Replacement Disassembly Guide: 手順 10、 1の画像 1
    • Schematic for reference

終わりに

To reassemble the device, follow these instructions in reverse order.

作成者

3人の作成者と共同で作成されました。

Rachel

メンバー登録日: 09/13/23

231 ポイント

1ガイドが承認済み

チーム

0件のガイドコメント

コメントを追加

統計データ:

過去 24時間: 0

過去 7 日: 8

過去 30 日: 21

今までの合計 258