メインコンテンツにスキップ

Marshall Kilburn Power Switch Replacement

必要な工具と部品

  1. Marshall Kilburn Power Switch Replacement, Battery: 手順 1、 2の画像 1 Marshall Kilburn Power Switch Replacement, Battery: 手順 1、 2の画像 2
    • Place the unit face down as shown in the picture, exposing the battery cover.

    • Remove the two 4.0mm long screws holding the cover on using a T10 driver.

  2. Marshall Kilburn Power Switch Replacement: 手順 2、 1の画像 1
    • Remove the battery cover using a fingernail or nylon spudger.

  3. Marshall Kilburn Power Switch Replacement: 手順 3、 1の画像 1
    • Remove the battery and unplug the power lead.

  4. Marshall Kilburn Power Switch Replacement, Power Switch: 手順 4、 3の画像 1 Marshall Kilburn Power Switch Replacement, Power Switch: 手順 4、 3の画像 2 Marshall Kilburn Power Switch Replacement, Power Switch: 手順 4、 3の画像 3
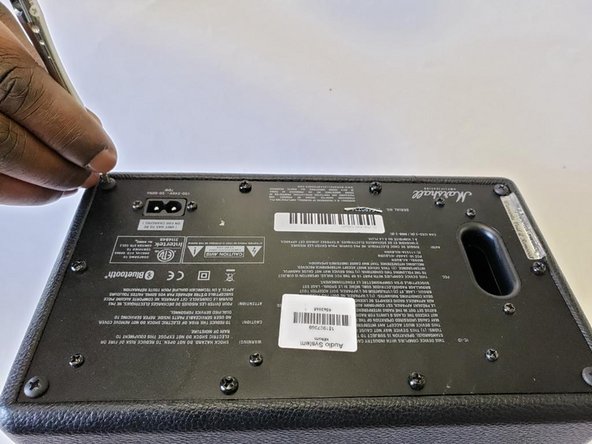
    • Place speaker as shown in image and remove the four corner 45.5mm back cover screws with a Phillips #2 driver.

    • Using a Phillips #2 driver, remove the six remaining 21.5mm outer back cover screws.

  5. Marshall Kilburn Power Switch Replacement: 手順 5、 2の画像 1 Marshall Kilburn Power Switch Replacement: 手順 5、 2の画像 2
    • Remove the back cover by using the vent hole as a grip.

    • Gently pull out the back cover and let it hang on the side of the speaker that has the knobs and power switch.

    • Unplug the main power lead from the control board; this allows the back to be opened more, allowing easy access to the power switch.

  6. Marshall Kilburn Power Switch Replacement: 手順 6、 3の画像 1 Marshall Kilburn Power Switch Replacement: 手順 6、 3の画像 2 Marshall Kilburn Power Switch Replacement: 手順 6、 3の画像 3
    • Pull the back cover attached to the motherboard to the side as shown in first image.

    • Remove the white insulator from the stereo speaker and place it to the side.

  7. Marshall Kilburn Power Switch Replacement: 手順 7、 2の画像 1 Marshall Kilburn Power Switch Replacement: 手順 7、 2の画像 2
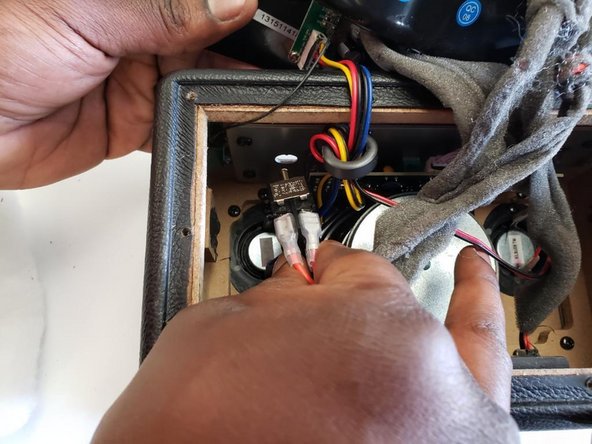
    • Place the speaker up right, and unscrew the golden bolt around the power switch with your hands, or a wrench.

    • Gently pull out the power switch as shown in the image.

  8. Marshall Kilburn Power Switch Replacement: 手順 8、 3の画像 1 Marshall Kilburn Power Switch Replacement: 手順 8、 3の画像 2 Marshall Kilburn Power Switch Replacement: 手順 8、 3の画像 3
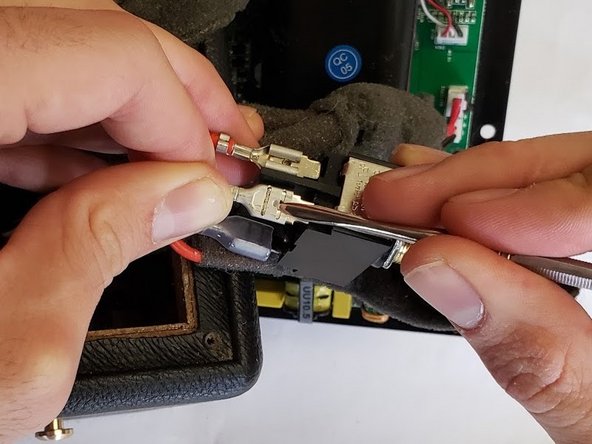
    • Use a slim spudger to wedge out the four red wires attached to the power switch.

終わりに

To reassemble your device, follow these instructions in reverse order.

ある他の人がこのガイドを完成しました。

作成者

3人の作成者と共同で作成されました。

Jeff Feuss

メンバー登録日: 01/14/19

423 ポイント

3のガイドは作成済み

チーム

2 件のコメント

And where to purchase a new switch???

Anders Skipper - 返信

Does the old switch have any writing on it?

Andrew S -

コメントを追加

統計データ:

過去 24時間: 1

過去 7 日: 15

過去 30 日: 63

今までの合計 4,779