メインコンテンツにスキップ

このバージョンは誤った内容を含んでいる可能性があります。最新の承認済みスナップショットに切り替えてください。

必要な工具と部品

  1. この手順は未翻訳です。 翻訳を手伝う。

    : 手順 1、 3の画像 1 : 手順 1、 3の画像 2 : 手順 1、 3の画像 3
    • The first step to any repair operation is to remove the front cover.

    • Grab the back of the calculator with one hand and the cover with the other.

    • Pull the cover off from one of the sides for easy removal.

  2. この手順は未翻訳です。 翻訳を手伝う。

    : 手順 2、 2の画像 1 : 手順 2、 2の画像 2
    • Orientate the calculator with the top facing towards you.

    • Slide the locking tab,found on the top part of the calculator, to the unlock position.

  3. この手順は未翻訳です。 翻訳を手伝う。

    : 手順 3、 2の画像 1 : 手順 3、 2の画像 2
    • "Locking Tab"

    • To remove the back cover, slide the cover away from the locking tab towards the bottom of the calculator until the cover no longer slides.

    • Then with the front of the calculator facing down, pull up on the back cover.

    • The calculator should now be orientated with the front facing down, as shown in picture 2.

  4. この手順は未翻訳です。 翻訳を手伝う。

    : 手順 4、 3の画像 1 : 手順 4、 3の画像 2 : 手順 4、 3の画像 3
    • The Batteries are now exposed and the calculator is face down with the back towards you.

    • Remove the bottom batteries by pressing the battery towards you while pulling it out from the far end.

    • If you can not do the previous step with your finger try using a flat ended tool such as an Ipod opening tool.

    • After the bottom battery has been removed push or slide the other(top) battery towards you until it is fully exposed in the battery slot.

    • Now simply remove the battery.

  5. この手順は未翻訳です。 翻訳を手伝う。

    : 手順 5、 3の画像 1 : 手順 5、 3の画像 2 : 手順 5、 3の画像 3
    • Using a Philips Screwdriver #00 unscrew the twelve 11.8mm screws shown in the picture and located on the back of the calculator.

  6. この手順は未翻訳です。 翻訳を手伝う。

    : 手順 6、 1の画像 1
    • Unscrew the 19mm screw located near center of the back of the calculator.

    • Remove the panel being held by the screw.

  7. この手順は未翻訳です。 翻訳を手伝う。

    : 手順 7、 1の画像 1
    • Using the same Phillips screwdriver, unscrew the remaining three 11.8mm screws.

  8. この手順は未翻訳です。 翻訳を手伝う。

    : 手順 8、 2の画像 1 : 手順 8、 2の画像 2
    • Using the Ipod Opening Tool pull up on both sides of the rectangular module while keeping the rest of the calculator flat on a surface face down

    • You may get a lot of resistance from the module. Do not use too much force as you risk damage. Use small amounts of force to work the module out.

  9. この手順は未翻訳です。 翻訳を手伝う。

    : 手順 9、 2の画像 1 : 手順 9、 2の画像 2
    • Pull out the rectangular module when it is finally loose enough.

  10. この手順は未翻訳です。 翻訳を手伝う。

    : 手順 10、 2の画像 1 : 手順 10、 2の画像 2
    • Now pull up on the back cover of the calculator while holding the rest of it flat on a surface.

    • Be careful not to tilt the front of the calculator at this point. The keyboard buttons are now unsupported and will fall out of place.

  11. この手順は未翻訳です。 翻訳を手伝う。

    : 手順 11、 2の画像 1 : 手順 11、 2の画像 2
    • Here we will use the front panel, separate from the motherboard

    • Make sure not to tilt this part unless you want to remove all the keys from the face plate.

    • Remove the rubber contact lying on top of the keys.

  12. この手順は未翻訳です。 翻訳を手伝う。

    : 手順 12、 1の画像 1
    • With the rubber contact removed the keys can now be removed to be replaced, cleaned, or manipulated in other ways.

    • To aid the removal of individual keys you can use the Ipod Opening Tool or preferably a pair of tweezers.

  13. この手順は未翻訳です。 翻訳を手伝う。

    : 手順 13、 3の画像 1 : 手順 13、 3の画像 2 : 手順 13、 3の画像 3
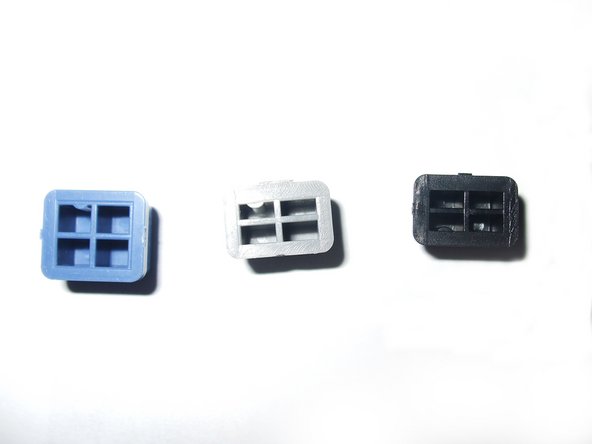
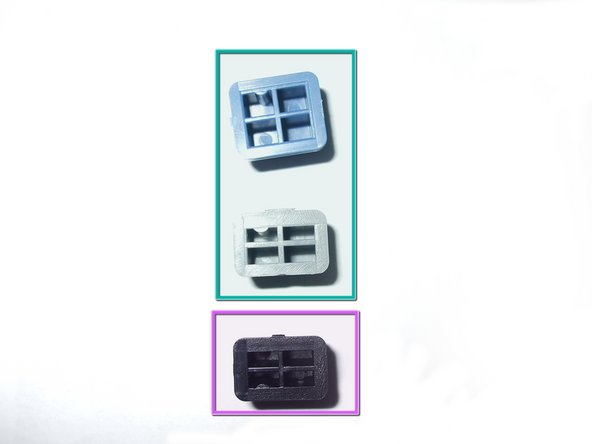
    • When placing the keys back into the faceplate you have to make sure that they are going in the right direction.

    • You can tell which way is up by a semicircular extrusion on the back of a key.

    • The gray and blue keys have the extrusion on the upper left hole looking at the back of the key.

    • The black keys on the other hand have the extrusions on the lower left hole looking at the back of the key.

  14. この手順は未翻訳です。 翻訳を手伝う。

    : 手順 14、 3の画像 1 : 手順 14、 3の画像 2 : 手順 14、 3の画像 3
    • Use the pictures shown here as guides for where the keys should go if the keys fell out or you simply chose to remove them.

ゴール

作成者

6人の作成者と共同で作成されました。

Daniel Maldonado

メンバー登録日: 04/14/10

240 ポイント

9のガイドは作成済み

チーム

Cal Poly, Team 15-51, Garner Spring 2010 Cal Poly, Team 15-51, Garner Spring 2010人のメンバー

CPSU-GARNER-S10S15G51

5 メンバー

9のガイドは作成済み

0 件のコメント

コメントを追加

統計データ:

過去 24時間: 2

過去 7 日: 10

過去 30 日: 20

今までの合計 2,522