メインコンテンツにスキップ

Makita DLM431 Lawn Mower Rear Axle Replacement

必要な工具と部品

  1. Makita DLM431 Lawn Mower Rear Axle Replacement, Prepare for the replacement: 手順 1、 3の画像 1 Makita DLM431 Lawn Mower Rear Axle Replacement, Prepare for the replacement: 手順 1、 3の画像 2 Makita DLM431 Lawn Mower Rear Axle Replacement, Prepare for the replacement: 手順 1、 3の画像 3
    • Charged batteries may be a risk of electrocution so it is best to discharge them or even better to remove them for the duration of the repair.

    • Remove lock key and the grass-catching basket.

    • Put the lawnmower on its head and store it safely.

  2. Makita DLM431 Lawn Mower Rear Axle Replacement, Wheel covers: 手順 2、 3の画像 1 Makita DLM431 Lawn Mower Rear Axle Replacement, Wheel covers: 手順 2、 3の画像 2 Makita DLM431 Lawn Mower Rear Axle Replacement, Wheel covers: 手順 2、 3の画像 3
    • Grasp the wheel cover caps in the middle and pull them off.

  3. Makita DLM431 Lawn Mower Rear Axle Replacement, Unscrew wheels: 手順 3、 3の画像 1 Makita DLM431 Lawn Mower Rear Axle Replacement, Unscrew wheels: 手順 3、 3の画像 2 Makita DLM431 Lawn Mower Rear Axle Replacement, Unscrew wheels: 手順 3、 3の画像 3
    • Loosen the nut of the wheels with a 13mm spanner.

    • Pull the wheel off the axle

  4. Makita DLM431 Lawn Mower Rear Axle Replacement, Loosen axle adjustment: 手順 4、 2の画像 1 Makita DLM431 Lawn Mower Rear Axle Replacement, Loosen axle adjustment: 手順 4、 2の画像 2
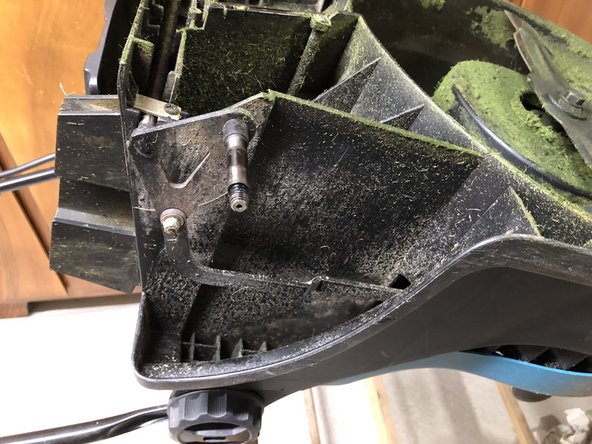
    • Loosen the nut of the connection between rear axle and axle adjustment with the 13mm nut.

    • Pull off the axle adjustment linkage.

  5. Makita DLM431 Lawn Mower Rear Axle Replacement, Loosening the axle bracket: 手順 5、 3の画像 1 Makita DLM431 Lawn Mower Rear Axle Replacement, Loosening the axle bracket: 手順 5、 3の画像 2 Makita DLM431 Lawn Mower Rear Axle Replacement, Loosening the axle bracket: 手順 5、 3の画像 3
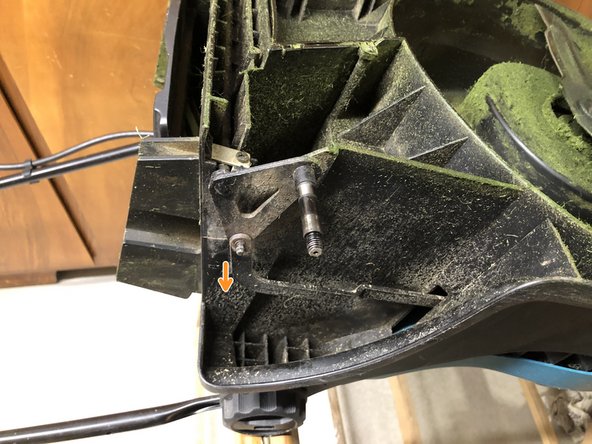
    • Remove screws with a Phillips screwdriver.

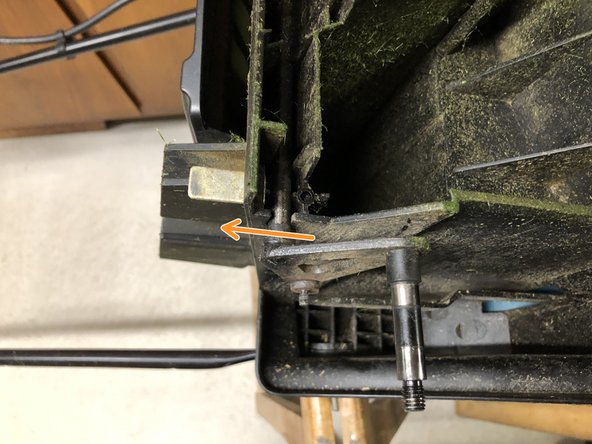
    • Push the axle holder backwards through the fairing to expose the axle.

  6. Makita DLM431 Lawn Mower Rear Axle Replacement, Replace rear axle: 手順 6、 1の画像 1
    • Remove the old axle upwards.

    • Attach new axle.

終わりに

Congrats! Now follow the steps in reverse order to reassemble your unit.

2 の人々がこのガイドを完成させました。

以下の翻訳者の皆さんにお礼を申し上げます:

de en

100%

carlotremoladaさんは世界中で修理する私たちを助けてくれています! あなたも貢献してみませんか?
翻訳を始める ›

作成者

1人の作成者と共同作成されました。

hainzy

メンバー登録日: 03/23/23

5,496 ポイント

27のガイドは作成済み

チーム

German Translators German Translators人のメンバー

Community

27 メンバー

760のガイドは作成済み

0 件のコメント

コメントを追加

統計データ:

過去 24時間: 9

過去 7 日: 64

過去 30 日: 204

今までの合計 572