メインコンテンツにスキップ

Makita Chain Saw EA6100PR 2017 Clutch Drum Replacement

必要な工具と部品

  1. Makita Chain Saw EA6100PR 2017 Clutch Drum Replacement, Remove the sprocket guard plate: 手順 1、 1の画像 1
    • Use a 13 mm socket to remove the two nuts securing the sprocket guard plate.

  2. Makita Chain Saw EA6100PR 2017 Clutch Drum Replacement: 手順 2、 1の画像 1
    • Remove the sprocket guard plate.

  3. Makita Chain Saw EA6100PR 2017 Clutch Drum Replacement, Remove the chain and guide bar: 手順 3、 1の画像 1
    • If the chainsaw has a chain and guide bar installed, follow the manufacturer's instructions and remove them before proceeding.

    • During reassembly, if you are reinstalling the chain and guide bar, follow the manufacturers instructions on proper chain tensioning techniques.

  4. Makita Chain Saw EA6100PR 2017 Clutch Drum Replacement, Release the chain brake: 手順 4、 2の画像 1 Makita Chain Saw EA6100PR 2017 Clutch Drum Replacement, Release the chain brake: 手順 4、 2の画像 2
    • Pull the hand guard towards the tubular handle until you hear a click to release the chain brake.

  5. Makita Chain Saw EA6100PR 2017 Clutch Drum Replacement, Remove the stop ring: 手順 5、 2の画像 1 Makita Chain Saw EA6100PR 2017 Clutch Drum Replacement, Remove the stop ring: 手順 5、 2の画像 2
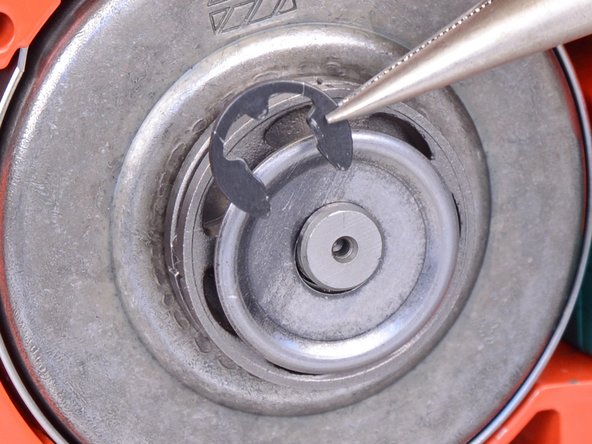
    • Use a small flathead screwdriver or snap ring pliers to pry and remove the stop ring from the axle.

  6. Makita Chain Saw EA6100PR 2017 Clutch Drum Replacement, Remove the flat washer: 手順 6、 1の画像 1
    • Slide the flat washer off of the axle and remove it.

    • Re-assembly tip—be sure to re-install the washer in the correct orientation as shown in the picture.

  7. Makita Chain Saw EA6100PR 2017 Clutch Drum Replacement, Remove the rim sprocket: 手順 7、 1の画像 1
    • Slide the rim sprocket off of the axle and remove it.

    • Re-assembly tip—be sure to re-install the rim sprocket in the correct orientation as shown in the picture.

  8. Makita Chain Saw EA6100PR 2017 Clutch Drum Replacement, Remove the clutch drum: 手順 8、 1の画像 1
    • Slide the clutch drum off of the axle and remove it.

    • During re-assembly, lubricate all moving surfaces, such as the axle.

終わりに

To reassemble your device, follow these instructions in reverse order.

2 の人々がこのガイドを完成させました。

作成者

2人の作成者と共同で作成されました。

Arthur Shi

メンバー登録日: 01/03/18

252,480 ポイント

526のガイドは作成済み

チーム

iFixit iFixit人のメンバー

Staff

135 メンバー

16,764のガイドは作成済み

0 件のコメント

コメントを追加

統計データ:

過去 24時間: 0

過去 7 日: 1

過去 30 日: 7

今までの合計 2,323