メインコンテンツにスキップ

このバージョンは誤った内容を含んでいる可能性があります。最新の承認済みスナップショットに切り替えてください。

必要な工具と部品

  1. , 下部ケース: 手順 1、 1の画像 1
    • MacBookの下部ケースを固定する8本の4ミリメートルプラスネジを外します

  2. : 手順 2、 3の画像 1 : 手順 2、 3の画像 2 : 手順 2、 3の画像 3
    • 下部ケースは、ゴムで覆われたアルミニウムで構成されています。再組み立て時に組み立てられなくなってしまうので、外す際に下部ケースを曲げすぎないでください

    • 通気口の近くを少し持ち上げます

    • 下部ケースは内部で固定されているので、固定が外れるまで下部ケースと本体の間に指を入れて動かし続けます。

    • これらの3つのクリップの位置は、3枚目の画像に示されています。

  3. この手順は未翻訳です。 翻訳を手伝う。

    : 手順 3、 1の画像 1
    • For precautionary purposes, we advise that you disconnect the battery connector from the logic board to avoid any electrical discharge. This step is optional and is not required.

    • Use the flat end of a spudger to lift the battery connector up out of its socket on the logic board.

    • It may be easier to use your fingernails to lift up on both sides of the connector.

  4. この手順は未翻訳です。 翻訳を手伝う。

    : 手順 4、 1の画像 1
    • Remove the following screws from the optical drive side of the rear vent:

    • Two 10 mm T8 Torx

    • Two 5.2 mm Phillips

  5. この手順は未翻訳です。 翻訳を手伝う。

    : 手順 5、 1の画像 1
    • Remove the following screws from the port side of rear vent:

    • Two 10 mm T8 Torx

    • Two 5.2 mm Phillips

  6. この手順は未翻訳です。 翻訳を手伝う。

    : 手順 6、 1の画像 1
    • Carefully lift the rear vent out of the upper case.

  7. : 手順 7、 1の画像 1
    • スパッジャーの平面側先端を使って、ロジックボードからAirPort/Bluetoothケーブルコネクタを持ち上げます。

  8. : 手順 8、 1の画像 1
    • 右側スピーカーアセンブリを上部ケースに固定している次のネジを外します:

    • 12mmプラスネジ 1本

    • 3mmプラスネジ 1本

  9. この手順は未翻訳です。 翻訳を手伝う。

    : 手順 9、 1の画像 1
    • Remove the single 2.2 mm Phillips screw inserted horizontally into the side of the optical drive.

  10. この手順は未翻訳です。 翻訳を手伝う。

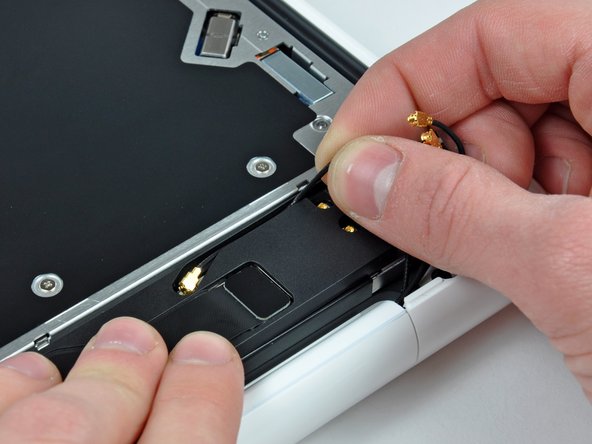
    : 手順 10、 2の画像 1 : 手順 10、 2の画像 2
    • Pry the AirPort and Bluetooth antenna connectors (3 total) up off the AirPort/Bluetooth card.

    • De-route the long antenna from its channel in the rear speaker housing.

  11. : 手順 11、 1の画像 1
    • スパッジャーの平面側先端を使って、ロジックボードからリアスピーカーケーブルコネクタを持ち上げます。

  12. : 手順 12、 1の画像 1
    • 上部ケースからリアスピーカーアセンブリを取り外します。

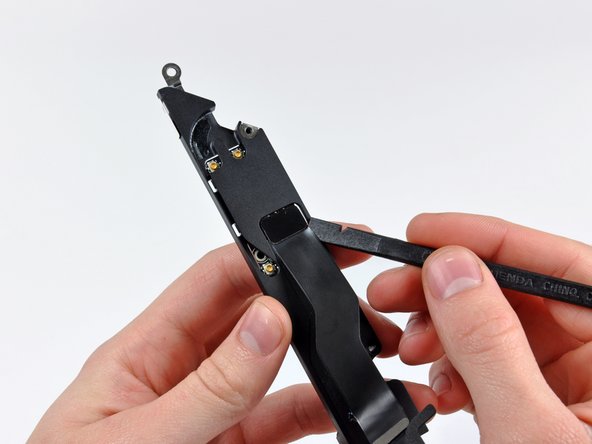
  13. : 手順 13、 2の画像 1 : 手順 13、 2の画像 2
    • リアスピーカーアセンブリ内の溝からAirPort/Bluetoothケーブルを注意深く剥がします。

    • スパッジャーの平面側先端を使って、リアスピーカーからAirPort/Bluetoothケーブルを持ち上げます。

  14. : 手順 14、 1の画像 1
    • AirPort/Bluetoothボードをリアスピーカーアセンブリに固定している3mmプラスネジを3本外します。

  15. : 手順 15、 1の画像 1
    • リアスピーカーアセンブリからAirPort/Bluetoothボードを持ち上げます。

  16. この手順は未翻訳です。 翻訳を手伝う。

    : 手順 16、 1の画像 1
    • Rear speaker remains.

ゴール

24 の人々がこのガイドを完成させました。

作成者

4人の作成者と共同で作成されました。

Walter Galan

694,773 ポイント

1,203のガイドは作成済み

4 件のコメント

Nice tuto ! Helped me so fine.

Rudy Pierrat - 返信

Perfect! That helps to keep older gear alive!

W. Scholz - 返信

How did you guys place the rear speaker wire back in place?

Kim Sluyk - 返信

hi everyone! iʻm about to replace the rear speaker on my late 2009 A1342, but i also need to replace both the left and right speakers as well. would someone please help me out? i hope i donʻt have to pull the logic board (i already did that on my mid 2012 A1284, and it was, ok, but i have more gray hairs now . . .).

Kahana - 返信

コメントを追加

統計データ:

過去 24時間: 3

過去 7 日: 21

過去 30 日: 103

今までの合計 32,986