はじめに
このガイドは、お持ちのラップトップからハードドライブケーブルを取り外す方法を説明します。
必要な工具と部品
-
-
ケースを閉じたまま、Unibodyを裏返しにして水平に置きます。
-
アクセスドアのリリース用ラッチの溝側を押し込んで、出てきた先端をつかみます。 リリース用ラッチが垂直になるまで持ち上げます。
-
-
-
下部ケースをシャーシに固定している次の8本のネジを外します:
-
3mmプラスネジ 1本
-
13.5mmプラスネジ 3本
-
3.5mmプラスネジ 4本
Make sure you have a good quality Phillips screwdriver. Mine had removable tips and had a small play at the connection. As a result I didn't have a good feel and damaged my screws (those securing the fan and the top left in step 23). Game over for me installing new thermal paste...
Be very carefull with your screws! Especially those on the inside.
You can get away with a Phillips #00 for many of the screws involved but the 4 at the bottom case split are likely to strip if you don’t use a JIS #00 or, in a pinch, a Phillips #000.
I used the Phillips #00 tip from my Pro Tech Toolkit, and it worked well enough. But yes, maybe #000 might have been better on the lower row of screws. Note to myself: Always read the comments first.
When replacing these screws, the order to replace them in is as follows:
1, Top left
2. Top right
3. Top center-left
4. Top center-right
5. Bottom center-right
6. Bottom center-left
7. Bottom right
8. Bottom left
I hope this information is helpful.
I followed my usual process of putting in all the screws loosely, then tightening them gradually in distributed pattern, to help ensure that the panel settles in place evenly. But maybe some orders are better.
-
-
-
両手を使って、上部ケースから下部ケースを持ち上げて外します。
Thanks for the guide!
It's implicit in the two photos, but worth mentioning because it blocked my progress in this step for a bit: You have to put the release latch back into its horizontal, closed position before you can lift off the lower-case panel.
-
-
-
スパッジャーの平面側先端を使って、サブウーファーのコネクタをロジックボードからまっすぐ持ち上げます。
Me, too, broke the subwoofer connector from the motherboard. I'd suggest removing the padding first so that you can see what kind of connector it is, then pry it loose (insert spudger where the cables enter the connector).
DO NOT REMOVE THE SUBWOOFER CONNECTION. Step 6 IS NOT NESCESSARY.
You can complete this guide without doing step 6 just BE CAREFUL as you already should be.
Oops, I followed Step-6 and my subwoofer connector came off from the motherboard!!! Please suggest me what needs to be done now?
Srinivasan - 返信
Happened the same to me ... step 6 is a @%#$$. You should put now a way to repair the damage done. I just have four small tin marks on the board ...
stratorick - 返信
Happened the same problem to me ... step 6 is a @%#$$**%%#. You should put now a way to repair the damage done. I just have four small tin marks on the board ... and looking to sky for help
There are two variants of this connector. In one, there are pins that come up from the motherboard and the connector can be pried directly up without damage.
The other variant of the connector that everyone commenting here has is soldered to the motherboard. To repair this type, first pull off the small square of foam padding on top of the connector. Then gently pull out the four black and red wires, leaving the soldered connector attached to the logic board. After you have installed the new speaker and subwoofer, you will remove the connector on the replacement component and carefully feed the red and black wires into the connector that is still attached to the motherboard (paying careful attention to their correct order). Then replace the square of black foam.
If you have removed the soldered on the connector, your two options are to solder it on yourself or to find a repair shop that can do that for you. There are instructables online for soldering tiny components that can help you.
Reading all of these comments prior to beginning the work, I didn’t even try to investigate the type of connector my laptop had. I just DIDN’T attempt removal of this connector, worked around it, and as others have mentioned, it is truly unnecessary to remove this connector. You can move the subwoofer (after removal of its other screws) out of the way just enough to slip out the old drive and slip in the new drive.
-
-
-
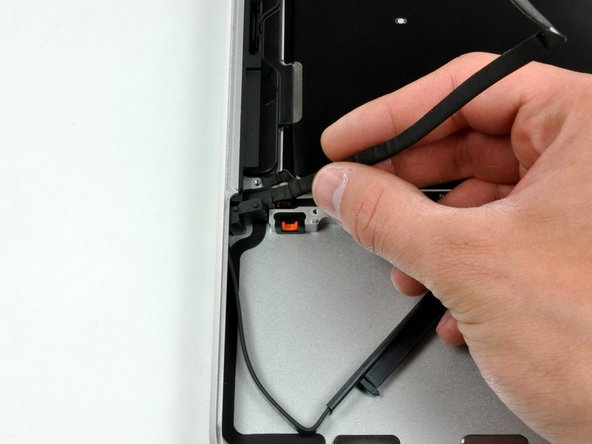
カメラケーブルのオスの先端をソケットからまっすぐ引き抜いて、カメラケーブルの接続を外します。
The lack of warning “Be careful not to pull up on the cable as you remove it from the socket.” here, as is displayed on a similar step on the “MacBook Unibody Model A1278 AirPort Card Replacement” guide, has caused me to break the cable. My WiFi is not working anymore. How can I replace only this cable? Thank you.
Bonjour J’ai eu le malheur de toucher à ce câble et depuis je n’ai plus de retro-éclairage sur mon écran. Est-ce lié ?
Hello I had the misfortune to touch this cable and since then I have no more backlight on my screen. Is it related? (but the computer works fine when I plug in a screen)
-
-
-
-
カメラケーブルブラケットと上部ケースを固定している2本のプラスネジを外してください。
-
-
-
光学ドライブを上部ケースに固定している2.5mmプラスネジを3本外します。
-


デバイスを再度組み立てるには、この説明書の逆の順番で組み立ててください。
デバイスを再度組み立てるには、この説明書の逆の順番で組み立ててください。
19 の人々がこのガイドを完成させました。
以下の翻訳者の皆さんにお礼を申し上げます:
100%

これらの翻訳者の方々は世界を修理する私たちのサポートをしてくれています。 あなたも貢献してみませんか?
翻訳を始める ›

3 件のコメント
My mid-2012 MBP MD101LL/A a1278 doesn’t look anything like this, nor does the cable.
These instructions are not for the Mid 2012 A1278, but for a much older MacBook Pro. Pretty confusing.
This is not a a1278 unibody MacBook Pro. A1278 MacBooks backs are one solid metal piece not two separate pieces. This guide is for a different MacBook Pro.
Brad Burgeson - 返信
This guide isn’t for a pro; it’s a MacBook unibody.
Nicholas -
So, it turns out that Apple used the model code A1278 for quite a few different Mac models, including both Pro and non-Pro versions! This guide is for the non-Pro Macbooks. There’s also one for the Pro models with the same A1278 identifier.
tempelmann - 返信