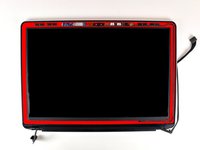
メインコンテンツにスキップ

MacBook Unibody Model A1278 Front Display Glass Replacement

必要な工具と部品

  1. MacBook Unibody Model A1278 Front Display Glass Replacement, Access Door: 手順 1、 1の画像 1
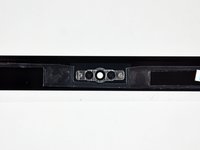
    • With the case closed, place the Unibody top-side down on a flat surface.

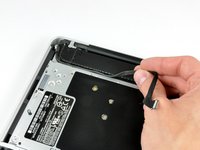
    • Depress the grooved side of the access door release latch enough to grab the free end. Lift the release latch until it is vertical.

  2. MacBook Unibody Model A1278 Front Display Glass Replacement: 手順 2、 1の画像 1
    • The access door should now be raised enough to lift it up and out of the Unibody.

  3. MacBook Unibody Model A1278 Front Display Glass Replacement, Battery: 手順 3、 1の画像 1
    • Be sure the access door release latch is vertical before proceeding.

    • Grab the white plastic tab and pull the battery up and out of the Unibody.

  4. MacBook Unibody Model A1278 Front Display Glass Replacement, Lower Case: 手順 4、 1の画像 1
    • Remove the following eight screws securing the lower case to the chassis:

    • One 3 mm Phillips screw.

    • Three 13.5 mm Phillips screws.

    • Four 3.5 mm Phillips screws.

  5. MacBook Unibody Model A1278 Front Display Glass Replacement: 手順 5、 1の画像 1
    • Using both hands, lift and remove the lower case off the upper case.

  6. MacBook Unibody Model A1278 Front Display Glass Replacement, Display Assembly: 手順 6、 1の画像 1
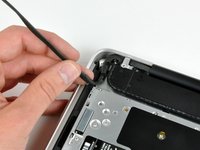
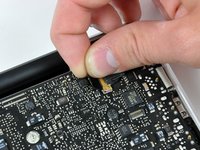
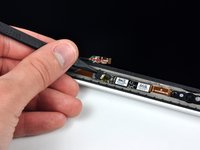
    • Disconnect the camera cable by pulling the male end straight away from its socket.

    • Be careful not to pull up on the cable as you remove it from the socket.

  7. MacBook Unibody Model A1278 Front Display Glass Replacement: 手順 7、 2の画像 1 MacBook Unibody Model A1278 Front Display Glass Replacement: 手順 7、 2の画像 2
    • De-route the camera data cable from the channel in the optical drive.

  8. MacBook Unibody Model A1278 Front Display Glass Replacement: 手順 8、 2の画像 1 MacBook Unibody Model A1278 Front Display Glass Replacement: 手順 8、 2の画像 2
    • Remove the following screws securing the camera data cable and right speaker to the upper case:

    • One 9.9 mm partially threaded Phillips screw

    • One 9.6 mm threaded Phillips screw

    • One 4 mm Phillips screw

    • Slide the camera cable bracket out from under the subwoofer and remove it from the computer.

    • The iSight cable has an eyelet through which passes the left-most screw in these pictures.

  9. MacBook Unibody Model A1278 Front Display Glass Replacement: 手順 9、 2の画像 1 MacBook Unibody Model A1278 Front Display Glass Replacement: 手順 9、 2の画像 2
    • Grab the plastic pull tab secured to the display data cable lock and rotate it toward the DC-in side of the computer.

    • Pull the display data cable connector straight away from its socket.

    • Make sure to pull the connector straight away and not straight up from its socket.

  10. MacBook Unibody Model A1278 Front Display Glass Replacement: 手順 10、 2の画像 1 MacBook Unibody Model A1278 Front Display Glass Replacement: 手順 10、 2の画像 2
    • Remove the following two screws from the display data cable bracket:

    • One 7 mm Phillips screw.

    • One 5 mm Phillips screw.

    • Lift the display data cable bracket out of the upper case.

  11. MacBook Unibody Model A1278 Front Display Glass Replacement: 手順 11、 1の画像 1
    • Remove the two outer 6 mm Torx screws securing each side of the display to the upper case (4 screws total).

  12. MacBook Unibody Model A1278 Front Display Glass Replacement: 手順 12、 1の画像 1
    • Open your MacBook so the display is perpendicular to the upper case.

    • Place your opened MacBook on a table as pictured.

    • While holding the display and upper case together with your left hand, remove the 6 mm Torx screw from the lower display bracket.

  13. MacBook Unibody Model A1278 Front Display Glass Replacement: 手順 13、 1の画像 1
    • Be sure to hold the display and upper case together with your left hand. Failure to do so may cause the freed display/upper case to fall, potentially damaging each component.

    • Remove the last remaining 6 mm Torx screw securing the display to the upper case.

  14. MacBook Unibody Model A1278 Front Display Glass Replacement: 手順 14、 3の画像 1 MacBook Unibody Model A1278 Front Display Glass Replacement: 手順 14、 3の画像 2 MacBook Unibody Model A1278 Front Display Glass Replacement: 手順 14、 3の画像 3
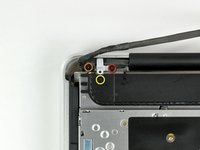
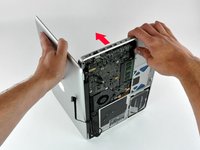
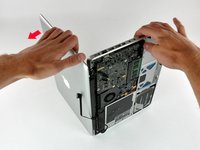
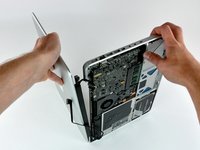
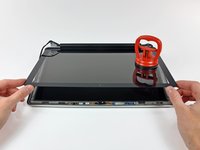
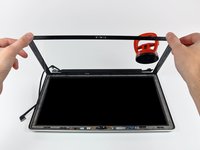
    • Grab the upper case with your right hand and rotate it slightly toward the top of the display so the upper display bracket clears the edge of the upper case.

    • Rotate the display slightly away from the upper case.

    • Lift the display away from the upper case, minding any brackets or cables that may get caught.

  15. MacBook Unibody Model A1278 Front Display Glass Replacement, Front Display Glass: 手順 15、 2の画像 1 MacBook Unibody Model A1278 Front Display Glass Replacement, Front Display Glass: 手順 15、 2の画像 2
    • In the following steps, you will use a heat gun to soften the adhesive securing the outer black border around the underside of the front glass panel to the display. The area the adhesive is applied to is shown in red in the second picture.

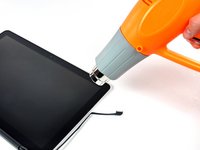
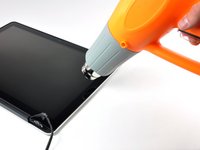
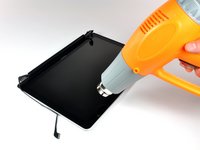
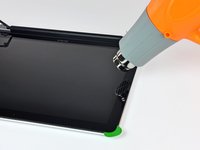
    • With the heat gun set to low, start by heating the outer black border near the upper right corner of the glass panel.

    • Always aim the heat gun away from the soft rubber strip around the display glass. Heating the rubber will cause it to melt slightly, turning its finish from matte to glossy. Touching overheated rubber can cause it to permanently deform.

    • Due to the heat applied, it is normal for a layer of condensation to develop on the inside of the glass panel and/or the outside of the LCD. It can be removed with glass cleaner once the glass is separated from the display.

  16. MacBook Unibody Model A1278 Front Display Glass Replacement: 手順 16、 3の画像 1 MacBook Unibody Model A1278 Front Display Glass Replacement: 手順 16、 3の画像 2 MacBook Unibody Model A1278 Front Display Glass Replacement: 手順 16、 3の画像 3
    この手順で使用する道具:
    Heavy-Duty Suction Cups (Pair)
    $14.95
    購入する
    • With the panel sufficiently heated, fasten a heavy-duty suction cup near the upper right corner of the display glass.

    • Don't fasten the suction cup on top of the rubber strip around the edge of the display glass.

    • To attach the suction cups we sell, first position the suction cup with the movable handle parallel to the face of the glass panel. While lightly holding the suction cup against the glass, raise the movable handle until it is parallel with the other handle.

    • Slowly and gently pull the corner of the display glass up off the display assembly.

    • If only the top edge of the glass lifts up (as seen in the third picture), repeat steps one and two until you can lift up the corner of the panel.

  17. MacBook Unibody Model A1278 Front Display Glass Replacement: 手順 17、 3の画像 1 MacBook Unibody Model A1278 Front Display Glass Replacement: 手順 17、 3の画像 2 MacBook Unibody Model A1278 Front Display Glass Replacement: 手順 17、 3の画像 3
    • Gently lift the corner of the display glass enough to insert a spudger between it and the display assembly.

    • Use the flat end of a spudger to gently pry up the adhesive securing the front glass to the display.

    • Pry up the glass panel a few inches away from the upper right corner along the top and right edges of the display.

  18. MacBook Unibody Model A1278 Front Display Glass Replacement: 手順 18、 2の画像 1 MacBook Unibody Model A1278 Front Display Glass Replacement: 手順 18、 2の画像 2
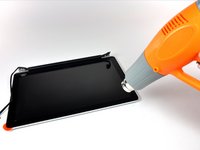
    • Use a heat gun to soften the adhesive under the black strip along the right side of the front glass panel.

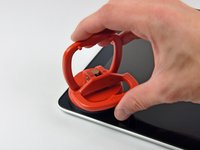
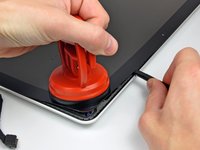
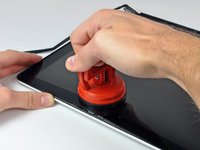
    • Attach a suction cup along the right side of the front glass panel.

    • Pull up on the glass panel while you use the flat end of a spudger to separate it from the rest of the display assembly.

    • Continue working along the right edge of the front display glass until it is separated from the display.

    • It may be helpful to use a guitar pick or another thin plastic object to keep the upper right corner of the front glass panel from sticking back down to the display assembly.

  19. MacBook Unibody Model A1278 Front Display Glass Replacement: 手順 19、 2の画像 1 MacBook Unibody Model A1278 Front Display Glass Replacement: 手順 19、 2の画像 2
    • Use your heat gun to soften the adhesive under the black strip along the top edge of the glass display panel.

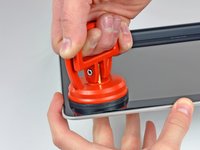
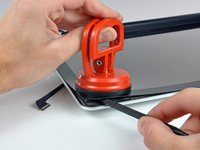
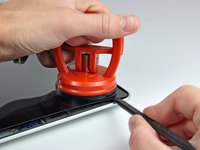
    • Attach a suction cup near the top edge of the glass display panel and use it to pull the glass panel up off the display.

    • Work along the top edge of the glass panel, carefully using the flat end of a spudger to separate the adhesive if necessary.

  20. MacBook Unibody Model A1278 Front Display Glass Replacement: 手順 20、 2の画像 1 MacBook Unibody Model A1278 Front Display Glass Replacement: 手順 20、 2の画像 2
    • Use a heat gun to soften the adhesive under the black strip near the upper left corner of the glass display panel.

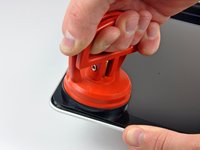
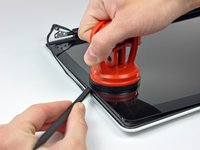
    • Attach a suction cup near the upper left corner of the glass display panel.

    • Pull up on the suction cup and use the flat end of a spudger to carefully pry the glass display panel out of the display assembly.

    • Once the upper left corner has been separated from the display, it may be helpful to use a guitar pick or another thin plastic object to keep the glass from sticking back down to the display assembly.

  21. MacBook Unibody Model A1278 Front Display Glass Replacement: 手順 21、 2の画像 1 MacBook Unibody Model A1278 Front Display Glass Replacement: 手順 21、 2の画像 2
    • Use a heat gun to soften the adhesive under the black strip along the left side of the front glass panel.

    • Attach a suction cup along the left side of the front glass panel.

    • Pull up on the glass panel while you use the flat end of a spudger to separate it from the rest of the display assembly.

    • Continue working along the left edge of the front display glass until it is separated from the display.

  22. MacBook Unibody Model A1278 Front Display Glass Replacement: 手順 22、 2の画像 1 MacBook Unibody Model A1278 Front Display Glass Replacement: 手順 22、 2の画像 2
    • Now that the top, left, and right edges of the glass are free from the display, slowly lift the top edge of the glass panel and gently rotate it out of the display.

    • If necessary, use the flat end of a spudger to free the bottom edge of the glass display panel from the display assembly.

    • Before reassembling, be sure to clean both the inside of the glass display panel and the LCD as any dust or fingerprints trapped inside will be annoyingly visible when the machine is on. It is recommended to use a silicon roller and sticky sheets to clean well.

  23. MacBook Unibody Model A1278 Front Display Glass Replacement: 手順 23、 2の画像 1 MacBook Unibody Model A1278 Front Display Glass Replacement: 手順 23、 2の画像 2
    • Insert the edge of a plastic opening tool between the display glass and the camera bracket, and run it around the camera bracket to separate it from the display glass.

    • Do not forget to stick the camera bracket down to the new front display glass before reassembly.

  24. MacBook Unibody Model A1278 Front Display Glass Replacement: 手順 24、 3の画像 1 MacBook Unibody Model A1278 Front Display Glass Replacement: 手順 24、 3の画像 2 MacBook Unibody Model A1278 Front Display Glass Replacement: 手順 24、 3の画像 3
    • During the glass removal process, the AirPort & iSight data cable may stick to the adhesive on the glass panel, disconnecting it from the camera board as the panel is lifted. If your AirPort & iSight data cable is still connected to the camera board, skip this step.

    • If your objective is to remove the camera board, skip this step as reconnecting the AirPort & iSight data cable is not necessary.

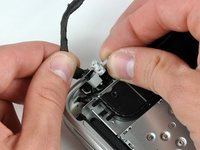
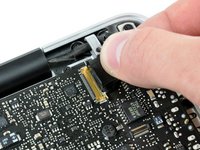
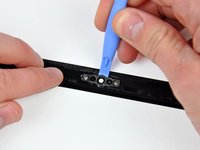
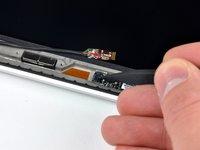
    • To reconnect the cable, first use the tip of a spudger to remove the piece of foam tape over the AirPort & iSight data cable ZIF socket.

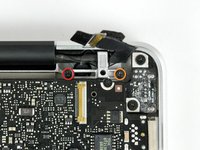
    • Use the tip of a spudger to flip up the ZIF cable retainer on the AirPort & iSight data cable socket.

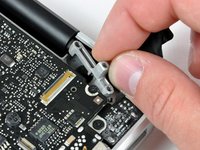
    • Insert the AirPort & iSight data cable into its socket on the camera board and use the tip of a spudger to snap down the ZIF cable retainer, locking the cable in place.

    • Reapply the piece of tape covering the AirPort & iSight data cable socket.

終わりに

To reassemble your device, follow these instructions in reverse order.

48 の人々がこのガイドを完成させました。

作成者

7人の作成者と共同で作成されました。

Andrew Bookholt

585,500 ポイント

619のガイドは作成済み

16 件のコメント

oh! and great organization tip for the screws: i poked them thru a piece of notebook paper with the corresponding steps written next to them. it worked like a charm, far better than anything else i could think of.

well, i didn't have the required suction cup... and so after trying for about 5 minutes with the iphone suction cups, i just picked at the broken glass (most of us have the broken screens, right?) and it went much better. i was worried about scratching the LCD as i picked and scraped, so be gentle, and wary of that. it was a fun/nerve-wracking 3.5 hours.

brianisbrillian - 返信

Agree, forget about getting the glass off in one try. Apparently the glue hardens out a bit, I couldn't get the screen off with the ordered suction cups. In the end I did the same as Brian above: just kept breaking off more glass until the LCD was free, then painstakingly removed the bits around the border with a sharp knife. Just be careful.

Keep a vacuum cleaner nearby, as you'll end up with lots of microscopic glass fragments.

I vacuumed the LCD then sprayed LCD cleaner on & wiped it with a microfiber cloth. This worked very well. Make sure you get all the glass fragments off the border as well, I missed one and now the border makes a bit of noise if you press down there.

kees - 返信

Everything on this review seemed to work rather flawlessly for me up until the point where I had to use the heat gun and suckers to remove the cracked screen. After much use of the heat gun (hairdryer in my case) I feared that the LCD may be effected by the excessive heat, so I started to carefully breaking away at my already cracked screen. With the screen not trapped beneath a sheet of glass and able to breathe, I felt much more relaxed about using the hairdryer to loosen glue around the edges. After a short amount of picking, and scraping, I managed to get all the glass shards off and apply the new glass screen. It was helpful to have another set of hands to position the hairdryer as I moved along to enable faster separation of glass from the panel. Good as new after mind you! Don't let the 9/10 difficulty rating deter you, just be careful, organized and take your time :)

Darragh Flynn - 返信

I totally agree: if your glass is broken (a good reason why you may be looking how to change it) you'll have to be VERY patient. It is very likely that the glass will break in hundreds of tiny pieces while performing these operations. My experience says: 1) Heat the adhesive thoroughly to minimize the work. 2) Go fetch some glasses to protect your eyes. 3) Good Luck! :)

fbeeper - 返信

BTW, if your model is a 13" Late 2008 MacBook you can go for the 13" MacBook Pro 2009+ glass. It fits, and you're old Mac will get a fun cosmetic upgrade :P

fbeeper - 返信

コメントを追加

統計データ:

過去 24時間: 0

過去 7 日: 6

過去 30 日: 60

今までの合計 73,669