はじめに
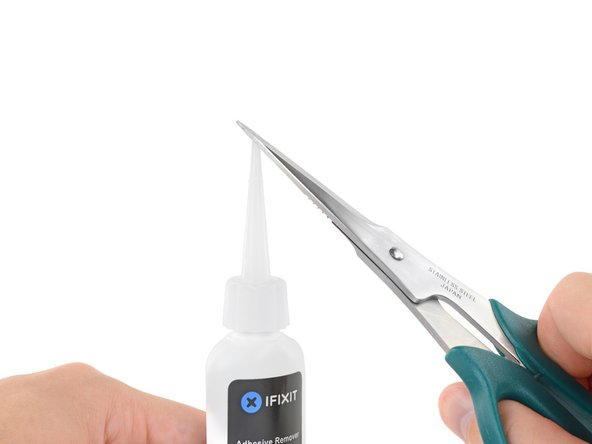
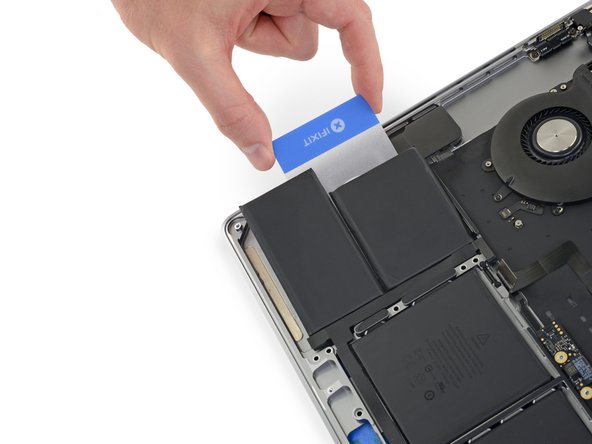
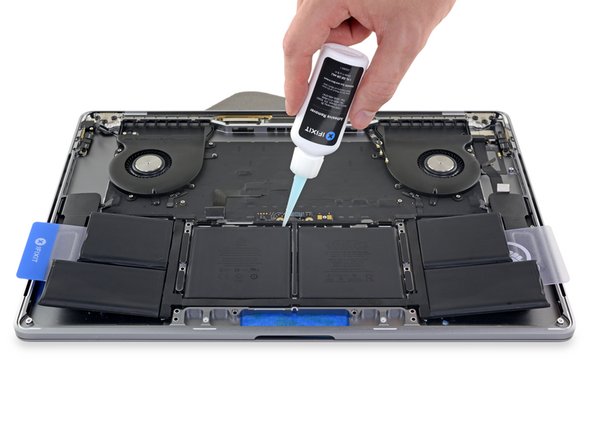
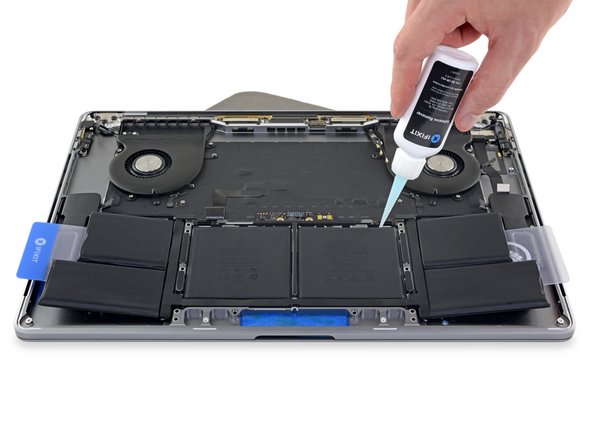
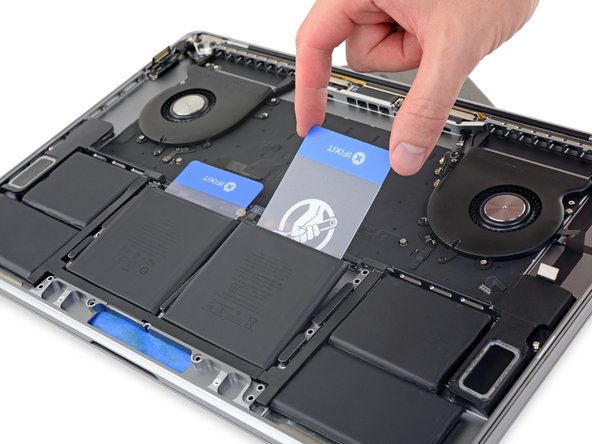
このガイドを参考に、接着剤リムーバー付きのiFixitキットを使って、16インチMacBook Proから接着剤で固定されたバッテリーを安全に取り外してください。接着剤リムーバーは、バッテリーを固定している接着剤を弱めるように設計されており、簡単に取り外すことができます。
iFixit接着剤リムーバーは可燃性です。この手順は、換気の良い場所で行ってください。タバコを吸ったり、火のそばで作業したりしないでください。
'''損傷のリスクを最小限に抑えるため、この手順を開始する前にMacBookの電源を入れ、バッテリーが完全に放電するようにしてください。充電されたリチウムイオン電池は、誤って穴を開けると危険で制御不能な火災を発生させる可能性があります。バッテリーが膨張している場合は、 適切な処理を行なってください。
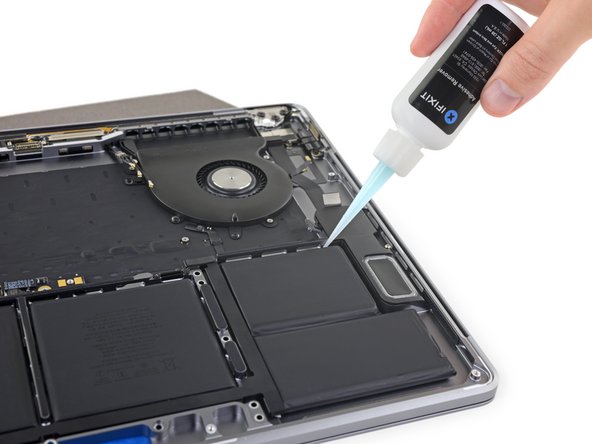
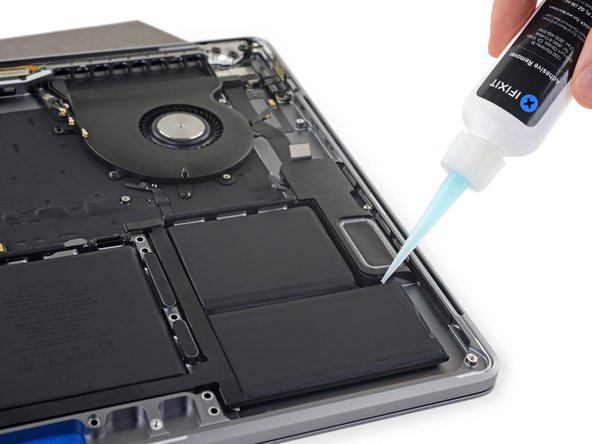
ご注意: バッテリーの接着剤を溶解するのに使用する溶剤は、特定のプラスチックを損傷することがあります。すべての指示に従い、接着剤除去剤を塗布する場所に注意してください。
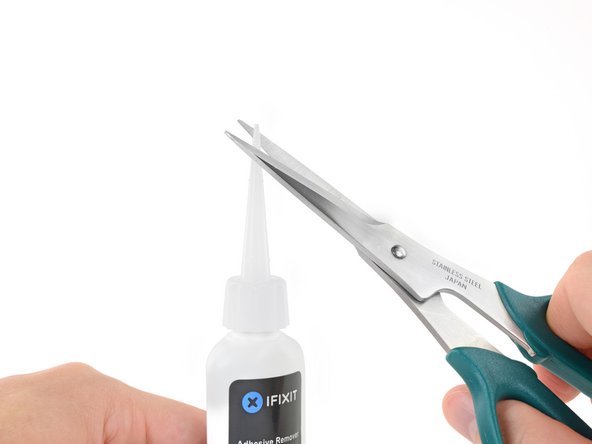
必要な工具と部品
-
-
Macを起動し、ターミナルを開きます。
-
以下のコマンドをターミナルにコピー(または正確にタイプ)します。
-
sudo nvram AutoBoot=%00
-
[return]キーを押します。パスワードを求められたら、管理者パスワードを入力し、 [return]キーを再度押します。補足: [return]キーは ⏎ や "enter"として印字されている場合もあります。
-
sudo nvram AutoBoot=%03
-
-
-
P5ペンタローブドライバーを使って、下部ケースに留められた次のネジを6本外します。
-
3.7mmネジー4本
-
7.3mmネジー2本
-
-
-
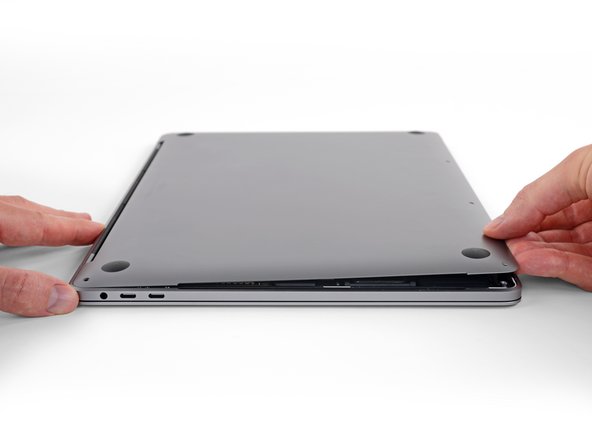
開口ピックのコーナーを隙間の下にスライドして差し込みます。
-
開口ピックを一番近い角に向けてスライドします。それからMacBook Proのサイド側をスライドします。
I recommend being careful while sliding as you can scratch the speaker. The actual clip is about halfway up the side, whereas the speaker is closer to the front (further from the hinge). So stay very shallow with just the tip of the pick until you get halfway up the side.
-
-
-
反対側でも前と同じ手順を繰り返します。2番目のクリップを外すには、同じように開口ピックをスライドします。
Same advice that I gave for the other side — be careful not to scratch the speaker which is close to the bottom. Keep the pick shallow until you get halfway up the side.
-
-
-
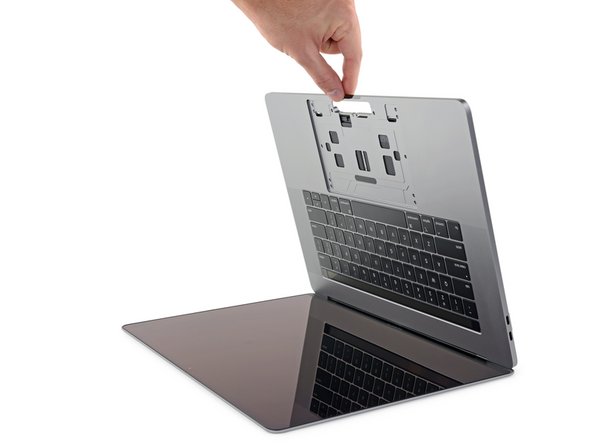
下部ケースをMacBook正面端に向けてしっかりとスライドします。(ヒンジのある位置から離すように)下部ケースを固定している最後のクリップを外します。
-
一方の角を先に引き抜いてから、反対側の角を引いてください。
This was made a lot easier by using a lever in the hinge area in combination with pulling. The amount of force required was more than the grip I could get on the metal allowed for my macbook.
Thank you for this comment! 🙏
For me it was the same way, wasn't able to get enough grip to pull sufficiently - but gently levering near the hinge with a spudger to "push" the bottom panel away worked well!There is no pulling required. Use an opening pick or a spudger at the hinge area to gently and easily nudge the bottom panel off the clips. It should be effortless.
If you do pull on the bottom case be careful of where you place the hand supporting the Mac, otherwise you'll make a blood sacrifice to the Mac gods! I placed my other hand too close to the feet on the bottom case and while removing it, the sharp edge of the bottom case sliced into my thumb.
-
-
-
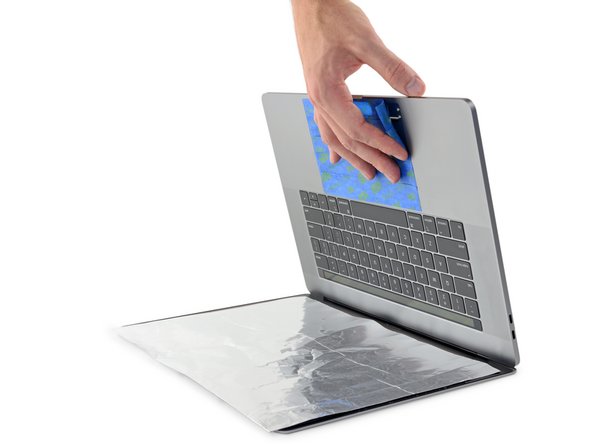
下部ケースを取り出します。
-
所定の位置に載せて、ディスプレイヒンジの近くにスライド式クリップの位置を合わせます。 カバーを押し下げて、ヒンジ側に向けてスライドします。 クリップが装着した時、これ以上スライドできません。
-
スライド式クリップが完全に装着して、下部ケースが正しい位置に合わさっていれば、下部ケースをしっかりと押し下げて、下にある4つの隠しクリップをかみ合わせます。 各クリップが所定の位置に装着したクリップ音を確認してください。
-
-
-
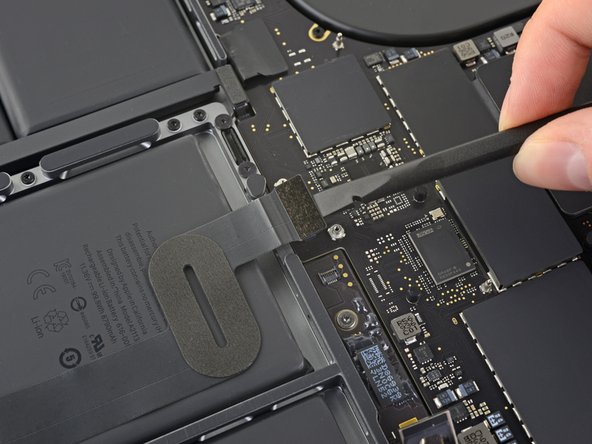
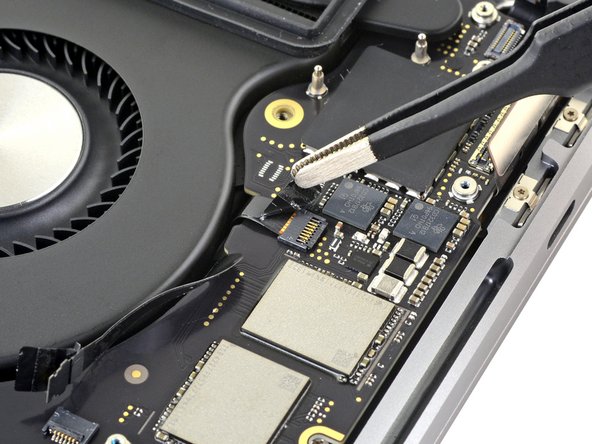
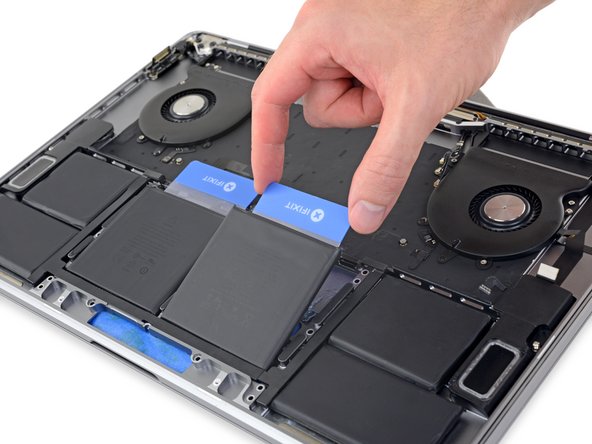
バッテリー付近のロジックボード端にあるバッテリーボードを覆っている絶縁ステッカーを剥がします。
-
カバーが簡単に剥がれない場合は、iOpenerやヘアドライヤーもしくはヒートガンを使って温め、接着剤を柔らかくしてから再試行してください。
-
-
-
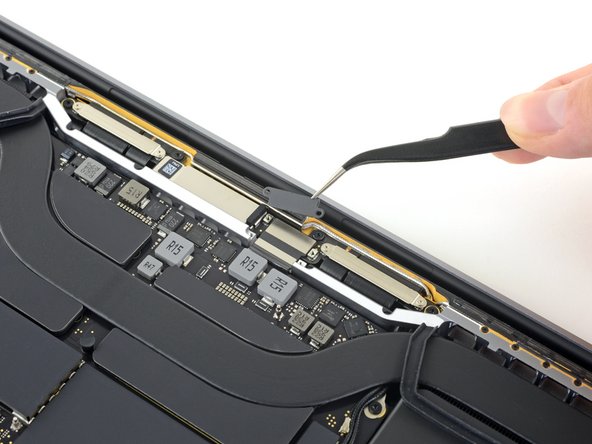
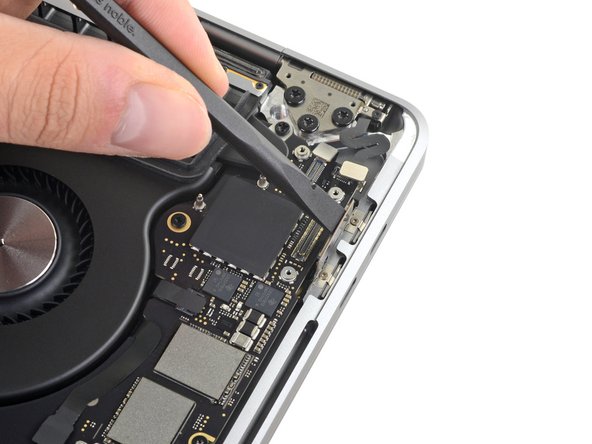
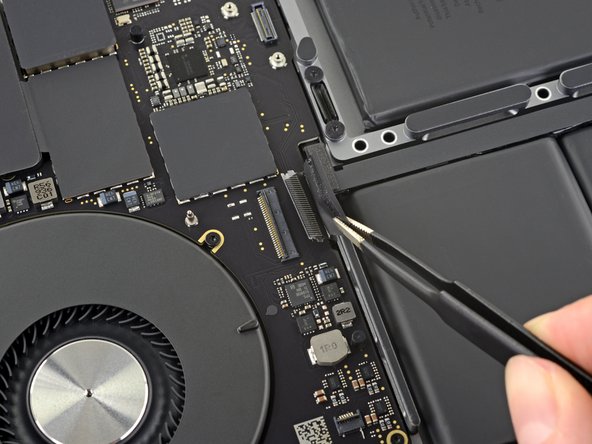
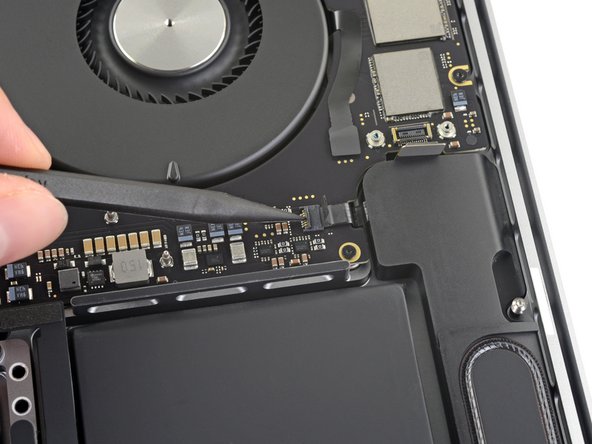
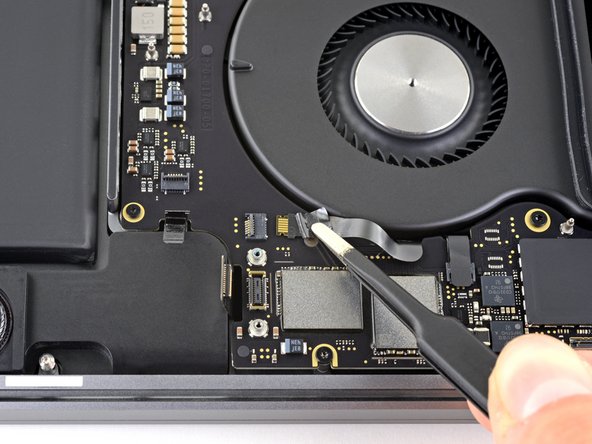
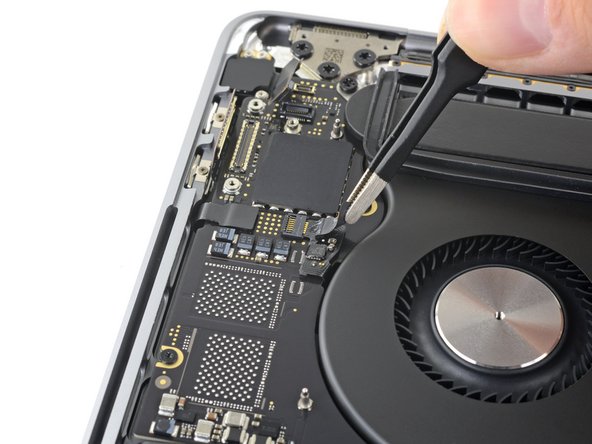
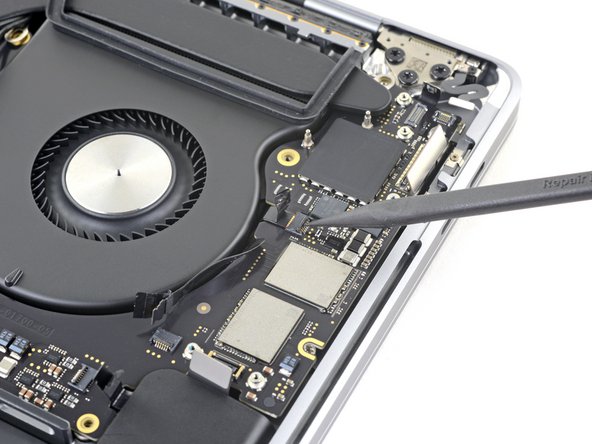
バッテリーボードのデータケーブルコネクタを覆っているテープがあれば剥がします。
-
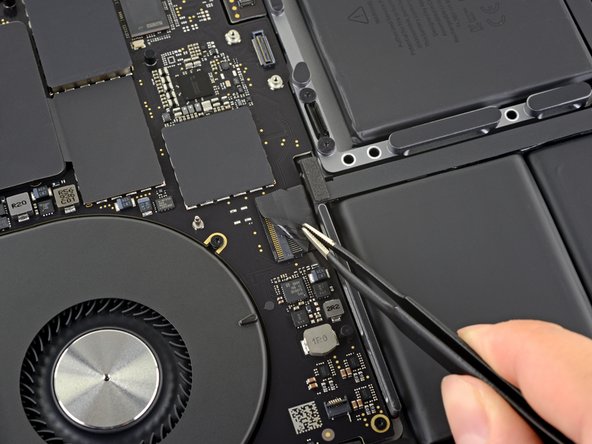
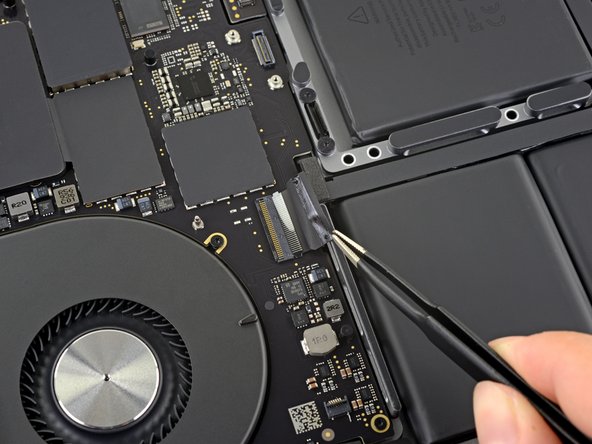
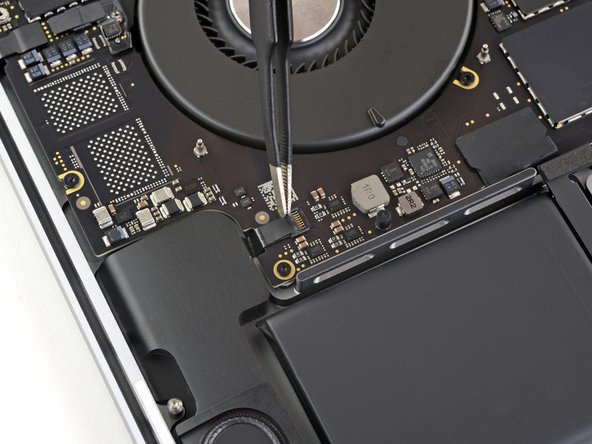
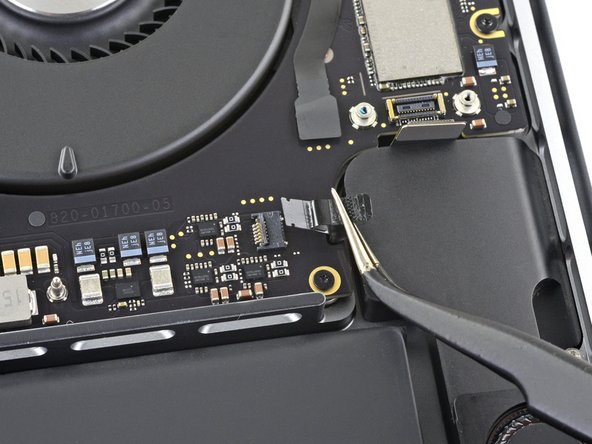
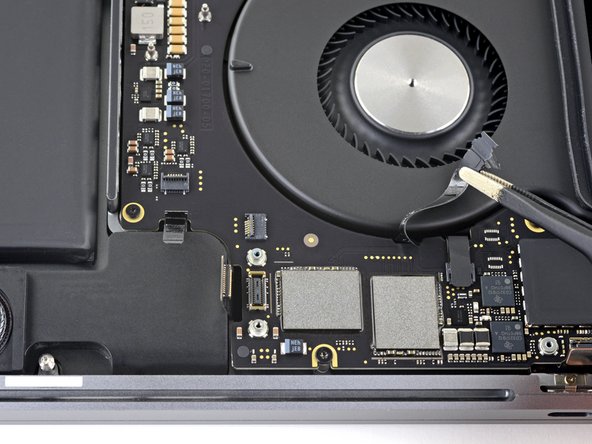
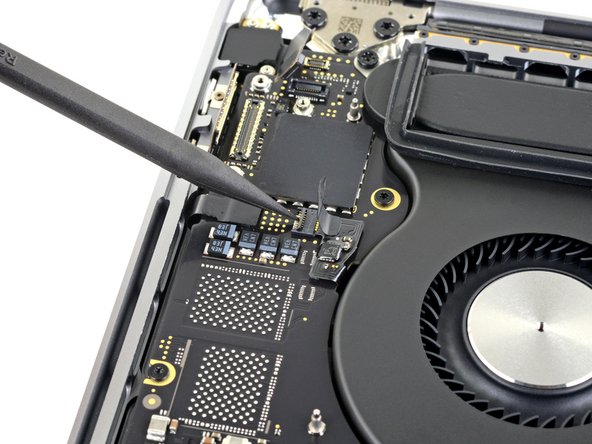
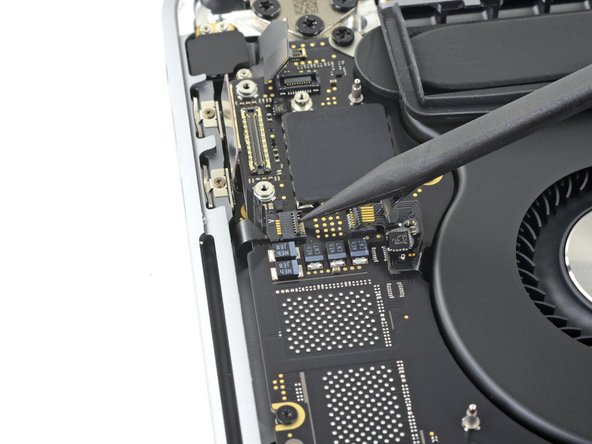
バッテリーボードのデータケーブルの反対側先端にある、コネクタ上の固定フラップの接続を外します。
I’ve seen versions of this battery board that the cable goes around and to the back of the board, so this step is not always necesary.
-
-
-
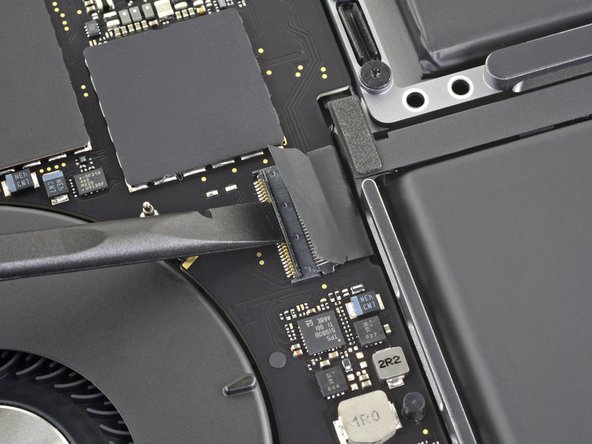
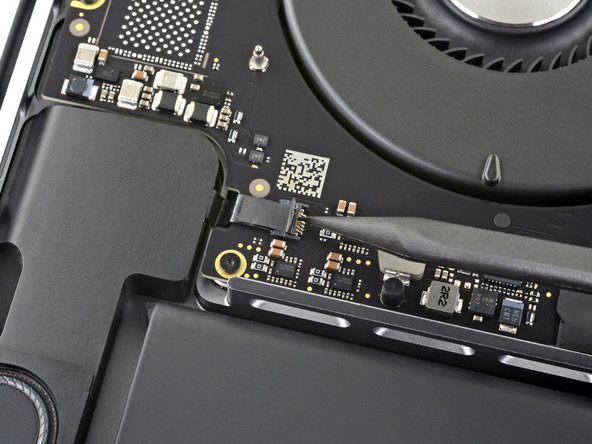
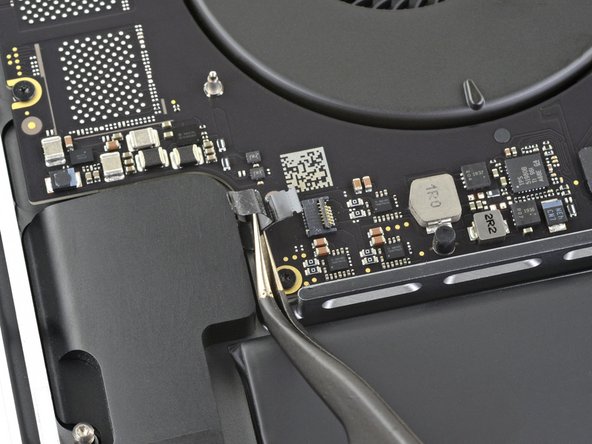
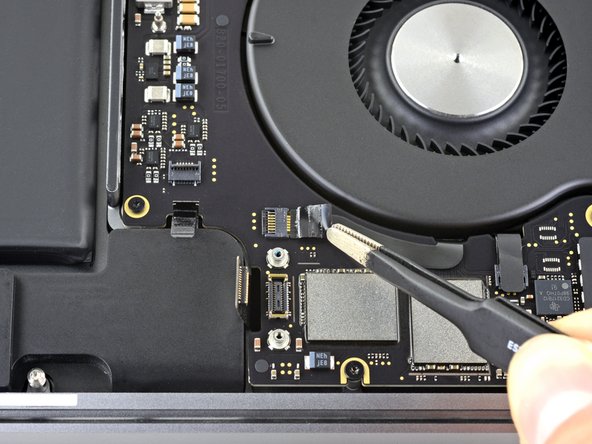
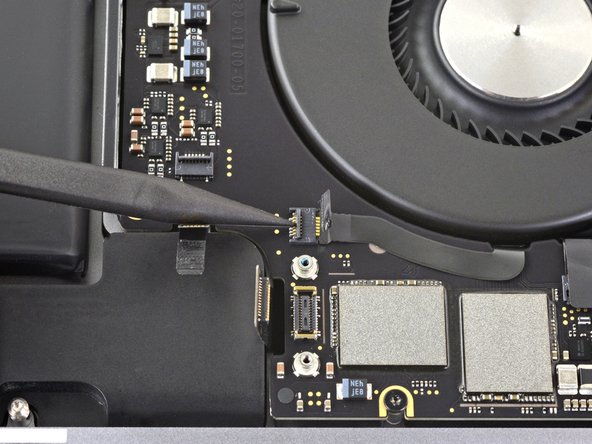
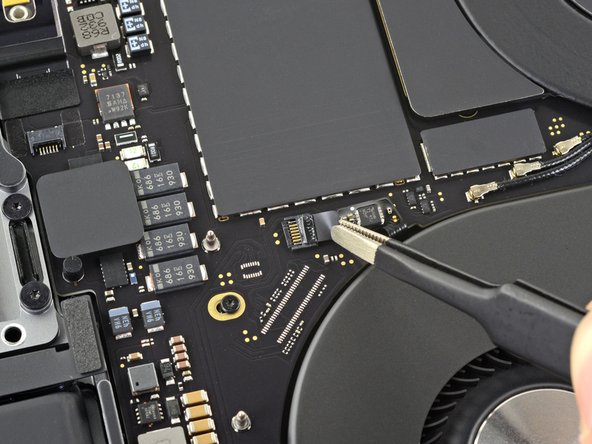
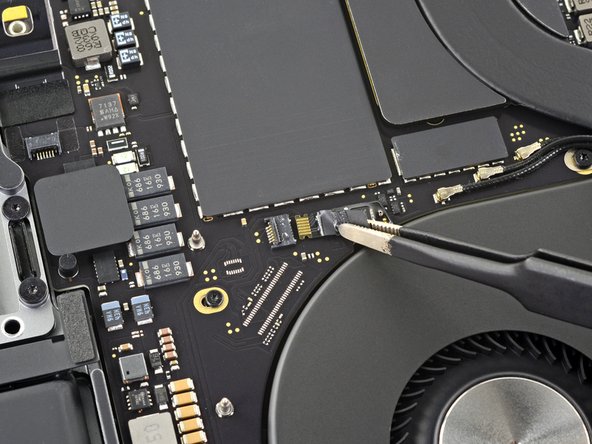
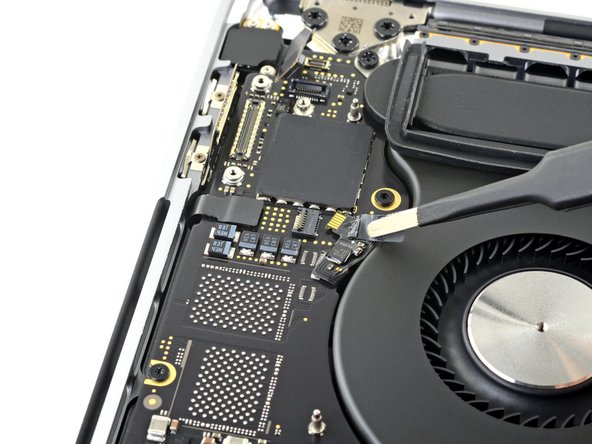
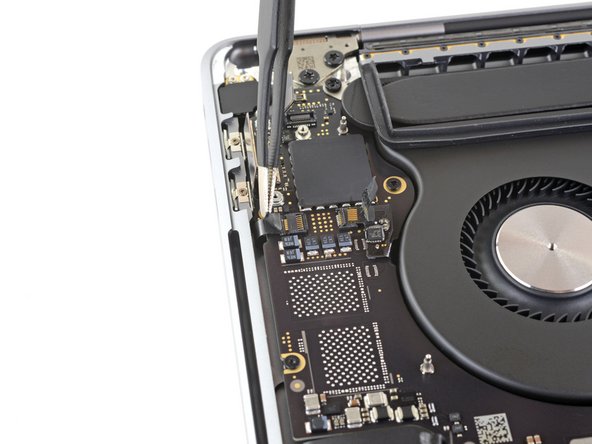
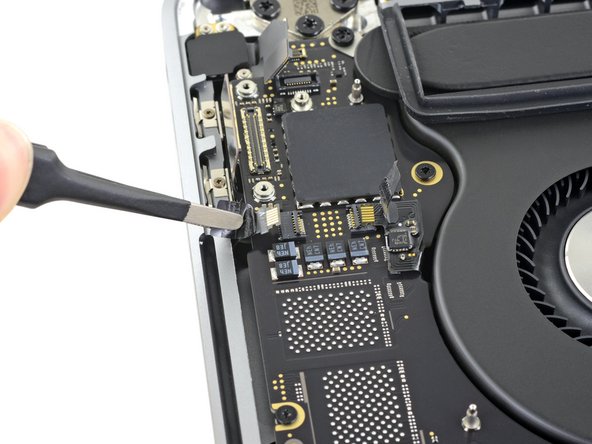
バッテリーボードのデータケーブルをバッテリーボード上のソケットからスライドして、完全に取り出します。
I’ve seen versions of this battery board that the cable goes around and to the back of the board, so this step is not always necesary.
Putting a mark on the cable will be helpful when reinstalling so you don't put it backwards or upside down.
maccentric - 返信
This isn't necessary for many repairs, such as the Screen Replacement. I just lift the cable out of the way enough to do the next few steps and leave it attached.
maccentric - 返信
-
-
-
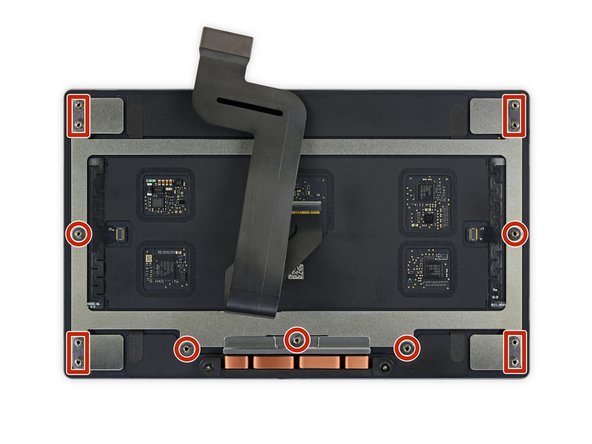
T3トルクスドライバーを使って、キーボードとトラックパッドケーブルのコネクタを固定している1.8 mmネジを2本外します。
-
ブラケットを外します。
-
-
-
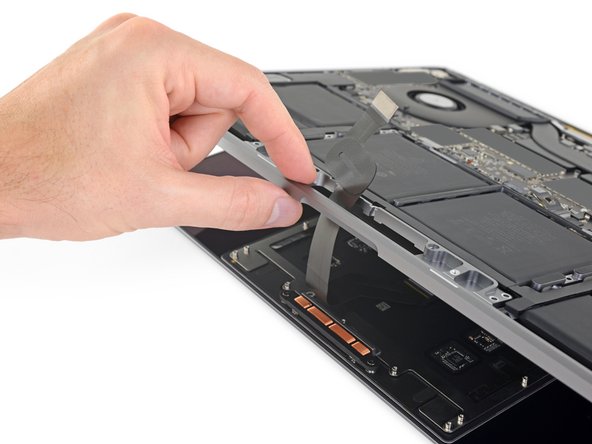
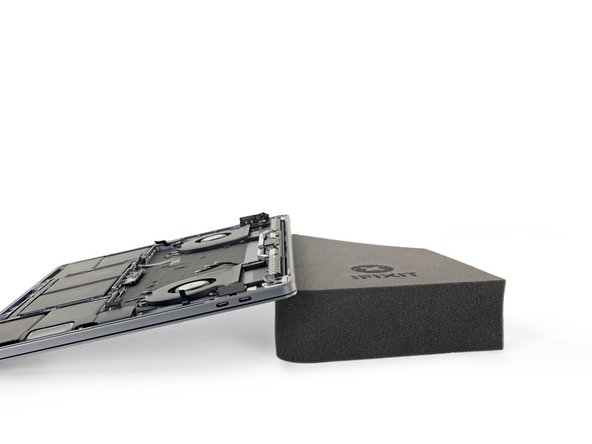
ディスプレイを少し開き、MacBookを逆さまにしたままにします。トラックパッドアセンブリが分離し、ディスプレイの上に平らに置かれるはずです。
-
トラックパッドのリボンケーブルを慎重にシャーシのスロットに通します。
-
-
-
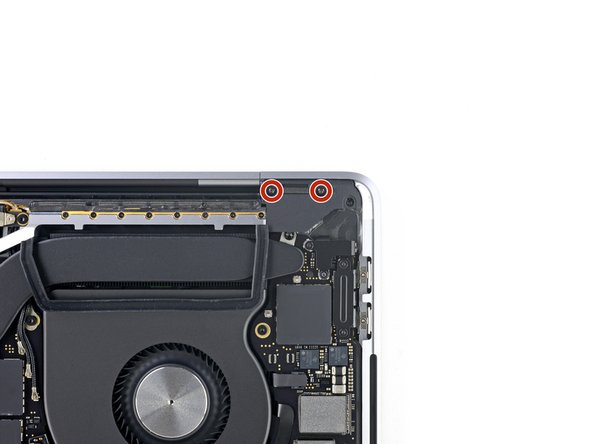
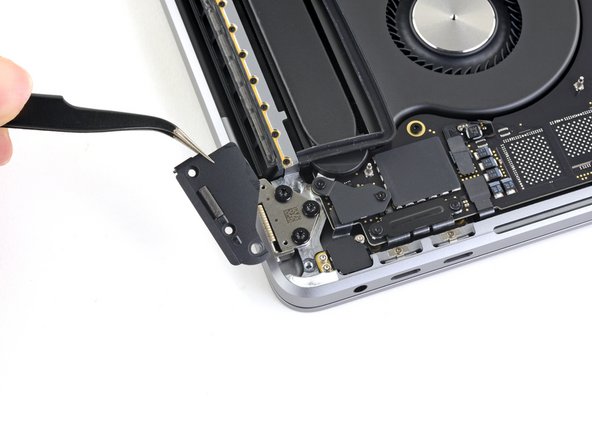
T3 トルクスドライバーを使用して、ディスプレイボードフレックスケーブルを固定している2つの3.5mmネジを外します。
-
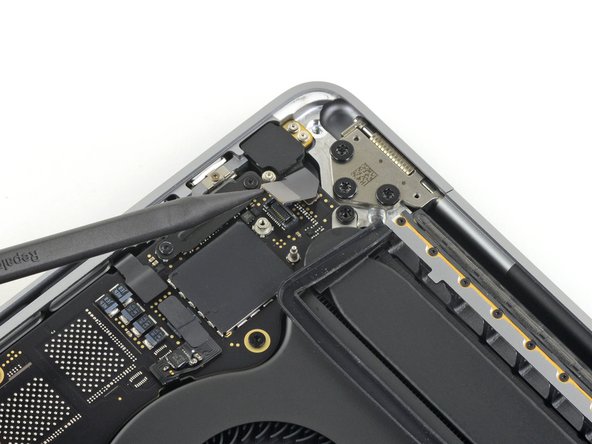
ディスプレイボードフレックスカバーを取り外します。
If you're familiar with repairing, you do not need to do a complete tear down, you can skip from here to step 63 and just loosen (or you can remove) the Three 3.3 mm T3 Torx screws (red) and the T5 screw (Yellow)below the left fan and slightly lift the logic board enough to slide out the battery board cable from under the logic board.
-
-
-
T3 トルクスドライバーを使って、4つの2.0mmネジをヒンジカバーから外します(左右に2つずつ)。
Bonjour @amaury29177 Merci de remarque. Vous avez l'œil ! J'ai corrigé l'erreur. iFixit étant un wiki, je vous invite à faire la correction de votre côté s'il vous arrive de trouver une autre erreur :) Excellente journée et merci encore !
-
-
-
-
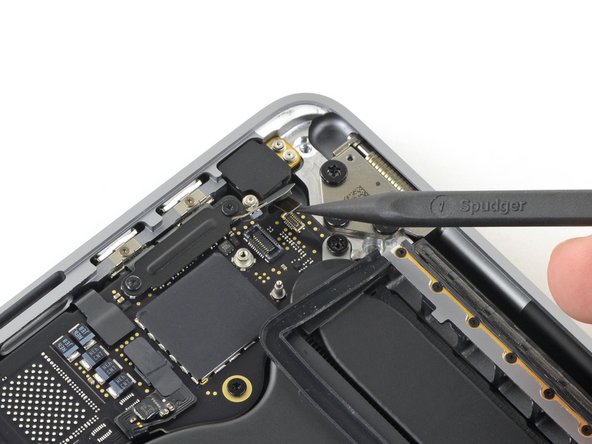
T3 トルクスドライバーを使ってTouch IDとヘッドフォンジャックを覆っているブラケットの2つの2.4mmネジを外します。
-
ブラケットを取り外します。
-
-
-
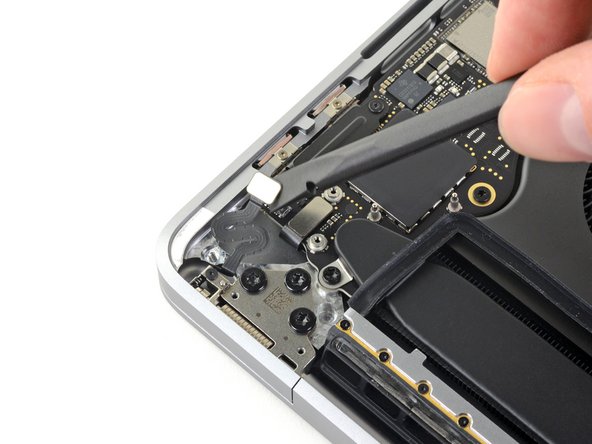
T3トルクスドライバーを使って、Touch Barディスプレイケーブルコネクタ用のブラケットを固定している1.9 mmネジを2本外します。
-
ブラケットを取り出します。
-
-
-
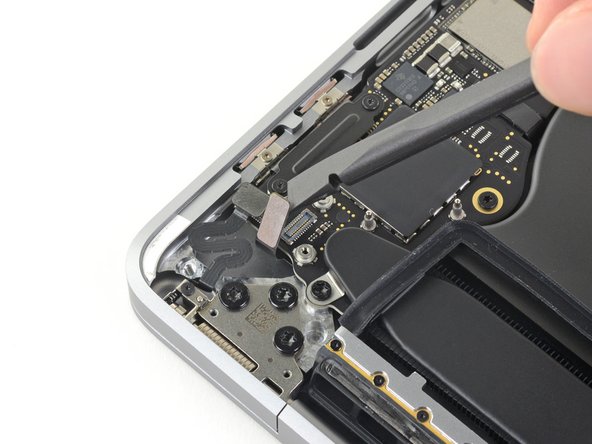
T3トルクスドライバーを準備します。
-
左側のTunderboltフレックスケーブルを固定している1.3 mmネジを2本外します。
-
右側のThunderboltケーブルカバーを固定している1.3 mmネジを2本外します。
-
-
-
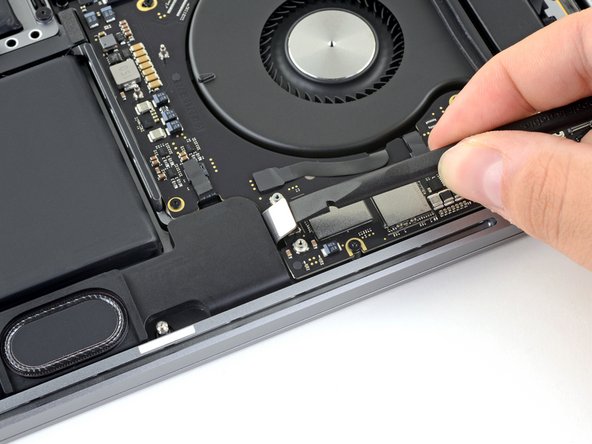
キーボードバックライトのZIFコネクタの固定するフラップを、ロジックボードからまっすぐ上にこじあけ、開きます。
-
-
-
3本全てのアンテナケーブルをソケットからそれぞれまっすぐ持ち上げて、接続を外します。
-
スパッジャーの平面側先端もしくはピンセットを各ケーブルの下にスライドさせて、ソケット付近に近づくまでスライドします。それからケーブルをゆっくりとひねり上げる、もしくはこじあけて、接続を外します。
One tip to make logic board removal and replacement easier, is to carefully tape all the flexes back out of the way. This makes it a lot easier, trust me. Paul Daniels of FlexBV fame taught me this https://pldaniels.com/flexbv/ See photo of taped back flexes here https://i.imgur.com/eriX0KV.jpg
-
-
-
ロジックボードアセンブリを固定している11本のネジを外します。
-
3.3 mm T3トルクスネジー3本
-
3.6 mm T5 トルクスネジー2本
-
2.9 mm T5トルクスネジー4本の
-
4.0 mm T8トルクスネジー1本
-
4.0 mm T8トルクスネジ(大型ヘッド)ー1本
-
-
-
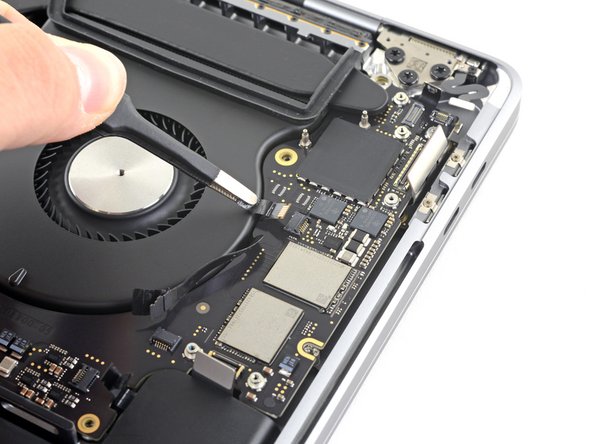
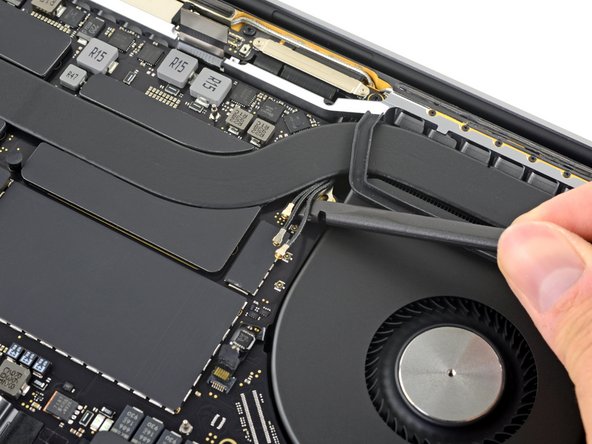
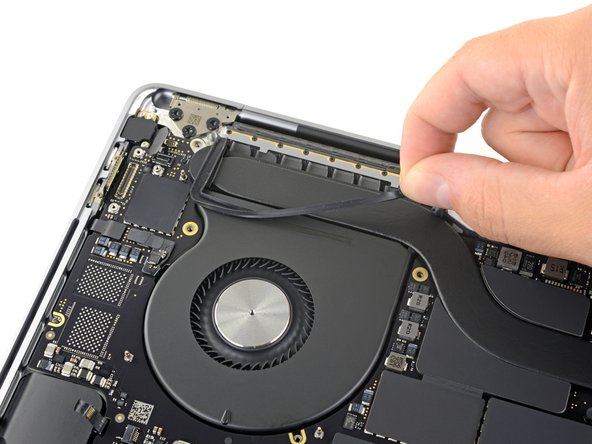
振動減衰ゴムのストリップをファンに固定している接着剤から剥がします(ただし、外さないでください)。
-
必要に応じて、iOpener、ヘアードライヤー、ヒートガンなどで軽く熱を加え、粘着剤を柔らかくしてダンパーを分離しやすくしてください。
-
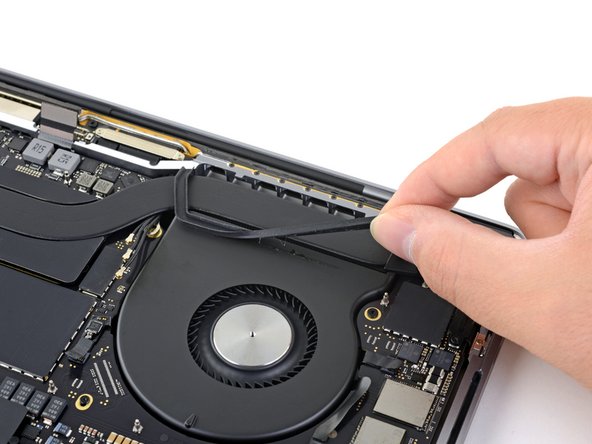
反対側のファンのもう片方の接着ストリップも同じようにします。
-
-
-
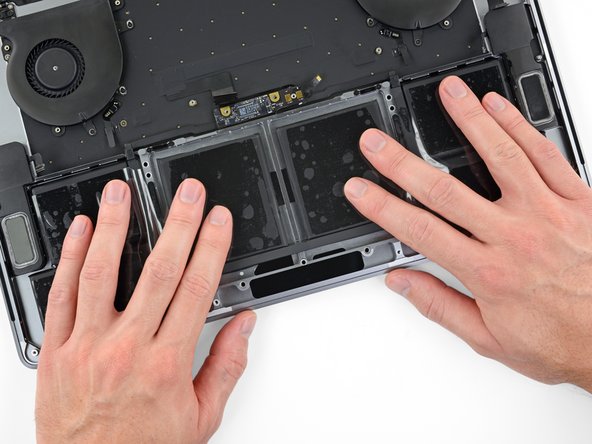
アンテナケーブルの束をロジックボードとヒートシンクの隙間に通し、正しく並んでいることを確認しながら、ロジックボードを所定の位置に下げます。
-
基板を取り付ける際に、ケーブルが基板の下に挟まっていないことを確認してください。15個のマークされた場所をそれぞれ注意深くチェックしてください。
One tip to make logic board removal and replacement easier, is to carefully tape all the flexes back out of the way. This makes it a lot easier, trust me. Paul Daniels of FlexBV fame taught me this https://pldaniels.com/flexbv/ See photo of taped back flexes here https://i.imgur.com/eriX0KV.jpg
So easy to refit the logic board with all the flexes taped back out of the way. The only way to go IMO https://i.imgur.com/1fiRGhe.jpg
-


デバイスを再組み立てする際は、これらの手順を逆の順番に従って作業を進めてください。
e-wasteを処理する時は、認可済みリサイクルセンターR2を通じて廃棄してください。
修理がうまく進みませんか?トラブルシューティングのヘルプはこのモデルのアンサーコミュニティを参照してください。
デバイスを再組み立てする際は、これらの手順を逆の順番に従って作業を進めてください。
e-wasteを処理する時は、認可済みリサイクルセンターR2を通じて廃棄してください。
修理がうまく進みませんか?トラブルシューティングのヘルプはこのモデルのアンサーコミュニティを参照してください。
45 の人々がこのガイドを完成させました。
以下の翻訳者の皆さんにお礼を申し上げます:
100%

これらの翻訳者の方々は世界を修理する私たちのサポートをしてくれています。 あなたも貢献してみませんか?
翻訳を始める ›


30 件のコメント
Amazing. This is truly thorough, and as soon as this battery starts to fail, will come back here. Nice work documenting a whole assembly line.
If I want to replace my fans, it looks like I can follow this guide to step 66 and then just figure it out from there? Is there a guide somewhere on this? Thanks!
You can do as you wrote for replacing only the fan. Ther’s nothing more to know about it.
I see that the MacBook Pro 13 logic board remains in place in iFixit battery replacement guide. Is there any reason why in the MacBook Pro 16 the logic board cannot remain in place while removing and reinstalling the battery?
Yes, there are two battery cables running under the logic board, clearly visible at step 68. No way to put the battery back with the logic board in place.
I recently did the 15” 2017 Macbook Pro battery replacement and that seemed more difficult than this one due to the speaker connectors. In my opinion, this 16” replacement can be marked as Moderate.
Because the battery connector is underneath the logic board here.
Peter H -
Great guide! Wow! Definitely not for the faint of heart! Thanks Carsten!
This is definitely a difficulty repair. I caused some damage to the speaker, likely while trying to get the battery out. (Luckily, that will be a very simple repair)
I definitely recommend double checking that you have all right screwdrivers, scrapers/spudgers, adhesive dissolvers, screw locker and a tray with lots of compartments to keep everything organized. I have done multiple complex repairs of mac laptops in the past including screen replacements, logic board replaceements and other battery replacements and this was the most difficult. I am very glad future generations included pull tabs for the adhesive.
Thanks for the guide!
FWIW I skipped about half the steps, and used spudgers to angle the motherboard up, in order to remove the battery. I'll list the steps I followed below:
1-21
27-29
35-36
41-49
53-54
61
63
68
I use 99% isopropyl alcohol, and an ifixit plastic card to cut through the battery adhesive. TBH that was the most time-consuming part, because I like to let the alcohol melt the adhesive a bit before cutting, in order to minimize the amount of pressure I have to apply.
The reason I skipped a lot of steps is to minimize risk, and also to save time. Thankfully the battery ribbons were easy to slide underneath the board, once the board was angled up a bit.
What a nightmare... There's no way this wasn't done in purpose.
2 years in and the battery's already dead. That's insane.
This took longer than expected due to the logic board removal, but wasn’t too difficult and everything went to plan.
Note that you need to be REALLY careful with the ZIF connector latches like on the battery board and logic board, they are very fragile and I had to re-attach the latch for one of them.
OMG!! I did not know that the process to change out the battery on the 2019 MBP was so intense. My old 2009 MBP was "cake walk" compared to this. Thanks for the HOW TO
For Step 16:
What does "damage" mean in this case? I have one of these that I was attempting to clean, so I lifted the battery power connector up, but I can't swear it didn't make contact. When I was trying to lay it down flat I thought it would stay flat until I put the screw in, but it popped back up a short way. I then held it down & put the screw it - now my MBP isn't powering on. Did this damage the logic board?
Nevermind my prior; took it to a local shop & they said it has liquid damage on logic board. Sending back to seller.
Woo hoo! Just finished. I don’t know who could do this battery repair on the quicker side of that range—mine took over 5 hours. Granted, I also redid the thermal paste on my CPU and my GPU. In addition, the old battery was really stuck in there, so that took extra time. Nonetheless, now I have more experience and, no need to buy a new computer ! Thanks, iFixIt !
Carsten did an excellent job in providing the correct information to do the job. But let us ALL NOT FORGET, this convoluted way of replacing a battery (something that would be considered a common and ordinary everyday routine need) is Apple's good faith attempt at preventing the everyday consumer from replacing their own battery in their own device. Take for example myself when it takes 80+ steps to change a battery, and provided I were wealthy, I'd have someone replace the battery for me. Not everyone is wealthy or similarly situated. Make sure you don't forget to encourage your elected officials in the U.S. Congress to vote to allow us Americans our right to repair our devices ourselves without long, drawn out, encumbering, and convoluted ways of doing it. Can you imagine how blinded in the night we would be if we had to go through all this just to change the batteries in our flashlights? We're no longer in the dark ages. I for one, am not prepared to go back even if Apple likes it or not.
Is there a way to replace the battery without removing everything? I can just slide the big battery out of my Dell Latitude E6500 and pop another one in. However, can I replace the battery in my 2019 MBP 16" without having to remove everything?
The repair guide is awesome. Unfortunately, replacing the battery didn't bring the machine back to life. Sadness!
But the repair guide was great. I felt very confident throughout.
Same with me. Did you figure out what was wrong with your machine? Replacing the battery was my best guess at what was wrong with my machine and now I'm stuck. Hopefully you had some luck diagnosing your issue?
Josef A -
Excellent guide
If I replace the battery, why coconut tool said that the manufacture date is 2013-03-18, is that normal?
So I just completed the whole sequence and everything went fine, really really well done Carsten! Only thing that went wrong is minor but still annoying: it seems I broke the left keyboard backlight cable. What to do in such a case?
Little extra onfo: I can't seem to find that part anywhere, and I can see the ribbon is slightly ripped in its angle, which must have happened when I put the logic board back in place. I can live without it, but it is strange having a keyboard lit only on one side... so any hint will be appreciated.
Yann,
Thank you for the kind words! Unfortunately, the keyboard, keyboard backlight, and their cables are integral to the laptop's upper case.
So thankful for this guide. Was able to resurrect an old unit that was collecting dust. Knew issue had to be the battery. Yes, a lot of steps; though, followed closely, you will succeed!!
3hours, with precaution and coffee time. All step are not so complicate. The unique attention is for the batterie removal. And cleaning step. So thanks for this tutorial.
Really thank you Carsten for this majestic guide, but shame on Apple for doing this job. I spent like 8 hours for doing everything (I know, I'm quite slow) and I even punctured the old battery while using the plastic card. I was a nightmare.
Hopefully, we will have easy-to-replace batteries by 2027 thanks to the European Union.
Special thanks to the Italian translators too, Grazie!
Do you seriously have to disconnect everything from power before removing the battery or can you just disconnect the battery and replace it with a new one? That just seems excessive.
But if their is a reason, I’d love to know
Is this step necessary? I can’t perform this step as I am attempting to repair water damage and need to remove logic board & most likely replace the battery.
Macrepair SF - 返信
@mac_medic You definitely don’t want the power coming on while the board is wet. In your case, I think powering on the machine to disable Auto Boot would do more damage than it prevents. I agree, skip this step and be prepared to disconnect the battery quickly if the laptop automatically powers on. Good luck!
Jeff Suovanen -
Thats right! You don't want power running while working on your logic board.
Dan -
This did not work when running High Sierra.
Kyle B - 返信
Tried this on a 2018 MBP 13” Touchbar (there’s no iFixit guide for this model yet). Need to replace a broken screen.
Luckily I managed to connect to an external screen (Cmd-Down Brightness to switch displays) and enter above command. Seems to work, but there’s another problem with this model - it powers up as soon as any key is pressed……. ffs <gnashes teeth>
Cool_Breeze - 返信
I unscrew the battery first and wrap electrical tape over the logic board battery connector before attempting any repairs to the board. Haven’t had any problems yet and I’ve worked on about 10 of these models already. Also when you open the bottom case use a suction cup at the bottom and pull up then run a plastic spudger along the edges to disconnect the clips. Also only use a plastic spudger on the board. Saw a youtube video from a repair shop and he did not disconnect the power and used all metal tools during the entire process of removing the board. His last step was to disconnect the battery terminal.
Brian - 返信
Is this step necessary if my mac can turn on? Battery fully dead(
Nursat b - 返信
BEFORE YOU START: The included torx head stripped off before I was done (and you might need an additional T4) so stop now and go buy a good one. Also they fail to warn you above to get some blue threadlocker ahead of time.
Jason Sherron - 返信
This command did not work for me and I read that sometime in later 2020 Apple stopped this command from working…any ideas on a work around?
Patrick Machacek - 返信
Not able to do that with damaged screen
richardjgreen - 返信
If you have a damaged screen you can still use a converter from thunderbolt (USB 3) to HDMI and plug your Macbook Pro to your TV as monitor display. Just make sure to chose the right Source (HDMI IN) in your TV. I did it and to make it work I unplug and plug again in my Macbook and so I could disable the Auto boot
Roberto Sanchez Bustos -
Hi. This does not work on 2018 13” MacBook Pro with Touch Bar. I did exactly this to disable auto boot. But when I check by using nvram -p it says: auto-boot true. Am I doing something incorrectly? I did everything step by step. Copied and pasted the sudo command, pressed enter and then entered my password. I have Big Sur 11.1 installed. Is there any other way since I need to replace the screen. Thank you. Adrian
Adrian Vizik - 返信
Hi everyone. This is also a little pointless if you can’t see anything on the screen, and you don’t have a display adapter to USB C to display it. I agree with Brian about removing the back and disconnecting the battery cable before you even think about opening the lid of the MacBook. Applying the insulation tape is also a handy little tip that just makes sure there is no way to discharge from either the board or battery.
Roberto Enrieu - 返信
running `nvram -p | grep 'AutoBoot'` in terminal verifies that it was accepted
result: `AutoBoot %00`
Marek Polák - 返信
Running Big Sur 11.6.7 on a 2019 16" MBP, it's "auto-boot". So it's:
nvram -p | grep 'auto-boot'to display the current state, the default istrue- and then to change it,sudo nvram auto-boot=falsewhich turns it off.Ed Mechem -
This step is completely unnecessary if you follow the guide to disconnect the battery properly. Just put some tape between the battery and logic board connection to prevent it from accidentally touching and therefore powering on the laptop.
Grant Ormsby - 返信
It took me a few tries to make this command work, as I was able to copy and paste the command into Terminal, but could not type in my laptop’s password. I finally typed my password into a text document, copied it (command C), and then pasted it into Terminal and it worked.
tommy404 - 返信
I didn’t do this. Mine never auto-booted before I replaced the battery. Now it does.
hatuxka - 返信
BEFORE YOU DO ANYTHING - CHECK THE BATTERY!
I-fixit sent me a bad battery, which I didn’t realize until it was already install. They sent me a new one, but I wasted hours uninstalling and reinstalled.
Get a volt meter and measure the voltage on the output of the battery pack. If it reads 0 V, SEND IT BACK. It should read over 2 V.
bcardanha - 返信
I've just received my replacement battery and it reads 0,042V between the two main connectors. Do you think it's dead?
peter sussex -
When I did this from Terminal.app within Recovery Mode, the “sudo” was not recognized but I could invoke it without the sudo part. It seems to have been accepted when looking at “nvram -p”
johann beda - 返信
When in Recovery Mode, you already have superuser powers. So you don't need to prefix commands with the sudo command to invoke them with root privileges; you already have them. Do a
pwd(print working directory) after opening Terminal in Recovery Mode, and you'll see that you're in the root user's directory.Ed Mechem -
I received the battery kit for my 2018 MacBook Pro and as per the above comment from bcardanha - Oct 12, 2021, I checked the voltage on the pads marked + and - . It was zero volts so I panicked a bit.
I sent a message on the iFixiT Facebook page and I got no reply. I finally found the customer service email for Ifixit Europe and sent them an email voicing my concern as I was not keen to work for couple of hours just to discover that the battery is faulty. I had an almost instant reply on the email (kudos to them) and they adviced me to go ahead and install the new battery as the voltage measured when battery is not connected is not relevant.
I took a leap of faith and after two hours… the new battery showed 50% charge and everything seems to be working just fine. I am happy it worked.
Mircea Comanici - 返信
After removing the old battery and installing the new battery I powered up the MBP before screwing the bottom on. I discovered the my keyboard would not function. It took a few hours of investigation and frustration that I discovered the track pad power ribbon had become partially dislodged from the trackpad. I was able to see that this through the little machined slot where the battery sat. I had to remove the trackpad to reinsert the power ribbon back into the connector in the trackpad. after reassembling and reinstalling the battery etc the keyboard worked. Just food for thought if your run into the keyboard issue.
Ed Mease - 返信
This should be the default. IMO I tell you to power on - not the lid.
G Sena - 返信
Est ce que cela fonctionne sur un macbook pro 2017 sans touchbar ?
maël muzelet - 返信
Bonjour Maël, oui, ce tutoriel concerne "les MacBook Pro 2016 (et plus récents) et les MacBook Retina 12" 2017 (et plus récents)"
Claire Miesch -
Excellent instructions. I was able to follow and install the new screen. I recommend that you get a good set of tools before you begin. I started with an inexpensive repair kit bought online. The Penta and torx bits failed. I bought an IFIXIT kit with quality bits and I was able to do everything I needed.
Tom Markham - 返信
If you're not running an admin account the sudo command won't work (which honestly, you should not be running admin). Rather than logging in to your admin amount via the OS, in the terminal type "login [admin username]," then the password and you'll be able to do the sudo command as described above. Once you're complete, type "logout [admin username]" and you'll be good to go. Obviously replace [admin username] with whatever the account name for your admin user is.
arichard2401 - 返信
For those unable to complete this step because the screen is too damaged I recommend leaving your macbook on until the battery dies.
Nicholas R Licato - 返信
Just replaced my 2018 15" MBP battery. Running Sonoma.
I found no way to disable AutoBoot (The status can be checked in the Power section of system report).
Anyway, i left my battery completely drain before opening the MBP, and had no issues during the process.
Cédric Bontems - 返信
After sending this command in terminal when I checked what happens if I now open the lid, instead the screen lit slightly up (still black) then a battery symbol showing the charging state showed up.
Now, after replacement of the battery, this is all I get to see.
No reset of NVRAM nor PRAM helped.
Currently the new battery charges (58% atm) and it feels like it‘s mocking me.
webrockers - 返信
I suspected the keyboard or TouchID sensor wouldn’t work, so I went on and checked every connector.
I missed connecting the left TouchID sensor from step 31.
webrockers -