はじめに
MacBook Proはディスクを読み込みませんか?このガイドを参照して、壊れた光学ドライブを交換しましょう。
必要な工具と部品
-
-
バッテリ上端の、2本のペンタローブネジを外します。
Question: why do you remove the battery? According to Apple's official manual, this is not required (not for the mid-2009 and not for the mid-2010 15-inch MacBook Pro) - see pages 37 ff:
alexkliからの引用:
Question: why do you remove the battery? According to Apple's official manual, this is not required (not for the mid-2009 and not for the mid-2010 15-inch MacBook Pro) - see pages 37 ff:
I'm interested by your experience.
Did you have removed the optical drive without removing the battery ?
I'm just in this step now and if it is possible I would proceed like you because removing the battery void the warranty (and there is a sticker).
Thanks in advance.
Looks like my note to step 3 appears on all repair guides that have the same step. I meant that in the context of the hard drive replacement only.
Did you have removed the optical drive without removing the battery ?
I haven't yet done anything, waiting for my MacBook Pro 15 inch mid-2010 to arrive.
I missed the notes and went ahead and purchased the 5 point driver for the battery before I realized it was not necessary.
I've edited the repair guide to remove the section on the battery, but I don't have the points to approve the changes.
Please note - the step about removing the battery is part of a pre-requisite guide, that is used for many of the guides, most that do require removal of the battery. Also, working inside a disassembled laptop with the battery still connected risks damaging/shorting out very expensive parts.
Eric Essen - 返信
Absolutely. To be clear -- ALL of the above discussion is ONLY in reference to replacing the hard drive.
I replaced a hard drive in a MacBook Pro of an earlier model than this without removing the battery. The hard drive wasn't right. It only worked at about half speed, and I had to replace it once more. The second time I removed the battery and all went well. The recommendation by the iFixit staff to remove the battery before working on electronic equipment is a good one.
What is the size of those screws... I have rounded off the socket on mine and would like to replace them.
I measured the screw size, using a micrometer, its about 1.523mm in diameter and 3.186mm in length. Not sure what screw size that is. They are not easily available I guess, unless someone is selling used ones on ebay
-
-
-
バッテリー上部についているプラスチックのプルタブを使って、上部ケースからバッテリーを上へスライドさせてずらします。
My T6 (appears to be same screw driver you have - $6 on amazon for 20piece set) did NOT fit int he battery screws...not sure if I had the wrong screws or what, but I went ahead w/o battery steps and it was pretty easy.
I also noticed that the new SDD (from crucial) didn't have the 4 screws, so I had to move those off the old HD and onto the new one.
Just had the same issue: T6 does not fit the battery screws ;-( ... but with a little bit more preassure it was possible to remove the screws.
-
-
-
バッテリーケーブルコネクターの接続を切る際には、バッテリーを十分に傾けて下に隙間を作ってください。
-
バッテリーケーブルのコネクターをメイン基板のソケットから手前に引いて接続を切り、バッテリーを上部ケースから取り外します。
-
-
-
-
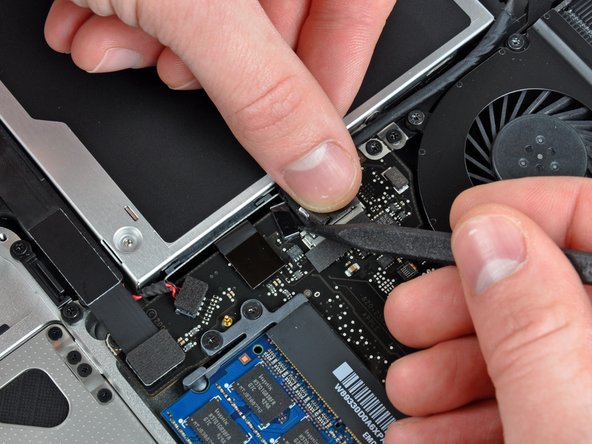
スパッジャーの先端を使用してもう一方の端をわずかに持ち上げ、カメラケーブルコネクタから離れるように回転させながら、1本の指でケーブル保持具の端を押し下げます。
I found it quite easy to carefully remove the drive from under the camera cable without disconnecting it, and guide the new drive back in under. It saved time and the danger of damaging those fragile connectors.
-
-
-
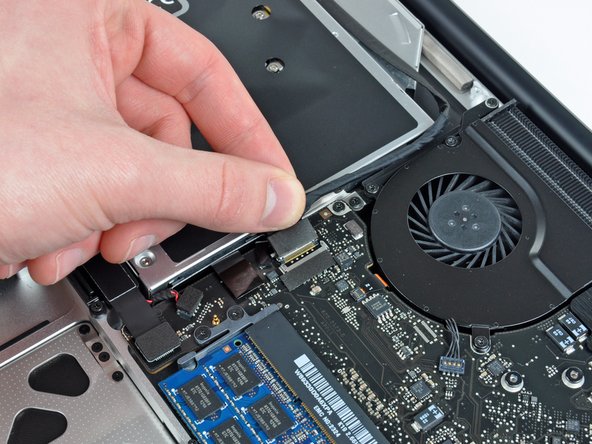
カメラケーブルのコネクタのオスを、ソケットから引き抜いて、接続を外します。
I would recommend leaving the camera cable plugged into the motherboard, and simply sliding the optical drive out from underneath it carefully. If you mistakenly life this connector straight up (as I did) you can damage either the cable connector or the motherboard socket. I damaged the connector on the cable and now the wifi antenna doesn't work. Replacing this damaged cable is about 10X more of a pain (in time and money) than the effort to slide the optical drive out from beneath this cable instead of disconnecting it.
Totally agree here, my wifi card is no longer recognized by the computer. Not sure what to do now.
-
-
-
光学ドライブに固定されたカメラケーブルの接着剤を剥がします。
-
-
-
Bluetoothケーブルのオス先端をソケットからまっすぐ引き抜いて、接続を外します。
-
スパッジャーの平面側先端を使って、ボード上のソケットからBluetoothアンテナケーブルをこじ開けます。
How can I determine if I have an antiglare display?
Thanks!
Dan
If you have the part in step 10, you do. If you don’t, you don’t (looks like pic in step 9).
As already pointed out in a comment to step 8, it is possible to slide carefully out the drive from underneath the bluetooth board without touching it, and to insert the replacement drive in the same way, avoiding to perform this step and the next one.
-
-
-
光学ドライブの外側と上部ケースを固定している、3.5 mmプラスネジを2本外します。
When installing the HD bay, the screws here will not go back. Not sure if the bracket/holes are somehow different. After completing the install, everything seems secure. Does anyone think not having these screws is critical beyond securing the drive?
-


デバイスを再度組み立てるには、この説明書の逆の順番で組み立ててください。
デバイスを再度組み立てるには、この説明書の逆の順番で組み立ててください。
49 の人々がこのガイドを完成させました。
以下の翻訳者の皆さんにお礼を申し上げます:
100%

これらの翻訳者の方々は世界を修理する私たちのサポートをしてくれています。 あなたも貢献してみませんか?
翻訳を始める ›

4 件のコメント
My replacement drive had screwholes in slightly different places and a different connector ribbon, but I was able to successfully swap the drive top plate, inner side screw bracket and connector ribbon with the ones from the existing drive.
Replaced the drive. DVD inserts. Drive works. But the DVD won't eject. Seems like the slot in the case and the drive don't align. Any Ideas?
May be helpful to have more distinct colors to identify the different screws.
Victor Caamano - 返信