メインコンテンツにスキップ

MacBook Pro 15" Unibody Mid 2009 Optical Drive Replacement

必要条件のみ
この修理ガイドは、他のガイドの前提条件として使用されます。それ自体は不完全で、単独で使用されることはありません。

必要な工具と部品

  1. MacBook Pro 15" Unibody Mid 2009 Optical Drive Replacement, Optical Drive: 手順 1、 1の画像 1
    • Apple sticks a small strip of clear plastic with adhesive applied to one side to the logic board behind the camera cable connector to keep it in its socket. When moving it out of the way, be sure not to break any surface-mount components off the logic board.

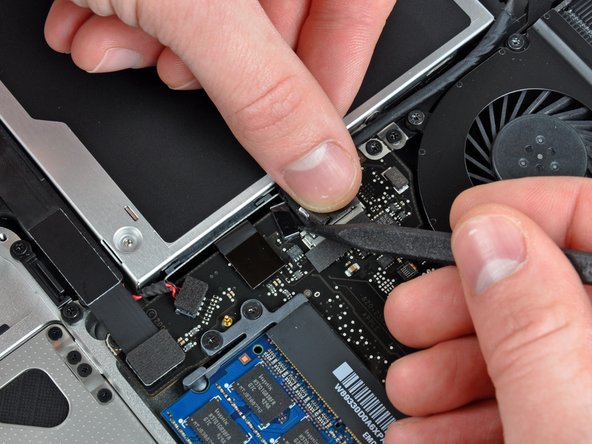
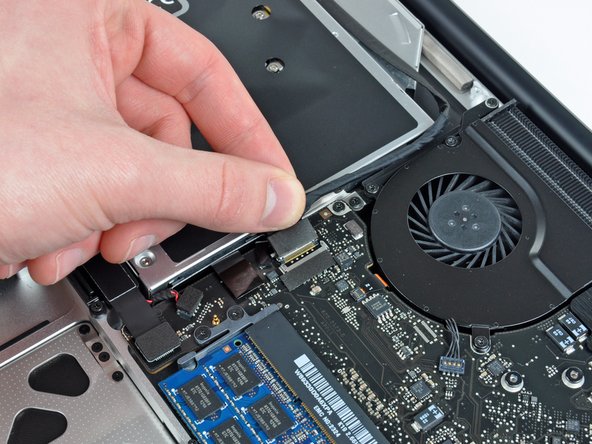
    • Hold the end of the cable retainer down with one finger while you use the tip of a spudger to slightly lift the other end and rotate it away from the camera cable connector.

  2. MacBook Pro 15" Unibody Mid 2009 Optical Drive Replacement: 手順 2、 2の画像 1 MacBook Pro 15" Unibody Mid 2009 Optical Drive Replacement: 手順 2、 2の画像 2
    • Disconnect the camera cable by pulling the male end straight away from its socket.

    • Pull the connector parallel to the face of the logic board, not straight up.

  3. MacBook Pro 15" Unibody Mid 2009 Optical Drive Replacement: 手順 3、 1の画像 1
    • Peel the camera cable off the adhesive securing it to the optical drive.

  4. MacBook Pro 15" Unibody Mid 2009 Optical Drive Replacement: 手順 4、 2の画像 1 MacBook Pro 15" Unibody Mid 2009 Optical Drive Replacement: 手順 4、 2の画像 2
    • This step is only required if you have an anti-glare display. If you have a glossy display, skip this step.

    • Disconnect the Bluetooth cable by pulling the male end straight away from its socket.

    • Pull the connector parallel to the face of the logic board, not straight up.

    • Use the flat end of a spudger to pry the Bluetooth antenna cable from its socket on the board.

  5. MacBook Pro 15" Unibody Mid 2009 Optical Drive Replacement: 手順 5、 2の画像 1 MacBook Pro 15" Unibody Mid 2009 Optical Drive Replacement: 手順 5、 2の画像 2
    • This step is only required if you have an anti-glare display.

    • Remove the two 8 mm Phillips screws securing the Bluetooth/camera cable retainer to the upper case.

    • One of the screws may remain captive in the Bluetooth/camera cable ground loop. If replacing the display, be sure to transfer this screw to the new unit.

    • Lift the Bluetooth board/cable retainer assembly out of the upper case.

  6. MacBook Pro 15" Unibody Mid 2009 Optical Drive Replacement: 手順 6、 1の画像 1
    • Use a spudger to pry the optical drive connector straight up off the logic board.

  7. MacBook Pro 15" Unibody Mid 2009 Optical Drive Replacement: 手順 7、 1の画像 1
    • Remove the single 3.5 mm Phillips screw securing the inner side of the optical drive to the upper case.

  8. MacBook Pro 15" Unibody Mid 2009 Optical Drive Replacement: 手順 8、 1の画像 1
    • Remove the two 3.5 mm Phillips screws securing the outer side of the optical drive to the upper case.

  9. MacBook Pro 15" Unibody Mid 2009 Optical Drive Replacement: 手順 9、 1の画像 1
    • Lift the optical drive from its left edge and pull it out of the upper case.

終わりに

To reassemble your device, follow these instructions in reverse order.

作成者

3人の作成者と共同で作成されました。

Andrew Bookholt

586,236 ポイント

619のガイドは作成済み

0 件のコメント

コメントを追加

統計データ:

過去 24時間: 0

過去 7 日: 0

過去 30 日: 0

今までの合計 783