はじめに
充電に支障がありますか?このガイドを参照して、故障したMagSafe DC-Inボードを交換しましょう。
必要な工具と部品
-
-
-
ヒートシンクが上向きになるようにして、ロジックボードを柔らかい平面上に置きます。
-
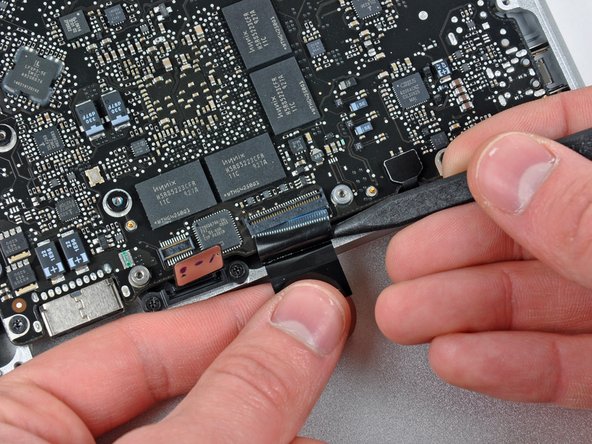
ソケットからDC-Inボードコネクタをまっすぐ引き離して、ロジックボードからコネクタの接続を外します。
-


デバイスを再度組み立てるには、この説明書の逆の順番で組み立ててください。
デバイスを再度組み立てるには、この説明書の逆の順番で組み立ててください。
22 の人々がこのガイドを完成させました。
以下の翻訳者の皆さんにお礼を申し上げます:
100%

これらの翻訳者の方々は世界を修理する私たちのサポートをしてくれています。 あなたも貢献してみませんか?
翻訳を始める ›

11 件のコメント
Great guide. The locking flaps in Steps 18, 21 and 23 are a little hard to decipher in the pictures. I accidentally pulled out the keyboard ribbon cable without unlocking its retaining flap, but I apparently got it in back correctly (after lifting the flap) and didn't break anything because everything works now. This has solved the charging problems I've had for years. I should be able to get a couple more useful years out of this machine now.
Great guide. For my Mid 2009 Macbook Pro, I only had one fan, so didn't have to do step 9 and 10. Also in Step 24 I had 8 3.3mm T6 Torx, not 7. Other than that was perfect!
How long did it take you Anonymous 7084?
Very good guide. It worked out perfectly for me. It takes around 45 minutes to complete.
Question: In My late model 2011 MacBook Pro is the pin port replaceable? The actual pins? It looks from the photo (step 28) as though it is adhered to the board. The receiving pins in the port in my Notebook are burning away and charging plug contact is greatly affected.
Amster Dam - 返信