はじめに
ディスプレイアセンブリ全体ではなく、LCDのみを交換してお金を節約しましょう。このガイドはアンチグレアディスプレイには対応していません。
必要な工具と部品
-
-
ケースを閉じた状態で、平らな作業台の上にUnibodyの上部を下側に向けて配置します。
-
アクセスドアの取り外しラッチの溝のある側を押して、飛び出した側の先端を掴んでください。取り出しラッチを垂直になるまで持ち上げます。
-
-
-
半透明のプラスチックタブを掴んで、バッテリーをUnibodyから引き上げます。
-
ラッチが押されると、バッテリーが所定の位置にロックされます。
Do I need to wait for the battery to charge completely before using the computer (while plugged in)?
No. You do not need to charge it completely before removing it.
-
-
-
下部ケースにカシス(筐体)を固定している次の8本のネジを外します。
-
5.4 mmプラスネジー1本
-
14 mmプラスネジー3本
-
3.5 mmプラスネジー4本
Hi, My name is Jess I need help asap I accidentally dropped my macbook Pro and i cant find the silver screw for the top left back side, Does any one know if I can replace it with an eye glass screw?? If you can help at all Please e-mail me at Chambliss_jess@yahoo.com thx please help me my bf is going off... ;(
The fixit PH00 is the wrong screw driver for this entire job. It did not fit in the screws, it was too pointy and caused screws to be rounded off.
-
-
-
両手を使って、上部ケースから下部ケースを持ち上げて取り出します。
About midway along each edge is a snap. To release each snap, gently slide the flat edge of a Spudger under the lower case, then lift the lower case away.
-
-
-
ケーブルのオス型先端をまっすぐソケットから光学ドライブの開口部分に向けて引っ張り、接続を外します。
-
カメラデータケーブルを光学ドライブのチャンネルから巻き戻します。
I have a problem with previous made unprofessional teardown of this mac, and the port that the camera cable is connected to, on the m-board, is cracked, because somebody pulled it straight up .. can someone please, share an idea about the way of fixing it, or maybe a name of the part i need ?
-
-
-
カメラケーブルのブラケットと上部ケースを固定している2本のプラスネジを外します。
-
カメラケーブルのブラケットをカメラケーブルから外して、デバイスから取り出します。
For reassembly, it would improve the instructions to note the exact orientation of the camera cable, as well as the LVDS cable, in these steps (7-10). This avoids confusion as to where those cables go when the display is reattached (working steps 11-13 in reverse).
As viewed from the orientation of the laptop at this point (looking into the motherboard from the underside), these cables are routed ABOVE the mounting plates for the hinges.
Viewed from the front of the machine (as it would be sitting on the desk in front of you during normal use), they are routed BELOW those plates.
-
-
-
上部ケースにディスプレイの左右サイドを固定している6 mmトルクスネジを各2本ずつ外します。(合計4本)
Ccouldn't make it past step 10 as the two T6 screws on the right stripped. I was using the correct tool, correctly seated, but the screws were simply unwilling to turn and the screw head gave out before they turned at all. The ones on the left came out alright, but there seems to be some type of thread glue on them. Recommendations on how to break that seal without stripping the screw heads might be a good idea. Otherwise - be forewarned.
I have the same problem with step 10. Can't remove the screw on the left, it is all damaged.
Benny Chew - 返信
-
-
-
-
MacBook Proを開口します。そしてディスプレイを垂直に立てます。
-
画像のようにMacBook Proをテーブル上に配置します。
-
ディスプレイと上部ケースを片手で両方を掴み、下部ディスプレイブラケットから6 mmトルクスネジを外します。
Unlock without removing them , the two remaining center 6mm Torx screws securing the display to the upper case.
-
-
-
上部ケースにディスプレイを固定している最後の6 mmトルクスネジを外します。
One of the Torx screws holding the Display in place failed to come out. I tried too hard and it shredded the head of the screw so there was no physical leverage to the screw driver, so I left it to avoid any further damage.
So instead I removed ‘not’the torx screw on the computer but the one on the display itself. There are three on the inner part of the screen, two facing the display and the third on the other side. It sled out easily.
It only added a couple of minutes to my time removing it.
But a word of caution, you must remove the long plastic housing that holds the cables for the iSight and display, just be gentle and slide it off trying not to snag the cables, it should come off easy.
-
-
-
右手で上部ケースを掴んで、ディスプレイの上部に向けて若干ずらします。すると上部ディスプレイブラケットが上部ケースの端から外れます。
-
ディスプレイを上部ケースから少しずらします。
-
ディスプレイを上部ケースから持ち上げて外します。ケーブルやブラケットが絡まないようにご注意ください。
-
-
-
作業を始める前に、ディスプレイガラスを湿らせたリントフリーの布で綺麗に拭き取ってください。こうすることで、吸盤カップが装着しやすくなり、再組み立ての際、汚れチェックが簡単になります。
-
ヒートガンを弱にして、ガラスパネルの上部右側端附近の黒色ボーダーの外側から温めます。
Another caution is needed - the heat gun is capable of discoloring the LCD panel (giving uneven coloration) if it overheats. This is possible on the low setting. Proceed cautiously, heating in increments until the glass releases.
I was wondering the same, is absolutely necessary to disassemble the screen to change the glass? Can I jump to step 21?
caholzmann - 返信
To change just the glass I used a hair dryer it gives off enough heat to do the job. Stand the computer up on its cover with the key board standing up.start at a corner heat the adhesive as you go along. I Put credit cards in as I went along so the adhesive doesn't stick again. take your time . Its easy.
-
-
-
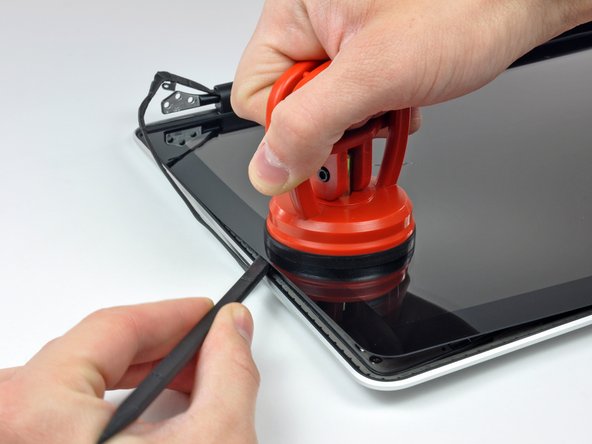
パネルに十分熱が当てられたら、重量用吸盤カップをディスプレイガラスの上部右側端にしっかりと取り付けます。
-
ディスプレイアセンブリからディスプレイガラスをゆっくりと丁寧に引き上げます。
Sufficiently heated is a meaningless phrase here. Is it two minutes? Three? Fifteen? An hour? I have tried doing this for increasing amounts of time while avoiding doing damage to the machine, and nothing is working. Sufficient heating needs definition.
Hi Keith, the key here is that you want to warm the adhesive that's spread thoroughly behind the masked-black area of the glass around the screen to release, but not put enough heat at the rubber gasket that seals the closed top lid to the base. Too much heat, too soon, will deform the rubber. Too much and you'll never get the glass to release. The 2x that I have done this, however, even with sufficient (and significant) heat, I remember the glass taking a surprising amount of leverage to pull clear. A tactic: using your heat gun warm all the sides of the display from the front, in a circulating/racetrack fashion - about 20 rpm. After 30sec, focus on the left and top sides, seesawing from bottom left, to top left, to top right, and back. Do that at the same pace, about 5-10 passes. Then spend about 10 sec waving over the whole top left corner. That should get enough heat to enough places to help the glass separate to start placing picks, and you can continue to heat the margins as you progress.
johnkimmel - 返信
-
-
-
ディスプレイガラスの角を丁寧に持ち上げて、ディスプレイアセンブリとディスプレイガラスの間にスパッジャーを差し込みます。
-
スパッジャーの平面側先端を使って、ディスプレイとフロントガラスを固定している接着剤をこじ開けます。
-
右側上部の角からディスプレイ上部と右側端に沿って、ガラスパネルを約4〜5cm持ち上げて外します。
Be patient and work slowly or else you will crack the glass like me.
I can not get the glass to come up despite two tries and dicsoloring the LCD with too much heat. Why can't I get the glass to budge at all?
bollucks66 - 返信
It is better , instead of using the suction cup , to use small flat end spudger . The suction cup should be used first to detach the window from the gasket , not furthermore as it may brake the glass.
I didn’t have large suction cups and the small ones didn’t work for me. Instead, I used an opening tool to pry up the glass slightly and got a guitar pick under it. Then I slowly worked the pick around the top three sides of the glass, heating sections of glue as I went.
I’ve managed to do it using hair dryer on max. First corner was though and took a lot of time to lift it. I decided to heat not only a corner but whole length and then it came off. I’ve put so much heat that was afraid I’ve damaged LCD, but it works fine. As BillyRachel1 said: patience is the way. In order to assemble it back I used old glue heated again. It’s easy but takes time.
Note: Don’t do this at home if you have cats otherwise you going to spend next hour or so trying to remove their fur from between glass and LCD. It’s because they all levitate after using hot air and just wait to stick to the screen again.
To be honest hardest thing was replacing clutch cover, took me so much time and I eventually cracked it.
-
-
-
ヒートガンを使って、フロントガラスパネルの右側に沿って熱を当て、黒いストリップの下に留められた接着剤を柔らかくします。
-
吸盤カップをフロントガラスパネルの右側沿いに取り付けます。
-
スパッジャーの平面側先端を使ってディスプレイアセンブリの残り部分からガラスパネルを外しながら、パネルを引き上げます。
-
ディスプレイからフロントディスプレイガラスが外れるまで、ディスプレイガラス右側端に沿ってスパッジャーでこじ開けます。
I used old credit cards
-
-
-
これでガラスの上部、左、右がディスプレイから解放されました。ゆっくりとガラスパネルの上部端を持ち上げて、ディスプレイから外します。
If you will be reusing the glass, with new adhesive, then you will want to remove the old adhesive. This is a bit of a pain, as alcohol doesn't work, and you need to be careful to avoid damaging the black screen border, which is black paint on the back (adhesive) side of the glass.
To remove the adhesive, note that it is actually a thin film with rubber cement on both sides. First, use a razor to carefully pull up one corner of the film and gently peel it off of the glass. If you are gentle and slow, the underlying adhesive may also come off; if not, then rubbing with your finger or a hard rubber eraser will do the trick.
If this is a rubber cement based glue, then would rubber solvent / thinner like N-Heptane help the removal process without damaging the black paint ?
Sandman619 - 返信
Don’t remove glue. Just reuse it by heating and sticking it again.
-
-
-
フロントベゼルにLCDパネルを取り付けている2.9 mmプラスネジを6本外します。
Hey guys, I need to get the part where the screws are on, whats its name or where could I find it? That part on my Computer broke.... Do you guys think its possible to guet it somewhere?
-
-
-
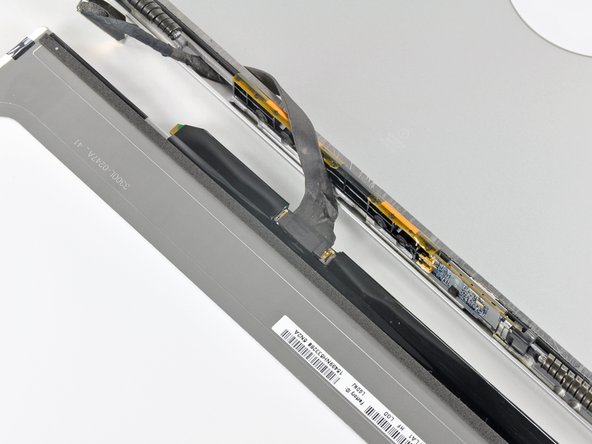
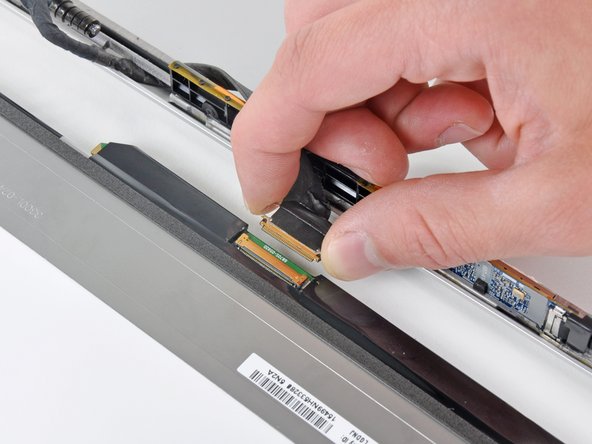
スパッジャーの先端を使って、LCD上のソケットにディスプレイのデータケーブルを固定している薄いスチール製の固定クリップを裏返します。
-
ディスプレイデータケーブルをLCD上のソケットからまっすぐ引き抜きます。
-
LCDをディスプレイアセンブリから持ち上げて、デバイスの脇に置きます。
Danke für das Bereitstellen der Anleitung dadurch konnte ich mein MacBook nach 12 Jahren Einsatz, für die nächsten Jahre fit machen.
Thanks you for providing this Manuel. It helped me, after 12 year of use to make my MacBook fit for the coming years.
-


デバイスを再組み立てする際は、これらのインストラクションを逆の順番に従って作業を進めてください。
デバイスを再組み立てする際は、これらのインストラクションを逆の順番に従って作業を進めてください。
53 の人々がこのガイドを完成させました。
以下の翻訳者の皆さんにお礼を申し上げます:
100%

これらの翻訳者の方々は世界を修理する私たちのサポートをしてくれています。 あなたも貢献してみませんか?
翻訳を始める ›

6 件のコメント
Amazing and wonderful. With a hairdryer, a loving wife who knows how to clean glass much much better than I do, the tools listed here and some patience, I now have a wonderfully ugraded 2008 unibody MBP with a high resolution display (wasn't offered until 2009). My display issues are gone as indeed my vertical banding was caused by a broken display.
Does one have to buy the LVDS display cable or can the one that is in the macbook already, be used?
I'm by no means an expert, or even vaguely knowledgable :), but i would assume you can just use the old cable, if it's just the actual LCD itself that is damaged and the cable seems fine.
Mal -
Great guide, i thought it was going to be tricky, but following this made it easy! I was actually replacing the display rear panel and the glass - my LCD was fine - so i had to improvise slightly taking hinges etc from damaged panel, but this guide made everything seem pretty straightforward, thanks guys!
THANK YOU THANK YOU THANK YOU for saving me from a $600 Apple Store repair bill! The instructions were excellent and I felt very comfortable working my way through the repair.
I lucked out getting the glass off. I heated the upper right corner until it was warm to the touch, attached the suction cup and... pop. The glass came off instantly in one piece. Unfortunately, I broke it trying to get the camera bracket off, but it looked like shite after being knocked around for seven years and I was planning on replacing it anyway. I also replaced the LVDS cable along with the LCD and bezel. The display looks as good as the day I took it home from the Apple Store back in 2008.
I'm giddy that I have my laptop back. Tablets are all the rage nowadays, but they really do have their limitations. You need a proper keyboard to do any serious work.
Thanks tons for putting out these repair guides and the great tools.
Thanks a lot : it is not so difficult provided you follow gently step by step the Ifixit guide .
I used a heat gun which has 15 levels of heat and only needed the no 4 or 5 maximum .
Had to glue again the frame of the macbook pro ( hinges are attached to it and it was broken ( bended) : I used for that rectavit 70 pro ( black)
https://www.klium.be/rectavit-g70-pro-he... which is better than the original glue to fix the frame inside the top case , it takes 24 hours before getting hard enough to use the hinges again .
MAcbook Pro late 2008 needs a new flash drive to be fully operational again !
The A1286 has no Access Door.!!
I actually can see no sign of the battery!...
aguib - 返信
I assume you have the newer model, with the built-in battery. It's still removable with tools, but these are the wrong instructions for that model.
lgc90 - 返信
when will there be a guide for the other unibody macbook pro. that does not have an access door?
irishking - 返信
Is there a manual to show, how disasembly the display, i mean, after step 5, to check the display between lcd and aluminiun back case?
Max
Max - 返信
On other guides you state the height of the HD that can be supported, e.g. MacBook Pro 15" Core 2 Duo Model A1211 Hard Drive Replacement , I have read ( but have not confirmed ) that the uni-body MacBook Pro can be fitted with the 750GB and 1TB 12mm drive from Western Digital.
Can you confirm this?
Many thanks in advance.
ahothabeth - 返信
My display and aluminum casing has separated.
I don't know if it just snaps back together or does it need to be glued.
I dropped mine on the carpeted stairs and the display still works.
I'm hoping I can just snap it back together and that no plastic pieces or teeth of the snapping
portion have been broken........
SHerwood Ball - 返信
When you say "left fan" is this "left when looking at the logic board after turning the computer over and looking it up opening it up" or "left when sitting at the computer keyboard and typing on it"?
thvv - 返信
We always use left and right in reference to the computer when you're using it.
Andrew Optimus Goldheart -
Directions were great and the worn dc in board was replaced. The hardest part of the procedure is disconnecting the data display cable. A better description of step 21 is to slide the connector parallel to the circuit board towards the outside corner. Reconnecting correctly took several tries.
I used the tip of the spudger to nudge the corners a little at a time to seat the connector.
The ribbon connector for the keyboard has to be inserted all the way before seating the retaining cap. It took me three tries . First try power button did not work second try numbers keys did not work.
Thanks for the directions ...could not have done it with out them!!!
landryd - 返信
Hola. Poseo un MacBook Pro Late 2008 y debo cambiarle las cornetas. Me sirve unas cornetas de un MBP Late 2011?
jegonzalez80 - 返信
Please read the instructions about removing the bluetooth cable - you CAN work around it, and NOT take off the plug.
kenneth krabat - 返信