はじめに
壊れたファンを交換する作業はとても簡単で、ラップトップを冷却してくれる大切な機能を保ってくれます。このガイドは通常通り機能しているMacBookの左側ファン用です。
必要な工具と部品
-
-
ケースを閉じた状態で、平らな作業台の上にUnibodyの上部を下側に向けて配置します。
-
アクセスドアの取り外しラッチの溝のある側を押して、飛び出した側の先端を掴んでください。取り出しラッチを垂直になるまで持ち上げます。
-
-
-
半透明のプラスチックタブを掴んで、バッテリーをUnibodyから引き上げます。
-
ラッチが押されると、バッテリーが所定の位置にロックされます。
Do I need to wait for the battery to charge completely before using the computer (while plugged in)?
No. You do not need to charge it completely before removing it.
-
-
-
-
下部ケースにカシス(筐体)を固定している次の8本のネジを外します。
-
5.4 mmプラスネジー1本
-
14 mmプラスネジー3本
-
3.5 mmプラスネジー4本
Hi, My name is Jess I need help asap I accidentally dropped my macbook Pro and i cant find the silver screw for the top left back side, Does any one know if I can replace it with an eye glass screw?? If you can help at all Please e-mail me at Chambliss_jess@yahoo.com thx please help me my bf is going off... ;(
The fixit PH00 is the wrong screw driver for this entire job. It did not fit in the screws, it was too pointy and caused screws to be rounded off.
-
-
-
両手を使って、上部ケースから下部ケースを持ち上げて取り出します。
About midway along each edge is a snap. To release each snap, gently slide the flat edge of a Spudger under the lower case, then lift the lower case away.
-
-
-
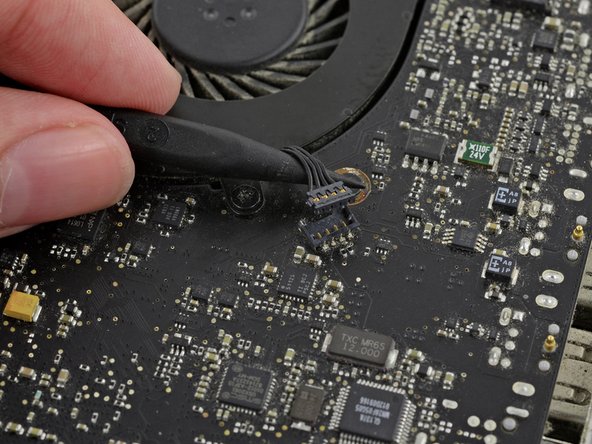
スパッジャーを使って、ファンコネクタをロジックボードからまっすぐ引き上げます。
Be very careful prying this connector off. I got the spudger in the wrong spot and popped the little connector right off the circuit board. Now I either need to replace the board, or find a trained flea with a soldering iron.
Have you found any places that can solder the socket back on, I'm in the same predicament.
Dino -
-
-
-
上部ケースとロジックボードに左側ファンを固定している3.5 mmプラスネジを3本外します。
Could not get the screws to release. Stripped two screw drivers, not the screw heads.
altgisjerr - 返信
Used a good heavy screwdriver and it worked fine. Still was very tight first, but the right tool made all the difference.
altgisjerr - 返信
Same problem, but I stripped one of the screws. Still cannot get out.
Stripped two of the three screws trying to swap the fan. Ordered several types of extractors online. The first one I got was a small set of extraction pliers: www.vampiretools.com/shop/products/pliers/vampliers-mini-5-screw-extraction-pliers-2 . These worked well: got both screws out in 10 seconds. (No affiliation with that company, just a surprised and satisfied user.)
-


デバイスを再組み立てする際は、これらのインストラクションを逆の順番に従って作業を進めてください。
デバイスを再組み立てする際は、これらのインストラクションを逆の順番に従って作業を進めてください。
94 の人々がこのガイドを完成させました。
以下の翻訳者の皆さんにお礼を申し上げます:
100%

Midori Doiさんは世界中で修理する私たちを助けてくれています! あなたも貢献してみませんか?
翻訳を始める ›

The A1286 has no Access Door.!!
I actually can see no sign of the battery!...
aguib - 返信
I assume you have the newer model, with the built-in battery. It's still removable with tools, but these are the wrong instructions for that model.
lgc90 - 返信
when will there be a guide for the other unibody macbook pro. that does not have an access door?
irishking - 返信
Is there a manual to show, how disasembly the display, i mean, after step 5, to check the display between lcd and aluminiun back case?
Max
Max - 返信
On other guides you state the height of the HD that can be supported, e.g. MacBook Pro 15" Core 2 Duo Model A1211 Hard Drive Replacement , I have read ( but have not confirmed ) that the uni-body MacBook Pro can be fitted with the 750GB and 1TB 12mm drive from Western Digital.
Can you confirm this?
Many thanks in advance.
ahothabeth - 返信
My display and aluminum casing has separated.
I don't know if it just snaps back together or does it need to be glued.
I dropped mine on the carpeted stairs and the display still works.
I'm hoping I can just snap it back together and that no plastic pieces or teeth of the snapping
portion have been broken........
SHerwood Ball - 返信
When you say "left fan" is this "left when looking at the logic board after turning the computer over and looking it up opening it up" or "left when sitting at the computer keyboard and typing on it"?
thvv - 返信
We always use left and right in reference to the computer when you're using it.
Andrew Optimus Goldheart -
Directions were great and the worn dc in board was replaced. The hardest part of the procedure is disconnecting the data display cable. A better description of step 21 is to slide the connector parallel to the circuit board towards the outside corner. Reconnecting correctly took several tries.
I used the tip of the spudger to nudge the corners a little at a time to seat the connector.
The ribbon connector for the keyboard has to be inserted all the way before seating the retaining cap. It took me three tries . First try power button did not work second try numbers keys did not work.
Thanks for the directions ...could not have done it with out them!!!
landryd - 返信
Hola. Poseo un MacBook Pro Late 2008 y debo cambiarle las cornetas. Me sirve unas cornetas de un MBP Late 2011?
jegonzalez80 - 返信
Please read the instructions about removing the bluetooth cable - you CAN work around it, and NOT take off the plug.
kenneth krabat - 返信