メインコンテンツにスキップ

MacBook Pro 15" Unibody Late 2008 and Early 2009 Upper Case Replacement

必要な工具と部品

  1. MacBook Pro 15" Unibody Late 2008 and Early 2009 Upper Case Replacement, Access Door: 手順 1、 2の画像 1 MacBook Pro 15" Unibody Late 2008 and Early 2009 Upper Case Replacement, Access Door: 手順 1、 2の画像 2
    • With the case closed, place the Unibody top-side down on a flat surface.

    • Depress the grooved side of the access door release latch enough to grab the free end. Lift the release latch until it is vertical.

  2. MacBook Pro 15" Unibody Late 2008 and Early 2009 Upper Case Replacement: 手順 2、 1の画像 1
    • The access door should now be raised enough to lift it up and out of the Unibody.

  3. MacBook Pro 15" Unibody Late 2008 and Early 2009 Upper Case Replacement, Battery: 手順 3、 1の画像 1
    • Be sure the access door release latch is vertical before proceeding.

    • Grab the translucent plastic tab and pull the battery up and out of the Unibody.

    • If the latch is depressed it will lock the battery in place.

  4. MacBook Pro 15" Unibody Late 2008 and Early 2009 Upper Case Replacement, Lower Case: 手順 4、 1の画像 1
    • Remove the following eight screws securing the lower case to the chassis:

    • One 5.4 mm Phillips screw.

    • Three 14 mm Phillips screws.

    • Four 3.5 mm Phillips screws.

  5. MacBook Pro 15" Unibody Late 2008 and Early 2009 Upper Case Replacement: 手順 5、 1の画像 1
    • Using both hands, lift and remove the lower case off the upper case.

  6. MacBook Pro 15" Unibody Late 2008 and Early 2009 Upper Case Replacement, Mid Wall: 手順 6、 1の画像 1
    • Remove the following 5 screws securing the mid wall to the upper case:

    • Three 10.5 mm Phillips screws.

    • Two 3.7 mm Phillips screws.

  7. MacBook Pro 15" Unibody Late 2008 and Early 2009 Upper Case Replacement: 手順 7、 1の画像 1
    • Lift the mid wall out of the upper case.

  8. MacBook Pro 15" Unibody Late 2008 and Early 2009 Upper Case Replacement, Logic Board: 手順 8、 1の画像 1
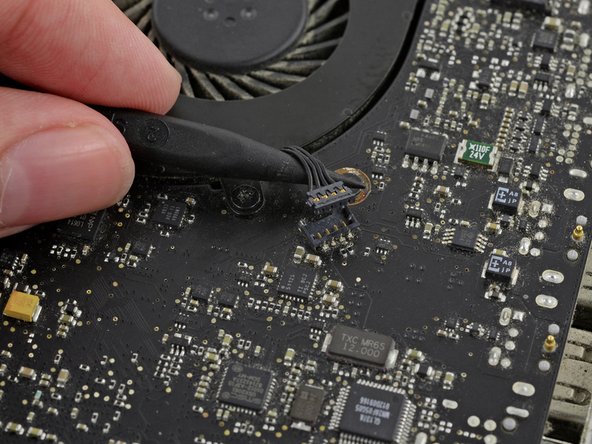
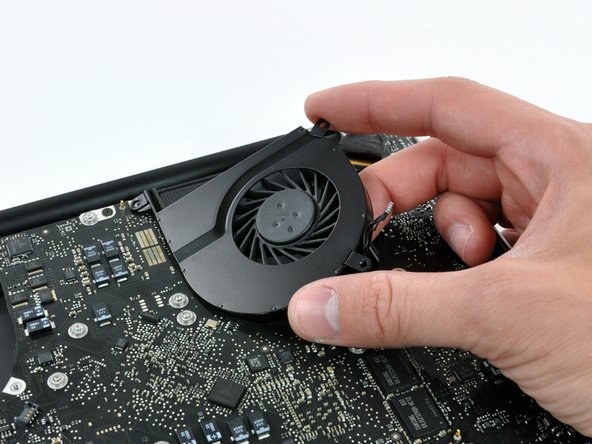
    • Remove the following six screws securing both the right fan and the left fan to the logic board:

    • Four 3.5 mm Phillips screws.

    • Two 3.2 mm Phillips screws.

  9. MacBook Pro 15" Unibody Late 2008 and Early 2009 Upper Case Replacement: 手順 9、 3の画像 1 MacBook Pro 15" Unibody Late 2008 and Early 2009 Upper Case Replacement: 手順 9、 3の画像 2 MacBook Pro 15" Unibody Late 2008 and Early 2009 Upper Case Replacement: 手順 9、 3の画像 3
    • Use the tip of a spudger to lift the right fan connector straight up from its socket on the logic board.

    • Be sure to only pry up on the connector itself not on the socket or you may damage the machine.

    • It is useful to twist the spudger axially from beneath the fan cable wires to release the connector.

    • Remove the right fan from the case.

  10. MacBook Pro 15" Unibody Late 2008 and Early 2009 Upper Case Replacement: 手順 10、 3の画像 1 MacBook Pro 15" Unibody Late 2008 and Early 2009 Upper Case Replacement: 手順 10、 3の画像 2 MacBook Pro 15" Unibody Late 2008 and Early 2009 Upper Case Replacement: 手順 10、 3の画像 3
    • Use the tip of a spudger to lift the left fan connector straight up from its socket on the logic board.

    • Be sure to only pry up on the connector itself not on the socket or you may damage the machine.

    • It is useful to twist the spudger axially from beneath the fan cable wires to release the connector.

    • Remove the left fan from the case.

  11. MacBook Pro 15" Unibody Late 2008 and Early 2009 Upper Case Replacement: 手順 11、 1の画像 1
    • Remove any adhesive from the camera cable connector.

    • Disconnect the camera cable by pulling the male end out of its socket, parallel to the logic board, do not lift it upwards.

  12. MacBook Pro 15" Unibody Late 2008 and Early 2009 Upper Case Replacement: 手順 12、 1の画像 1
    • Use a spudger to carefully pry the optical drive connector straight up off its socket on the logic board.

  13. MacBook Pro 15" Unibody Late 2008 and Early 2009 Upper Case Replacement: 手順 13、 1の画像 1
    • If necessary, peel off the foam bumper covering the subwoofer connector.

    • Using the flat end of a spudger, pry the subwoofer connector straight up off its socket on the logic board.

    • Be very careful. This connection is delicate, the socket can be easily broken off the logic board.

  14. MacBook Pro 15" Unibody Late 2008 and Early 2009 Upper Case Replacement: 手順 14、 1の画像 1
    • Use the flat end of a spudger to pry the silver-colored hard drive cable connector straight up out of its socket on the logic board.

  15. MacBook Pro 15" Unibody Late 2008 and Early 2009 Upper Case Replacement: 手順 15、 1の画像 1
    • Use a spudger to pry the trackpad connector straight up out of its socket on the logic board.

  16. MacBook Pro 15" Unibody Late 2008 and Early 2009 Upper Case Replacement: 手順 16、 2の画像 1 MacBook Pro 15" Unibody Late 2008 and Early 2009 Upper Case Replacement: 手順 16、 2の画像 2
    • Using the tip of a spudger, flip up the IR/sleep LED ribbon cable retaining flap.

    • Pull the IR/sleep LED ribbon cable straight out of its socket.

  17. MacBook Pro 15" Unibody Late 2008 and Early 2009 Upper Case Replacement: 手順 17、 1の画像 1
    • Use a spudger to pry the battery indicator light connector straight up out of its socket on the logic board.

    • Pry up under the cable wires to avoid pulling the socket itself off of the logic board.

  18. MacBook Pro 15" Unibody Late 2008 and Early 2009 Upper Case Replacement: 手順 18、 2の画像 1 MacBook Pro 15" Unibody Late 2008 and Early 2009 Upper Case Replacement: 手順 18、 2の画像 2
    • Using the tip of a spudger, flip up the keyboard ribbon cable retaining flap.

    • Pull the keyboard ribbon cable straight out of its socket.

    • During reassembly, make sure to fully insert the keyboard ribbon cable back into the ZIF socket.

  19. MacBook Pro 15" Unibody Late 2008 and Early 2009 Upper Case Replacement: 手順 19、 2の画像 1 MacBook Pro 15" Unibody Late 2008 and Early 2009 Upper Case Replacement: 手順 19、 2の画像 2
    • Using the tip of a spudger, flip up the express card cage ribbon cable retaining flap.

    • Pull the express card cage ribbon cable straight out of its socket.

  20. MacBook Pro 15" Unibody Late 2008 and Early 2009 Upper Case Replacement: 手順 20、 1の画像 1
    • Using the flat end of a spudger, pry the microphone cable connector straight up out of its socket on the logic board.

    • Pry up under the cable wires to avoid pulling the socket itself off of the logic board.

  21. MacBook Pro 15" Unibody Late 2008 and Early 2009 Upper Case Replacement: 手順 21、 2の画像 1 MacBook Pro 15" Unibody Late 2008 and Early 2009 Upper Case Replacement: 手順 21、 2の画像 2
    • Grab the plastic pull tab secured to the display data cable lock and rotate it toward the DC-in side of the computer.

    • Pull the display data cable connector straight away from its socket.

    • When disconnecting the display data cable, do not pull on the black tab secured to the cable lock. We recommend wiggling the cable while applying tension to slowly "walk" the connector out of its socket.

    • Make sure the display data cable is placed correctly in its socket during reassembly. Failure to do so will result in a partially visible display or no display image at all.

  22. MacBook Pro 15" Unibody Late 2008 and Early 2009 Upper Case Replacement: 手順 22、 2の画像 1 MacBook Pro 15" Unibody Late 2008 and Early 2009 Upper Case Replacement: 手順 22、 2の画像 2
    • Locate the keyboard backlight ribbon cable (near the left fan space).

    • Using the tip of a spudger, flip up the keyboard backlight ribbon cable retaining flap.

    • Pull the keyboard backlight ribbon cable straight out of its socket.

  23. MacBook Pro 15" Unibody Late 2008 and Early 2009 Upper Case Replacement: 手順 23、 1の画像 1
    • Remove seven 3.2 mm Phillips screws securing the logic board to the upper case.

    • Do not remove the logic board yet! There are connectors attached to the underside of the logic board that must first be disconnected.

  24. MacBook Pro 15" Unibody Late 2008 and Early 2009 Upper Case Replacement: 手順 24、 1の画像 1
    • Remove two 7 mm Phillips screws securing the DC-in board to the upper case.

    • Note: This step is not completely necessary, but it will make it easier to disconnect the cable that is connected to the DC-in board.

  25. MacBook Pro 15" Unibody Late 2008 and Early 2009 Upper Case Replacement: 手順 25、 2の画像 1 MacBook Pro 15" Unibody Late 2008 and Early 2009 Upper Case Replacement: 手順 25、 2の画像 2
    • Remove two 3.5 mm Phillips screws securing the bottom case clip to the upper case.

    • Lift the bottom case clip out of the upper case.

    • Some MacBook Pro Unibodies do not have a bottom case clip and do not require this step.

  26. MacBook Pro 15" Unibody Late 2008 and Early 2009 Upper Case Replacement: 手順 26、 2の画像 1 MacBook Pro 15" Unibody Late 2008 and Early 2009 Upper Case Replacement: 手順 26、 2の画像 2
    • Carefully lift the logic board assembly from the left side and work it out of the upper case, minding the port side that may get caught during removal.

    • Do not entirely remove the logic board yet!

    • Ensure that the logic board is free from all connections to the upper case (except the battery connector) before proceeding.

    • During reassembly, ensure all connectors and cables are not placed underneath the logic board. Some of the ribbon cables are very thin and fragile.

  27. MacBook Pro 15" Unibody Late 2008 and Early 2009 Upper Case Replacement: 手順 27、 2の画像 1 MacBook Pro 15" Unibody Late 2008 and Early 2009 Upper Case Replacement: 手順 27、 2の画像 2
    • Lift the logic board enough to grab the battery connector and pull it straight away from its socket on the logic board.

    • Lift the logic board assembly out of the upper case.

  28. MacBook Pro 15" Unibody Late 2008 and Early 2009 Upper Case Replacement, Battery Connector: 手順 28、 1の画像 1
    • Remove three 2 mm Phillips screws securing the battery connector cover to the upper case.

  29. MacBook Pro 15" Unibody Late 2008 and Early 2009 Upper Case Replacement: 手順 29、 2の画像 1 MacBook Pro 15" Unibody Late 2008 and Early 2009 Upper Case Replacement: 手順 29、 2の画像 2
    • The battery connector cover is held onto the upper case by a strong adhesive. Use a spudger to loosen the adhesive around the edges of the battery connector.

    • Lift the battery connector cover out of the upper case.

  30. MacBook Pro 15" Unibody Late 2008 and Early 2009 Upper Case Replacement: 手順 30、 2の画像 1 MacBook Pro 15" Unibody Late 2008 and Early 2009 Upper Case Replacement: 手順 30、 2の画像 2
    • Peel the battery connector cable off the adhesive securing it to the upper case.

    • De-route the battery connector cable through the gap in the upper case and remove it from the computer.

  31. MacBook Pro 15" Unibody Late 2008 and Early 2009 Upper Case Replacement, Upper Case: 手順 31、 2の画像 1 MacBook Pro 15" Unibody Late 2008 and Early 2009 Upper Case Replacement, Upper Case: 手順 31、 2の画像 2
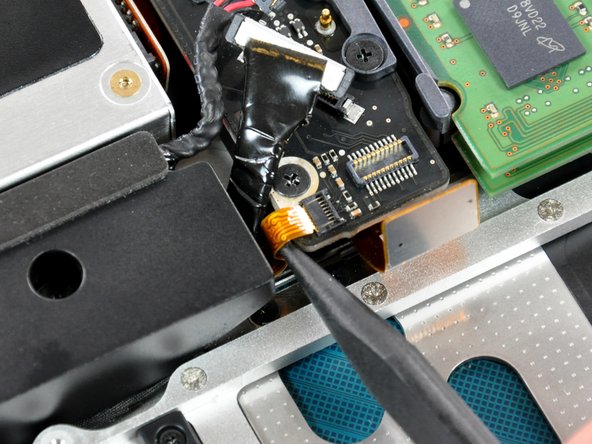
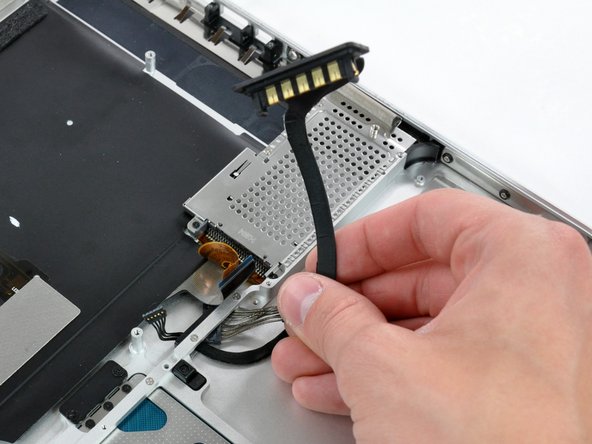
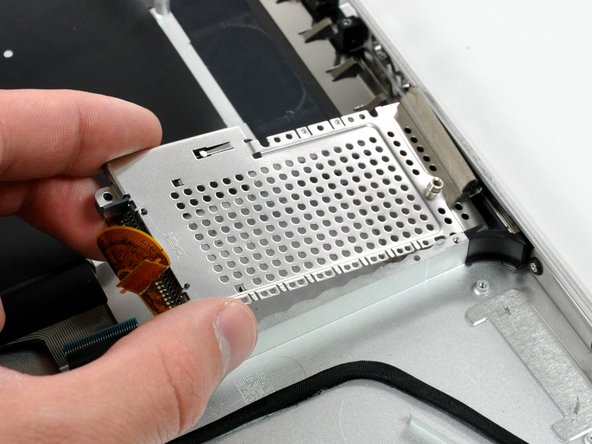
    • Remove the following screws securing the ExpressCard Cage to the upper case:

    • Two 4 mm Phillips screws.

    • Two 1.9 mm Phillips screws.

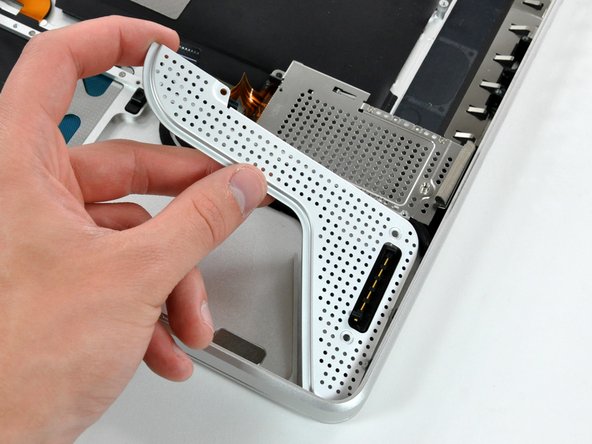
    • Lift the the ExpressCard Cage out of the upper case.

  32. MacBook Pro 15" Unibody Late 2008 and Early 2009 Upper Case Replacement: 手順 32、 1の画像 1
    • Remove the single Phillips screw securing the hard drive bracket to the upper case.

    • This screw is captive to the hard drive bracket.

  33. MacBook Pro 15" Unibody Late 2008 and Early 2009 Upper Case Replacement: 手順 33、 1の画像 1
    • Lift the hard drive by its pull tab enough to grab and remove the retaining bracket.

    • Lift the hard drive out of the upper case, minding the cable attaching it to the computer.

  34. MacBook Pro 15" Unibody Late 2008 and Early 2009 Upper Case Replacement: 手順 34、 1の画像 1
    • Remove the hard drive from its cable by pulling the cable connector straight away from the drive.

  35. MacBook Pro 15" Unibody Late 2008 and Early 2009 Upper Case Replacement: 手順 35、 2の画像 1 MacBook Pro 15" Unibody Late 2008 and Early 2009 Upper Case Replacement: 手順 35、 2の画像 2
    • Remove the following three Phillips screws securing the optical drive to the upper case:

    • One 3.5 mm Phillips screw.

    • Two 2.5 mm Phillips screws.

    • Lift the optical drive from its right edge and pull it out of the computer.

  36. MacBook Pro 15" Unibody Late 2008 and Early 2009 Upper Case Replacement: 手順 36、 2の画像 1 MacBook Pro 15" Unibody Late 2008 and Early 2009 Upper Case Replacement: 手順 36、 2の画像 2
    • Remove the following four screws securing the subwoofer and right speaker to the upper case:

    • Two 3.2 mm Phillips screws.

    • One 2.6 mm Phillips screw.

    • One 5.0 mm Phillips screw.

    • Lift the subwoofer and right speaker assembly out of the upper case.

  37. MacBook Pro 15" Unibody Late 2008 and Early 2009 Upper Case Replacement: 手順 37、 2の画像 1 MacBook Pro 15" Unibody Late 2008 and Early 2009 Upper Case Replacement: 手順 37、 2の画像 2
    • Peel the hard drive cable from the adhesive securing it to the upper case, and maneuver the plastic retaining block out of the upper case.

  38. MacBook Pro 15" Unibody Late 2008 and Early 2009 Upper Case Replacement: 手順 38、 2の画像 1 MacBook Pro 15" Unibody Late 2008 and Early 2009 Upper Case Replacement: 手順 38、 2の画像 2
    • Remove two 8 mm Phillips screws securing the camera cable bracket to the upper case.

    • The rightmost screw may remain captive in the camera cable.

    • Seperate the camera cable bracket from the camera cable and remove it from the computer.

  39. MacBook Pro 15" Unibody Late 2008 and Early 2009 Upper Case Replacement: 手順 39、 2の画像 1 MacBook Pro 15" Unibody Late 2008 and Early 2009 Upper Case Replacement: 手順 39、 2の画像 2
    • Remove the 7 mm Phillips screw from the LVDS cable bracket.

    • This screw may remain captive in the LVDS cable.

    • Lift the LVDS cable bracket out of the upper case.

  40. MacBook Pro 15" Unibody Late 2008 and Early 2009 Upper Case Replacement: 手順 40、 1の画像 1
    • Remove two outer 6 mm T6 Torx screws securing each side of the display to the upper case (4 screws total).

    • We intentionally have you leave one screw in each hinge to aid in the following steps.

  41. MacBook Pro 15" Unibody Late 2008 and Early 2009 Upper Case Replacement: 手順 41、 1の画像 1
    • Open your MacBook Pro so the display is perpendicular to the upper case.

    • Place your opened MacBook Pro on a table as pictured.

    • While holding the display and upper case together with your other hand, remove the 6 mm Torx screw from the lower display bracket.

  42. MacBook Pro 15" Unibody Late 2008 and Early 2009 Upper Case Replacement: 手順 42、 1の画像 1
    • Be sure to hold the display and upper case together with your other hand. Failure to do so may cause the freed display/upper case to fall, potentially damaging each component.

    • Remove the last remaining 6 mm Torx screw securing the display to the upper case.

  43. MacBook Pro 15" Unibody Late 2008 and Early 2009 Upper Case Replacement: 手順 43、 3の画像 1 MacBook Pro 15" Unibody Late 2008 and Early 2009 Upper Case Replacement: 手順 43、 3の画像 2 MacBook Pro 15" Unibody Late 2008 and Early 2009 Upper Case Replacement: 手順 43、 3の画像 3
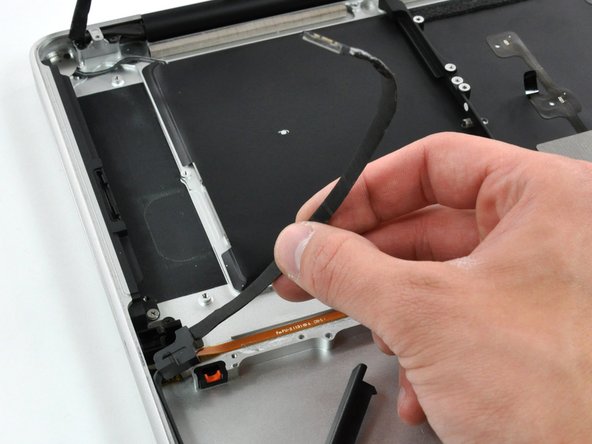
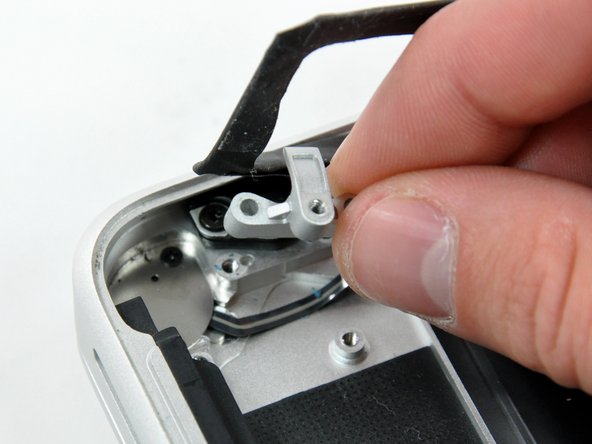
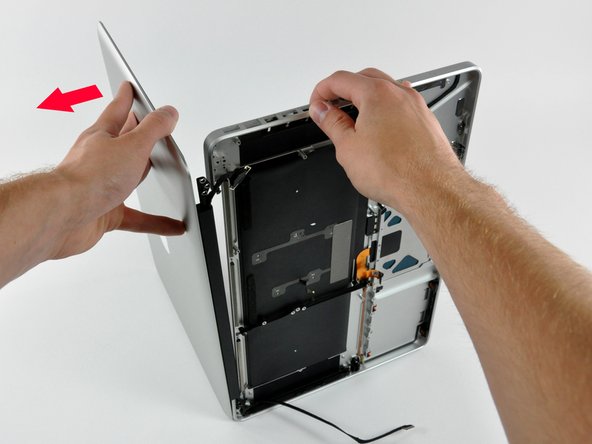
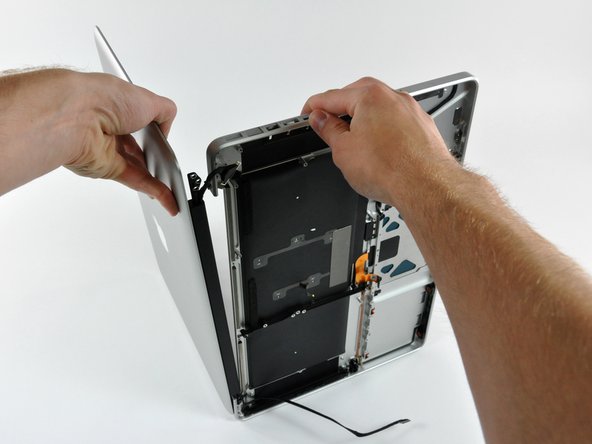
    • Grab the upper case with your right hand and rotate it slightly toward the top of the display so the upper display bracket clears the edge of the upper case.

    • Rotate the display slightly away from the upper case.

    • Lift the display away from the upper case, minding any brackets or cables that may get caught.

終わりに

To reassemble your device, follow these instructions in reverse order.

45 の人々がこのガイドを完成させました。

作成者

5人の作成者と共同で作成されました。

Walter Galan

693,685 ポイント

1,203のガイドは作成済み

2 件のコメント

This requires a Torx T6 (Step 39) that is not included in the "Required Tools" list.

dan - 返信

Thanks Dan. The T6 Torx screwdriver is now part of the required tools list.

Walter Galan -

コメントを追加

統計データ:

過去 24時間: 0

過去 7 日: 4

過去 30 日: 14

今までの合計 64,750