必要な工具と部品
-
-
-
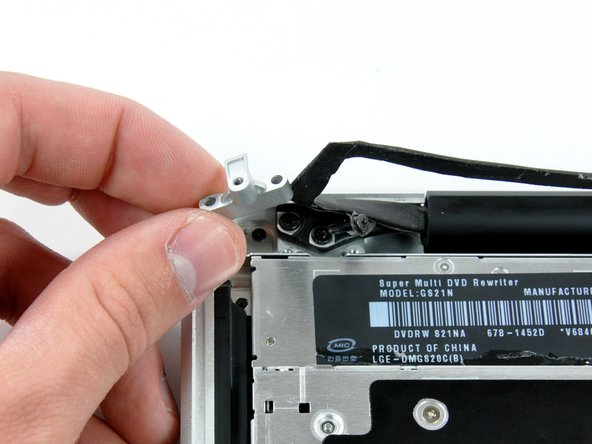
上部ケースに光学ドライブを固定している3本のプラスネジを外します。
-
3.5 mmプラスネジー1本
-
2.5 mmプラスネジー2本
I can't remove one of the Two 2.5 mm Phillips screw, the one on the top of the picture.
It seems to be very tight and I am using a newertechnology PH00 from my Mac repair tool kit.
I am afraid to damage the head of the screw. What do you suggest to do?
Thanks
You most likely need a jewelers screwdriver to remove the two 2.5 mm screws. they are very tiny and very tight
ph 000 will do the trick
I ruined the head of the 3.5 mm Phillips screw. What kind of screw is this (M1, M1.2, ...?)?
I know this is a little late, but I found a part number from another guide. It says that all three of those screws are the same. Here is the part number for that screw: 922-8662, and here is a link to what I found on that screw: https://www.impactcomputers.com/922-8662...
Under the "specifications" tab, it says that they are M2.
The top screw was locked tight for me also and I eventually stripped the phillips screw head. The only thing I could do is drill it out. Since I replaced the optical drive with an SSD, I didn't need the screw after all.
-


デバイスを再組み立てする際は、こららのインストラクションを逆の順番に従って作業を進めてください。
デバイスを再組み立てする際は、こららのインストラクションを逆の順番に従って作業を進めてください。
以下の翻訳者の皆さんにお礼を申し上げます:
100%

Midori Doiさんは世界中で修理する私たちを助けてくれています! あなたも貢献してみませんか?
翻訳を始める ›

And in that case, I lost my camera and bluetooth connection.
Ian Ho - 返信
You have to be EXTREMELY careful when detaching and reattaching this cable!!! It carries your Bluetooth, iSight camera, and Wifi connections!! I was being very careful when reattaching it and ending up either messing up the connector on the logic board or the cable itself- both cases are equally as bad. The cable doesn't snap back in or have guides, and it is therefore difficult to know if it's in as far as it needs to be, etc. If you mess up the connector on the logic board (that's what it's connecting to), you have to replace the entire logic board, and if you mess up the cable itself (it has very small, delicate metal connectors), you have to replace your entire display!! Each costs around $500/ea! I did a ton of research before embarking on this procedure and really wish someone had made a note of this prior- learn from my mistake!
Evan Roth - 返信
I had some difficulty getting the 'isight' cable back on. Pay close attention when you remove it as you will need to reattach the cable at an angle to get the small protrusion on the right side of the connector passed the little black plastic block that is glued onto the system board. It looks like this little block is there to keep the cable from slipping out... so it makes it tricky getting it back in.
Andrew Gill - 返信
Personally I would avoid disconnecting the cable from the socket as advised in this step, one should be able to proceed simply by carefully lifting the cable free from the adhesive holding it on to the optical drive.
Like others here, I followed Step 6 as per the guide and ended up with no Bluetooth or iSight camera, due to somehow damaging the connector and/or socket, despite taking the utmost care. It is possible to carefully slip the old drive out, and a new drive in, with the cable connector in situ (at least that was the case on my Late 2008 MacBook Pro).
Trevor - 返信
You can remove the small smooth block that is blocking this plug pretty easy. Once you connect the plug then you can stick that block back in place, it's just glued down.
Melyn Vicente - 返信
I second what Trevor wrote: it's actually pretty easy to work around the cable without unplugging the connector and, as it's extremely delicate, I therefore recommend skipping this step.
jack - 返信
Looking at the cable socket towards the DVD drive - to the left of the cable socket there is a small rectangular, transparent plastic piece glued to the print board. Its function is to apply pressure to the left of the plug, so that it stays in the socket. Even if you can relatively easy unplug the plug from the socket, this piece of plastic makes it impossible to re-enter the plug into the socket. So, if you can do your thing without un-plugging this cable, you are more safe.
-
Also, IF you decide to take the plastic piece off and glue it back on, face your tool away from the resistors and towards the DVD-drive. I did not and sheared off 3 resistors from the motherboard. Result = Dead machine. Costwise I cannot defend having it repaired, so am shipping it off in parts, as everthing else works.
-
But the 2 GPUs DOES make it a nifty little machine - even past Apple and general progress killing off El Capitan.
kenneth krabat - 返信
BUT I found a guy, who soldered 3 resistors on for next to nothing, and now I have High Sierra running quite well on it with DosDude1's patches. Only thing is a bit choppy vid at 1080 HD watching youtube, when vid restarts after commercials, for some reason. And the speakers are crackling, but easy to fix with rubber cement, perfect.
kenneth krabat -
ok, this step ruined my machine. should have lokked at the comment before removing the cable
Andreas Lepach - 返信