メインコンテンツにスキップ

MacBook Pro 15" Retina Display Mid 2015 AirPort/Camera Cables Replacement

必要条件のみ
この修理ガイドは、他のガイドの前提条件として使用されます。それ自体は不完全で、単独で使用されることはありません。

必要な工具と部品

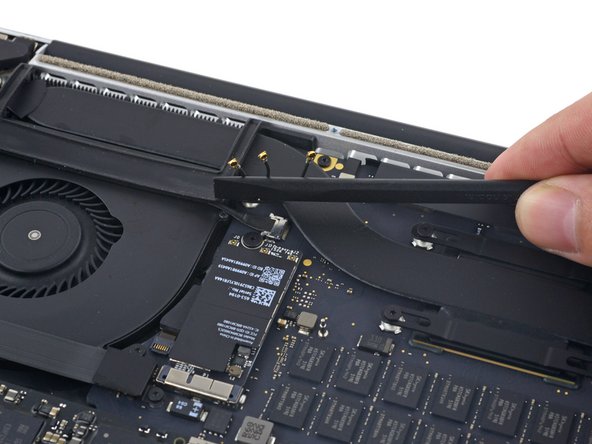
  1. MacBook Pro 15" Retina Display Mid 2015 AirPort/Camera Cables Replacement, AirPort/Camera Cables: 手順 1、 3の画像 1 MacBook Pro 15" Retina Display Mid 2015 AirPort/Camera Cables Replacement, AirPort/Camera Cables: 手順 1、 3の画像 2 MacBook Pro 15" Retina Display Mid 2015 AirPort/Camera Cables Replacement, AirPort/Camera Cables: 手順 1、 3の画像 3
    • Use a spudger or tweezers to pry the three AirPort antenna cables straight up off of their sockets on the AirPort board, and bend them up and out of the way.

    • The cable connection points are fragile. Be careful to lift only on the connector, and not on the socket or cable.

    • To reconnect, align the connector carefully into position over the socket, and press it down firmly with the flat of your spudger.

  2. MacBook Pro 15" Retina Display Mid 2015 AirPort/Camera Cables Replacement: 手順 2、 2の画像 1 MacBook Pro 15" Retina Display Mid 2015 AirPort/Camera Cables Replacement: 手順 2、 2の画像 2
    • Peel the right rubber cover up off the fan and fold it out of the way.

  3. MacBook Pro 15" Retina Display Mid 2015 AirPort/Camera Cables Replacement: 手順 3、 2の画像 1 MacBook Pro 15" Retina Display Mid 2015 AirPort/Camera Cables Replacement: 手順 3、 2の画像 2
    • Use the tip of a spudger to push the camera cable connector out of its socket on the logic board.

    • Be sure to push parallel to the board, pushing first on one side, then the other to "walk" the connector out of its socket.

  4. MacBook Pro 15" Retina Display Mid 2015 AirPort/Camera Cables Replacement: 手順 4、 3の画像 1 MacBook Pro 15" Retina Display Mid 2015 AirPort/Camera Cables Replacement: 手順 4、 3の画像 2 MacBook Pro 15" Retina Display Mid 2015 AirPort/Camera Cables Replacement: 手順 4、 3の画像 3
    • Use your fingers to pull the AirPort/Camera cables up off the fan.

    • The cables are adhered to the fan, so peel them up carefully to avoid damaging them.

    • Carefully de-route the cables from the plastic cable guide.

    • On reassembly, there should be enough adhesive still on these cables to stick them back down to the fan.

終わりに

To reassemble your device, follow these instructions in reverse order.

ある他の人がこのガイドを完成しました。

作成者

4人の作成者と共同で作成されました。

Andrew Optimus Goldheart

メンバー登録日: 10/17/09

502,849 ポイント

407のガイドは作成済み

チーム

iFixit iFixit人のメンバー

Staff

135 メンバー

16,817のガイドは作成済み

0 件のコメント

コメントを追加

統計データ:

過去 24時間: 0

過去 7 日: 0

過去 30 日: 0

今までの合計 360