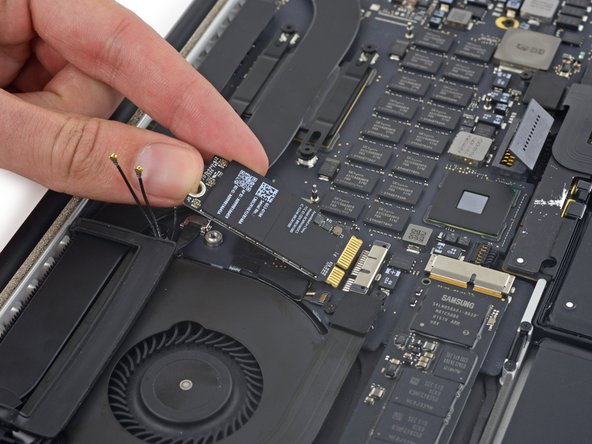
メインコンテンツにスキップ

MacBook Pro 15" Retina Display Mid 2015 AirPortボードの交換

必要な工具と部品

  1. MacBook Pro 15" Retina Display Mid 2015 AirPortボードの交換, 下部ケース: 手順 1、 1の画像 1
    • MacBook Proに固定された下部ケースから次のP5 ペンターブネジを取り外します。

    • 3.1 mm−8本

    • 2.3 mm−2本

  2. MacBook Pro 15" Retina Display Mid 2015 AirPortボードの交換: 手順 2、 2の画像 1 MacBook Pro 15" Retina Display Mid 2015 AirPortボードの交換: 手順 2、 2の画像 2
    • クラッチカバーに最も近い端から持ち上げて、MacBook Proの底面ケースを持ち上げます。

  3. MacBook Pro 15" Retina Display Mid 2015 AirPortボードの交換: 手順 3、 3の画像 1 MacBook Pro 15" Retina Display Mid 2015 AirPortボードの交換: 手順 3、 3の画像 2 MacBook Pro 15" Retina Display Mid 2015 AirPortボードの交換: 手順 3、 3の画像 3
    • 底面ケースには、上部ケース(オレンジ色)のプラスチッククリップに収まるプラスチック製の2つのペグ(赤色)があります。

    • 再組立中に、底面ケースの中心を静かに押し下げて、2つのプラスチッククリップにケースを再び取り付けます。

  4. MacBook Pro 15" Retina Display Mid 2015 AirPortボードの交換, バッテリーコネクター: 手順 4、 1の画像 1
    • バッテリーコネクタを覆うステッカーを巻き戻します。

  5. MacBook Pro 15" Retina Display Mid 2015 AirPortボードの交換: 手順 5、 3の画像 1 MacBook Pro 15" Retina Display Mid 2015 AirPortボードの交換: 手順 5、 3の画像 2 MacBook Pro 15" Retina Display Mid 2015 AirPortボードの交換: 手順 5、 3の画像 3
    • バッテリーコネクターの両側を静かに持ち上げて、コネクターをロジックボード上のソケットから引き出します。

    • バッテリーコネクターが誤ってロジックボードに接触しないように、コネクターをバッテリーの方に戻してください。

  6. MacBook Pro 15" Retina Display Mid 2015 AirPortボードの交換, AirPort ボード: 手順 6、 3の画像 1 MacBook Pro 15" Retina Display Mid 2015 AirPortボードの交換, AirPort ボード: 手順 6、 3の画像 2 MacBook Pro 15" Retina Display Mid 2015 AirPortボードの交換, AirPort ボード: 手順 6、 3の画像 3
    • この3本のエアポートアンテナケーブルコネクタを、AirPortボード上のソケットから取り外してください。そして作業の邪魔にならない位置に曲げて固定してください。

    • ケーブルやソケットではなく、コネクターだけをこじ開けてください。

  7. MacBook Pro 15" Retina Display Mid 2015 AirPortボードの交換: 手順 7、 1の画像 1
    • AirPort ボードを固定している2.9mm T5 トルクスネジを1本外します。

  8. MacBook Pro 15" Retina Display Mid 2015 AirPortボードの交換: 手順 8、 3の画像 1 MacBook Pro 15" Retina Display Mid 2015 AirPortボードの交換: 手順 8、 3の画像 2 MacBook Pro 15" Retina Display Mid 2015 AirPortボードの交換: 手順 8、 3の画像 3
    • AirPort ボードの端を持ち上げて、後ろにあるヒートシンクに十分なスペースを作ります。

    • AirPort ボードを高く持ち上げ過ぎないようご注意ください。コンタクト部分、またはソケットにダメージを与えてしまうことがあります。

    • ロジックボードにあるソケットからAirPort ボードをまっすぐ引き出します。

    • AirPort ボードの裏には粘着性放熱パッドがついています。再組立や交換する際は、この放熱パットを新しい交換用ボード上に必ず移してください。

終わりに

再組立てする際は、これらの手順を逆の順番に従って作業を行ってください。

20 の人々がこのガイドを完成させました。

以下の翻訳者の皆さんにお礼を申し上げます:

en jp

100%

これらの翻訳者の方々は世界を修理する私たちのサポートをしてくれています。 あなたも貢献してみませんか?
翻訳を始める ›

作成者

4人の作成者と共同で作成されました。

Andrew Optimus Goldheart

メンバー登録日: 10/17/09

502,710 ポイント

407のガイドは作成済み

チーム

iFixit iFixit人のメンバー

Staff

135 メンバー

16,731のガイドは作成済み

5 件のコメント

Hi! I need to replace the cable with the 3 prongs on the end. Do you have a video for that and would you be able to tell me where I can buy the cable?

Maria Juliano - 返信

Hello Maria - Did you ever find the cable and how a guide to replace it? Anyone on ifixit know where to get this part? I need one too.

Tony -

Yea this cable is easily damaged. Just broke mine trying to put in the new cord…the contact got bent and is no longer able to fit on the little button like socket. So annoying! Definitely need a replacement cable now…

Alex Backman -

Is there any WiFi6 replacement card compatible, so I would not just fix a broken one, but upgrade to 802.11ax and Bluetooth 5.x? All valuable comments are welcome.

Alex AA - 返信

Bonjour,

c'est possible de la changer aussi sur le Macbook pro 13" de mi-2012 ?

Sandrine Mathieu (Sandy0500) - 返信

コメントを追加

統計データ:

過去 24時間: 4

過去 7 日: 44

過去 30 日: 217

今までの合計 30,875