メインコンテンツにスキップ

MacBook Pro 15" Retina Display Mid 2014 Heat Sink Replacement

必要な工具と部品

  1. MacBook Pro 15" Retina Display Mid 2014 Heat Sink Replacement, Lower Case: 手順 1、 1の画像 1
    • Remove the following P5 pentalobe screws securing the lower case to the MacBook Pro:

    • Eight 3.0 mm

    • Two 2.3 mm

  2. MacBook Pro 15" Retina Display Mid 2014 Heat Sink Replacement: 手順 2、 1の画像 1
    • Lifting from the edge nearest the clutch cover, lift the lower case off the MacBook Pro.

    • Set the lower case aside.

  3. MacBook Pro 15" Retina Display Mid 2014 Heat Sink Replacement, Battery Connector: 手順 3、 1の画像 1
    • Peel back the warning label covering the battery connector.

  4. MacBook Pro 15" Retina Display Mid 2014 Heat Sink Replacement: 手順 4、 2の画像 1 MacBook Pro 15" Retina Display Mid 2014 Heat Sink Replacement: 手順 4、 2の画像 2
    • Using the flat end of a spudger, gently pry the battery connector straight up out of its socket on the logic board.

    • Bend the battery cables back and out of the way, ensuring that the battery connector doesn't accidentally make contact with the logic board.

  5. MacBook Pro 15" Retina Display Mid 2014 Heat Sink Replacement, Heat Sink: 手順 5、 3の画像 1 MacBook Pro 15" Retina Display Mid 2014 Heat Sink Replacement, Heat Sink: 手順 5、 3の画像 2 MacBook Pro 15" Retina Display Mid 2014 Heat Sink Replacement, Heat Sink: 手順 5、 3の画像 3
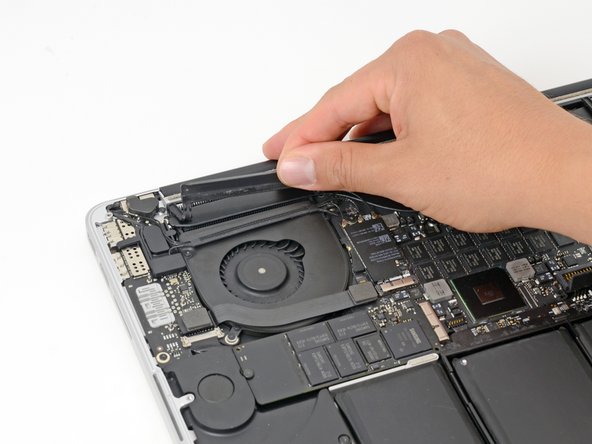
    • Insert the flat end of a spudger underneath the rubber heat sink cover on the right fan.

    • Slide the spudger underneath the length of the cover, releasing the adhesive.

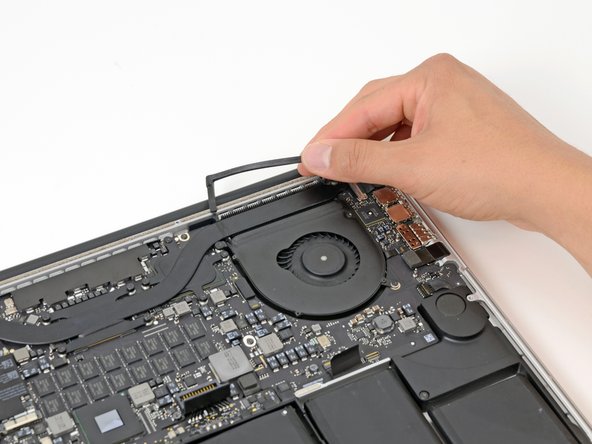
    • Lift the cover and rotate it off of the heat sink.

  6. MacBook Pro 15" Retina Display Mid 2014 Heat Sink Replacement: 手順 6、 3の画像 1 MacBook Pro 15" Retina Display Mid 2014 Heat Sink Replacement: 手順 6、 3の画像 2 MacBook Pro 15" Retina Display Mid 2014 Heat Sink Replacement: 手順 6、 3の画像 3
    • In the same manner described above, release the adhesive and flip back the heat sink cover on the left fan.

  7. MacBook Pro 15" Retina Display Mid 2014 Heat Sink Replacement: 手順 7、 1の画像 1
    • Remove the following six screws securing the heat sink to the logic board:

    • One 5.5 mm silver raised head T5 Torx screw

    • Four 3.5 mm T5 Torx screws

    • If your model uses discrete graphics, you may have more screws to remove.

    • One 3.8 mm silver T5 Torx screw

  8. MacBook Pro 15" Retina Display Mid 2014 Heat Sink Replacement: 手順 8、 2の画像 1 MacBook Pro 15" Retina Display Mid 2014 Heat Sink Replacement: 手順 8、 2の画像 2
    • Grasping the heat sink from one side, lift the heat sink off of the MacBook Pro, pulling it free from the computer.

    • The thermal paste may make it difficult to remove the heat sink. Pull the heat sink off gently but forcefully to avoid damaging any components on the logic board.

    • When installing the new heat sink, do not forget to replace the thermal paste underneath the heat sink. See our Applying Thermal Paste guide for further instructions.

終わりに

To reassemble your device, follow these instructions in reverse order.

22 の人々がこのガイドを完成させました。

作成者

3人の作成者と共同で作成されました。

Walter Galan

694,676 ポイント

1,203のガイドは作成済み

6 件のコメント

Half of photos are with mac that has only integrated graphics, half with one that has discrete GPU. This frustrates.

Because of fact that this is about heatsink, it's kinda important to point the difference out.

semioniy - 返信

He could at least just add a note on the heatsink screw photo.

Eduardo Melean -

Are the denser fan blades in some of the pictures from a different model year? iirc my 2014 one had denser fan blades, but not that metallic inner fan part.

tipoo - 返信

do one with the discrete gpu and integrated graphics please

Matthew De Leon - 返信

For the discrete GPU, there are 4 screws surrounding a square copper plate, just unscrew those 4 and follow the steps above. It’s very similar to the integrated graphics board, but with 4 extra screws.

JoeyLovesTrains -

コメントを追加

統計データ:

過去 24時間: 6

過去 7 日: 27

過去 30 日: 160

今までの合計 33,535