このバージョンは誤った内容を含んでいる可能性があります。最新の承認済みスナップショットに切り替えてください。
必要な工具と部品
-
-
この手順は未翻訳です。 翻訳を手伝う。
-
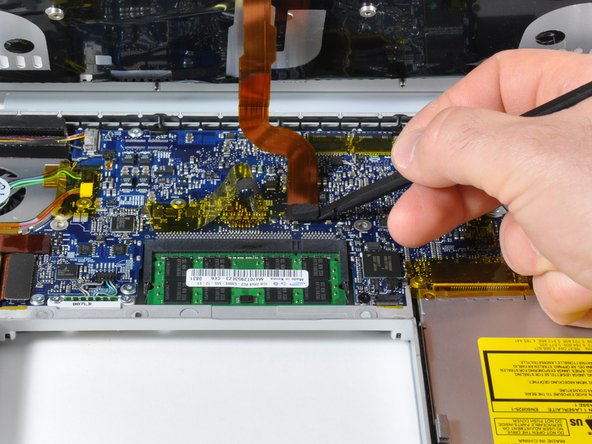
Slide the keyboard ribbon out of its connector.
-
It is common for the small ribbon just beside the keyboard ribbon to wear out with use in this model. (Keyboard and trackpad would not work but power button will.) The solution is to apply pressure directly on that cable where it enters the flap (with a piece of plastic or a folded paper that is pushed against by the battery).
-
-
この手順は未翻訳です。 翻訳を手伝う。
-
Place the upper casing on its edge and use a spudger to push the keyboard away from the casing, poking the spudger through the central keyboard screw hole. Grasp the keyboard as it separates from the casing.
-
Maintaining your hold on the keyboard, lay the casing flat and gently bow the keyboard until the two tabs on either side of the keyboard come free.
-
Slide the keyboard away from the trackpad and out of the upper case.
-
-
この手順は未翻訳です。 翻訳を手伝う。
-
Remove the two Phillips screws securing the black antenna holder to the upper case.
-
Lift the black Bluetooth antenna holder off of the upper case.
-
Disconnect the Bluetooth antenna cable from the Bluetooth board.
-
Lift the Bluetooth antenna out of its housing in the upper case. The Bluetooth antenna may be secured to the upper case with an adhesive, so rocking the antenna board from side to side may help it come free easier.
-
-
この手順は未翻訳です。 翻訳を手伝う。
-
Disconnect the Bluetooth antenna cable from the Bluetooth board.
-
Lift the Bluetooth antenna out of its housing in the upper case. The Bluetooth antenna may be secured to the upper case with an adhesive, so rocking the antenna board from side to side may help it come free easier.
-
28 の人々がこのガイドを完成させました。
3 件のコメント
this part is actually called the "top case", and is referenced as such in Apple's part numbers and take-apart guides.
Just did this. The guide is great. A good mod. Caveats:
(1) Use good screwdrivers... Really. I've done this for years and made the mistake of impatience anyway. I used poor-quality ones (though the right size) and partly stripped screws... Long story short, I had to buy replacement screws and dremel off the heads of the originals (thus also unable to easily re-use old top case)
(2) If your computer's old, you might need some new tape or adhesive at a few points (for the old sticky covers).
(3) If your upgrading A1226 to A1260 to get the new multi-touch trackpad (works BEAUTIFULLY, by the way :)), consider buying the keyboard with the upper case. Swapping keyboards is a fair bit of work, another chance to strip screws, and then you need to re-label (or swap) some keys to reflect the new special functions (these are changed by the new top case controller). If you keep the old keyboard (as I did), a simple P-touch labeler can be used to make new labels over the old keys (or you can swap keycaps if you have them from the new keyboard). Bottom line... A much more elegant solution is to swap the keyboard at the same time.
(4) Take care reassembling new the DVD drive. It's easy to bend the top piece of metal down (the one that engages the clips) and your DVD can get stuck occasional ejecting. Very annoying. Maybe give it a little prophylactic bend upward.
Overall, very happy!! Awesome pictures in the guide.
Yet another way to get good life out of an old Mac. Had an original MacBook Pro 3,1, since upgraded to new mainboard (under warranty), 6GB RAM, new MB fans (thanks iFixIt), new 500GB hybrid flash drive, now multi-touch thanks to this! Running 10.7.2 easily, great return on a purchase in 2007.
Cheers to the iFixit community!
I had a problem that is so common that I would love to see it as a comment within the guide: I spend the better part of a long afternoon reassembling different top cases and cables with the result that trackpad and keyboard didn´t work but the power button did. Sometimes both were working for a few minutes and next time I would start up they would be dead again. Solution was: The small cable that fits into the trackpad / USB Controller and takes the trackpad / keyboard signal to the logic board has a widely documented tendency to loose touch with its connectors after a few years. What helps is to apply pressure on the end of the cable where it enters the controller below the trackpad. Easy to check with fingers. In the long run use a piece of a thick plastic card or cardboard to apply pressure from the battery direkt on that spot. Easy. And works like charm. After I was so close before giving up my Macbook Pro or buying another topcase. Please add that possibility to the guide as it is really common.


