メインコンテンツにスキップ

MacBook Pro 15" Core 2 Duo Models A1226 and A1260 Upper Case Replacement

必要な工具と部品

  1. MacBook Pro 15" Core 2 Duo Models A1226 and A1260 Upper Case Replacement, Battery: 手順 1、 3の画像 1 MacBook Pro 15" Core 2 Duo Models A1226 and A1260 Upper Case Replacement, Battery: 手順 1、 3の画像 2 MacBook Pro 15" Core 2 Duo Models A1226 and A1260 Upper Case Replacement, Battery: 手順 1、 3の画像 3
    • Use your fingers to push both battery release tabs away from the battery, and lift the battery out of the computer.

  2. MacBook Pro 15" Core 2 Duo Models A1226 and A1260 Upper Case Replacement, RAM Shield: 手順 2、 2の画像 1 MacBook Pro 15" Core 2 Duo Models A1226 and A1260 Upper Case Replacement, RAM Shield: 手順 2、 2の画像 2
    • Remove the three identical 2mm Phillips screws from the memory door.

    • Lift the memory door up enough to grip it and slide it toward you, pulling it away from the casing.

  3. MacBook Pro 15" Core 2 Duo Models A1226 and A1260 Upper Case Replacement, Upper Case: 手順 3、 1の画像 1
    • Remove the two 2.8 mm Phillips screws in the battery compartment near the latch.

  4. MacBook Pro 15" Core 2 Duo Models A1226 and A1260 Upper Case Replacement: 手順 4、 1の画像 1
    • Remove the following 6 screws:

    • Two 10 mm T6 Torx screws on either side of the RAM slot.

    • Four 14.5 mm Phillips screws along the hinge.

  5. MacBook Pro 15" Core 2 Duo Models A1226 and A1260 Upper Case Replacement: 手順 5、 1の画像 1
    • Remove the four 3.2 mm PH00 Phillips screws on the port side of the computer.

  6. MacBook Pro 15" Core 2 Duo Models A1226 and A1260 Upper Case Replacement: 手順 6、 1の画像 1
    • Rotate the computer 90 degrees and remove the two 3.2 mm Phillips screws from the rear of the computer.

  7. MacBook Pro 15" Core 2 Duo Models A1226 and A1260 Upper Case Replacement: 手順 7、 1の画像 1
    • Rotate the computer 90 degrees again and remove the four 3.2 mm Phillips screws from the side of the computer.

  8. MacBook Pro 15" Core 2 Duo Models A1226 and A1260 Upper Case Replacement: 手順 8、 3の画像 1 MacBook Pro 15" Core 2 Duo Models A1226 and A1260 Upper Case Replacement: 手順 8、 3の画像 2 MacBook Pro 15" Core 2 Duo Models A1226 and A1260 Upper Case Replacement: 手順 8、 3の画像 3
    • Do not yank the upper case off quickly. The case is attached to the logic board via a ribbon cable.

    • Lift up at the rear of the case and work your fingers along the sides, freeing the case as you go. Once you have freed the sides, you may need to rock the case up and down to free the front of the upper case.

    • There are four plastic clips above the DVD slot, and another above and to the left of the IR sensor. These clips can be very difficult to disengage without prying. They can also be difficult to re-engage during reassembly.

    • Reassembly Tip: Press down firmly on the tip of the top case above the location of each clip until you hear a snap to reseat them in their slots.

    • Reassembly Tip: The two center DVD clips will rarely snap back into place properly without help, and downward pressure will instead simply deform the frame around the DVD slot. Support the frame by inserting a plastic spudger into the DVD slot directly under the clip location until it is snug, then press down until you hear the snap.

  9. MacBook Pro 15" Core 2 Duo Models A1226 and A1260 Upper Case Replacement: 手順 9、 2の画像 1 MacBook Pro 15" Core 2 Duo Models A1226 and A1260 Upper Case Replacement: 手順 9、 2の画像 2
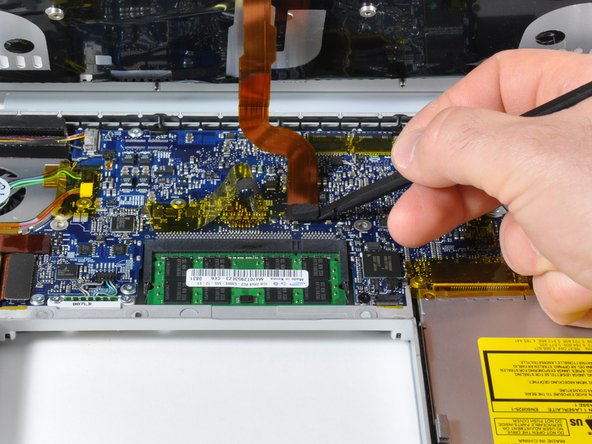
    • Disconnect the trackpad and keyboard ribbon cable from the logic board, removing tape as necessary.

    • Note: It is possible to replace the hard drive without disconnecting the keyboard from the chassis, but it will need to be held upright to keep it out of the way, while still allowing you both hands to work on the drive removal.

    • Be careful when removing the keyboard-trackpad ribbon cable to ensure that the rear of the upper case is disengaged from the area near the hinge. It is easy to accidentally bend the screw receivers on either side of the keyboard.

    • Remove the upper case.

  10. MacBook Pro 15" Core 2 Duo Models A1226 and A1260 Upper Case Replacement, Upper Case: 手順 10、 1の画像 1
    • Use a spudger to pry up the translucent plastic sheet covering the keyboard connector.

  11. MacBook Pro 15" Core 2 Duo Models A1226 and A1260 Upper Case Replacement: 手順 11、 1の画像 1
    • Use the tip of a spudger to flip up the black plastic flap locking down the keyboard ribbon cable.

    • Slide the orange keyboard backlight ribbon out of its connector.

  12. MacBook Pro 15" Core 2 Duo Models A1226 and A1260 Upper Case Replacement: 手順 12、 1の画像 1
    • Peel up the orange tape covering the keyboard backlight connector.

  13. MacBook Pro 15" Core 2 Duo Models A1226 and A1260 Upper Case Replacement: 手順 13、 1の画像 1
    • Use the tip of a spudger to flip up the brown plastic flap locking down the keyboard backlight ribbon cable.

  14. MacBook Pro 15" Core 2 Duo Models A1226 and A1260 Upper Case Replacement: 手順 14、 1の画像 1
    • Use a spudger or your finger to slide the keyboard backlight ribbon out of its connector.

  15. MacBook Pro 15" Core 2 Duo Models A1226 and A1260 Upper Case Replacement: 手順 15、 2の画像 1 MacBook Pro 15" Core 2 Duo Models A1226 and A1260 Upper Case Replacement: 手順 15、 2の画像 2
    • In this step you will be peeling adhesive to give access to screws, it is not necessary to fully remove these shields.

    • Peel back the black protective sheath on the right side of the upper case.

    • Similarly, peel back the black protective sheath on the left side of the upper case.

  16. MacBook Pro 15" Core 2 Duo Models A1226 and A1260 Upper Case Replacement: 手順 16、 1の画像 1
    • Remove the 12 identical Phillips screws attaching the keyboard to the casing.

    • There are six locking tabs along the back edge of the keyboard holding it in place. These tabs must be straightened before you can remove the keyboard.

  17. MacBook Pro 15" Core 2 Duo Models A1226 and A1260 Upper Case Replacement: 手順 17、 1の画像 1
    • Slide the keyboard ribbon out of its connector.

    • If the keyboard ribbon won't slide out, make sure that the black plastic flap holding the ribbon in place is vertical.

    • It is common for the small ribbon just beside the keyboard ribbon to wear out with use in this model. (Keyboard and trackpad would not work but power button will.) The solution is to apply pressure directly on that cable where it enters the flap (with a piece of plastic or a folded paper that is pushed against by the battery).

  18. MacBook Pro 15" Core 2 Duo Models A1226 and A1260 Upper Case Replacement: 手順 18、 2の画像 1 MacBook Pro 15" Core 2 Duo Models A1226 and A1260 Upper Case Replacement: 手順 18、 2の画像 2
    • Place the upper casing on its edge and use a spudger to push the keyboard away from the casing, poking the spudger through the central keyboard screw hole. Grasp the keyboard as it separates from the casing.

    • Maintaining your hold on the keyboard, lay the casing flat and gently bow the keyboard until the two tabs on either side of the keyboard come free.

    • Slide the keyboard away from the trackpad and out of the upper case.

    • Reassembly Tip: Ensure that the keyboard backlight ribbon emerges cable through the hole in the upper case.

  19. MacBook Pro 15" Core 2 Duo Models A1226 and A1260 Upper Case Replacement: 手順 19、 1の画像 1
    • Remove the two Phillips screws securing the black antenna holder to the upper case.

    • Lift the black Bluetooth antenna holder off of the upper case.

    • Disconnect the Bluetooth antenna cable from the Bluetooth board.

    • Lift the Bluetooth antenna out of its housing in the upper case. The Bluetooth antenna may be secured to the upper case with an adhesive, so rocking the antenna board from side to side may help it come free easier.

  20. MacBook Pro 15" Core 2 Duo Models A1226 and A1260 Upper Case Replacement: 手順 20、 2の画像 1 MacBook Pro 15" Core 2 Duo Models A1226 and A1260 Upper Case Replacement: 手順 20、 2の画像 2
    • Disconnect the Bluetooth antenna cable from the Bluetooth board.

    • Lift the Bluetooth antenna out of its housing in the upper case. The Bluetooth antenna may be secured to the upper case with an adhesive, so rocking the antenna board from side to side may help it come free easier.

  21. MacBook Pro 15" Core 2 Duo Models A1226 and A1260 Upper Case Replacement: 手順 21、 1の画像 1
    • Remove the single Phillips screw securing the Bluetooth board to the lower case.

  22. MacBook Pro 15" Core 2 Duo Models A1226 and A1260 Upper Case Replacement: 手順 22、 2の画像 1 MacBook Pro 15" Core 2 Duo Models A1226 and A1260 Upper Case Replacement: 手順 22、 2の画像 2
    • Peel up the Bluetooth data cable from the adhesive on the upper case, removing tape as necessary.

    • Disconnect the Bluetooth data cable from the upper case.

    • Lift the Bluetooth board and attached cable off the upper case.

    • To install your replacement upper case, install your current Bluetooth board, antenna, and keyboard into the replacement case and reassemble your computer.

終わりに

To reassemble your device, follow these instructions in reverse order.

28 の人々がこのガイドを完成させました。

作成者

8人の作成者と共同で作成されました。

Walter Galan

693,685 ポイント

1,203のガイドは作成済み

3 件のコメント

this part is actually called the "top case", and is referenced as such in Apple's part numbers and take-apart guides.

David Iwanicki - 返信

Just did this. The guide is great. A good mod. Caveats:

(1) Use good screwdrivers... Really. I've done this for years and made the mistake of impatience anyway. I used poor-quality ones (though the right size) and partly stripped screws... Long story short, I had to buy replacement screws and dremel off the heads of the originals (thus also unable to easily re-use old top case)

(2) If your computer's old, you might need some new tape or adhesive at a few points (for the old sticky covers).

(3) If your upgrading A1226 to A1260 to get the new multi-touch trackpad (works BEAUTIFULLY, by the way :)), consider buying the keyboard with the upper case. Swapping keyboards is a fair bit of work, another chance to strip screws, and then you need to re-label (or swap) some keys to reflect the new special functions (these are changed by the new top case controller). If you keep the old keyboard (as I did), a simple P-touch labeler can be used to make new labels over the old keys (or you can swap keycaps if you have them from the new keyboard). Bottom line... A much more elegant solution is to swap the keyboard at the same time.

(4) Take care reassembling new the DVD drive. It's easy to bend the top piece of metal down (the one that engages the clips) and your DVD can get stuck occasional ejecting. Very annoying. Maybe give it a little prophylactic bend upward.

Overall, very happy!! Awesome pictures in the guide.

Yet another way to get good life out of an old Mac. Had an original MacBook Pro 3,1, since upgraded to new mainboard (under warranty), 6GB RAM, new MB fans (thanks iFixIt), new 500GB hybrid flash drive, now multi-touch thanks to this! Running 10.7.2 easily, great return on a purchase in 2007.

Cheers to the iFixit community!

davidkkim - 返信

I had a problem that is so common that I would love to see it as a comment within the guide: I spend the better part of a long afternoon reassembling different top cases and cables with the result that trackpad and keyboard didn´t work but the power button did. Sometimes both were working for a few minutes and next time I would start up they would be dead again. Solution was: The small cable that fits into the trackpad / USB Controller and takes the trackpad / keyboard signal to the logic board has a widely documented tendency to loose touch with its connectors after a few years. What helps is to apply pressure on the end of the cable where it enters the controller below the trackpad. Easy to check with fingers. In the long run use a piece of a thick plastic card or cardboard to apply pressure from the battery direkt on that spot. Easy. And works like charm. After I was so close before giving up my Macbook Pro or buying another topcase. Please add that possibility to the guide as it is really common.

David Schubert - 返信

コメントを追加

統計データ:

過去 24時間: 3

過去 7 日: 6

過去 30 日: 47

今までの合計 47,391