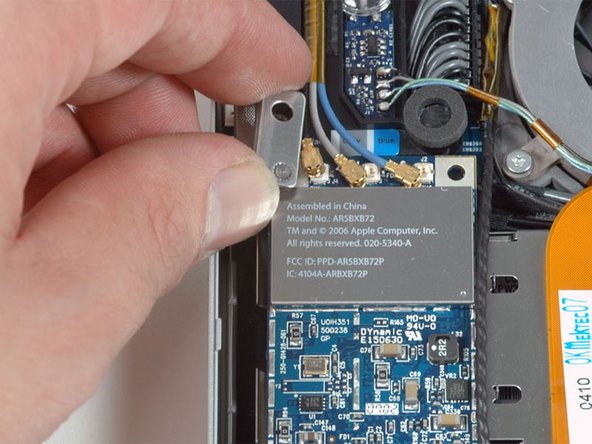
メインコンテンツにスキップ

MacBook Pro 15" Core 2 Duo Model A1211 Airport Extreme Replacement

必要な工具と部品

  1. MacBook Pro 15" Core 2 Duo Model A1211 Airport Extreme Replacement, Battery: 手順 1、 1の画像 1
    • Use your fingers to push both battery release tabs away from the battery, and lift the battery out of the computer.

  2. MacBook Pro 15" Core 2 Duo Model A1211 Airport Extreme Replacement, RAM Shield: 手順 2、 1の画像 1
    • Remove the three identical Phillips screws from the memory door.

  3. MacBook Pro 15" Core 2 Duo Model A1211 Airport Extreme Replacement: 手順 3、 1の画像 1
    • Lift the memory door up enough to get a grip on it, and slide it toward you, pulling it away from the casing.

  4. MacBook Pro 15" Core 2 Duo Model A1211 Airport Extreme Replacement, Upper Case: 手順 4、 1の画像 1
    • Remove the two 2.8 mm Phillips screws in the battery compartment near the latch.

  5. MacBook Pro 15" Core 2 Duo Model A1211 Airport Extreme Replacement: 手順 5、 1の画像 1
    • Remove the following 6 screws:

    • Two 10 mm T6 Torx screws on either side of the RAM slot.

    • Four 14.5 mm Phillips screws along the hinge.

  6. MacBook Pro 15" Core 2 Duo Model A1211 Airport Extreme Replacement: 手順 6、 1の画像 1
    • Remove the four 3.2 mm Phillips screws on the port side of the computer.

  7. MacBook Pro 15" Core 2 Duo Model A1211 Airport Extreme Replacement: 手順 7、 1の画像 1
    • Rotate the computer 90 degrees and remove the two 3.2 mm Phillips screws from the rear of the computer.

  8. MacBook Pro 15" Core 2 Duo Model A1211 Airport Extreme Replacement: 手順 8、 1の画像 1
    • Rotate the computer 90 degrees again and remove the four 3.2 mm Phillips screws from the side of the computer.

  9. MacBook Pro 15" Core 2 Duo Model A1211 Airport Extreme Replacement: 手順 9、 1の画像 1
    • Do not yank the upper case off quickly. The case is attached to the logic board via a ribbon cable.

    • Lift up at the rear of the case and work your fingers along the sides, freeing the case as you go. Once you have freed the sides, you may need to rock the case up and down to free the front of the upper case (there are some hidden plastic clips that need to be clicked off).

  10. MacBook Pro 15" Core 2 Duo Model A1211 Airport Extreme Replacement: 手順 10、 1の画像 1
    • Disconnect the trackpad and keyboard ribbon cable from the logic board, removing tape as necessary.

    • Remove the upper case.

  11. MacBook Pro 15" Core 2 Duo Model A1211 Airport Extreme Replacement, Airport Extreme: 手順 11、 1の画像 1
    • Disconnect the three antenna cables attached to the Airport Extreme card.

    • Apple was kind enough to include a label showing where each color antenna cable plugs in - just make sure to look at this when reconnecting the antenna cables.

  12. MacBook Pro 15" Core 2 Duo Model A1211 Airport Extreme Replacement: 手順 12、 1の画像 1
    • Remove the single black T6 Torx screw located just above the Airport Extreme card.

  13. MacBook Pro 15" Core 2 Duo Model A1211 Airport Extreme Replacement: 手順 13、 1の画像 1
    • Lift the small silver metal retaining bracket up and out of the computer.

  14. MacBook Pro 15" Core 2 Duo Model A1211 Airport Extreme Replacement: 手順 14、 1の画像 1
    • Lift the Airport Extreme card up and slide it out of its connector.

終わりに

To reassemble your device, follow these instructions in reverse order.

12 の人々がこのガイドを完成させました。

iRobot

メンバー登録日: 09/24/09

1 ポイント

636のガイドは作成済み

0 件のコメント

コメントを追加

統計データ:

過去 24時間: 1

過去 7 日: 4

過去 30 日: 12

今までの合計 29,389