はじめに
ディスプレイアセンブリ全体よりもLCDのみを交換して節約しましょう。このガイドでは、壊れたMacBook Pro 15インチ Unibody Mid 2010 LCDの交換を交換します。
必要な工具と部品
-
-
両手を使用して排気口の近くから底ケースを持ち上げて、上部ケースに固定している2本のクリップを外します。
-
底ケースを取り外して脇に置きます。
16 GB is the max
-
-
-
バッテリ上端の、2本のY1 トライウィングネジを外します。
-
※特定の修理(ハードディスクドライブなど)の場合はバッテリーを取り外す必要はありませんが、マザーボード上で誤ってショートさせてしまうのを防ぐ事が出来ます。バッテリーを取り外さない場合は、マザーボード上の部品が帯電している可能性があるので注意してください。
A 1/16th flathead screwdriver easily removes the tri-wing screws in this step. I could not find a Y0 Tri-wing driver at any local stores.
I'd like to add that for me, a 1/16th flathead screwdriver did NOT allow me to remove the tri-wing screws holding the battery in place. After several careful attempts, it became obvious I was perilously close to stripping the screw(s), so I abandoned the attempt to unscrew the tri-wing screws with a flathead screwdriver altogether. As it turned out, I didn't need to remove the battery to do what I needed to do (keyboard replacement), but it would have been a whole lot easier had the battery been easily removable.
The Tri-wing screw driver is impossible to find in retail, amazon and ebay are great bets but they vary wildly in quality... I ordered two, and both were so cheap, and barely got the job done. It could be worth getting it here. When you do get it, make sure you push, the Y0 screws were very tight in my macbook, pressing hard prevents you from stripping the Y screw.
I believe they are Y1 screws, no?
Mark -
What worked for me was actually a set of needlenose pliers - the heads on those screws aren't flush, they actually stick out enough that it's possible to turn them from the outside. Caused some scuff marks on the finish of the screws but it's not like anyone's going to see them anyway!
I had a cheap Tri-wing screw driver. The one that comes with the “Newertech“ battery. It did not make the job and it rather damaged the screws. Panic! I decided to buy the screwdriver sold by ifixit, the German one, not the other. At any point did I want more surprises. Yes it’s pretty expensive, but equally useful even with the screws already damaged. Thanks guys!
Raul Roman - 返信
-
-
-
指先を使って警告ラベルの隅を慎重にはがし、隠れているトライウィングネジが見えるようにします。
-
上部ケースとバッテリーを固定している、最後の隠れた7.4 mm Y1トライウィングネジを外します。
It is not strictly necessary. As mentioned above, removing the battery is the only way to be sure that no parts of the logic board are electrified. It is very easy to replace the hard drive without removing the battery, but it is safer to remove the battery first.
Note: removing the battery can cause a hitch with OS X 10.9 Mavericks installation to a blank drive, or at least it did for me.
Disconnecting the battery makes the hardware clock reset to something like Jan 1, 2000. This causes the Mavericks installer to fail its self-check with the error message: "This copy of the Install OS X Mavericks application can't be verified. It may have been corrupted or tampered with during downloading."
To fix this, you need to open up Terminal from the Utilities menu in the bootable OS X installer environment and use the `date` command to set your Mac's clock back to the correct time before proceeding with the "Install OS X" menu selection, as described here: http://blog.mconserv.net/2013/10/install...
Thanks for that warning, Andrew.
Happened here too, thanks for the tip!
As a note, my Mid-2010 Unibody Macbook did not have this third screw, just two to remove the battery.
Max Fenton - 返信
Can anyone answer this question. I cannot afford the entire 80 dollar repair kit listed here and the tools needed only list a spunger t6 and a phillips...it appears from some of these comments there are more drivers needed. I am afraid to do this anyway but not having the right tools off the bat will just make things more difficult while waiting for an order to come in...can someone list the exact tools I would need ? Any help would be appreciated...I am ready to order this but want to put in one order....ifixit, can you clear this up perhaps ?
One of the most important tool you should get is the head strap magnifier with lighting, it will make your viewing and capable ability much more confident.
James -
Taking the battery out is the easiest part once you have the Tri-Wing screwdriver
Ne trouvant pas de tournevis Y1, j'ai utilisé avec succès une pince électrique à bouts fins pour déserrer la vis puis j'ai terminé avec un tournevis plat très fin (1.5x35)
I stripped the Y screw! Arghhhh. Any help ideas?
erinandjoy - 返信
new battery drains at the rate of about 10% a minute. i may have received a faulty one but i wouldn't have bought it if i knew what i know now.
Is this a battery from iFixit?
-
-
-
バッテリーケーブルコネクターにアクセスするために、ロジックボードからバッテリーを十分に傾けて下に隙間を作ってください。
-
バッテリーケーブルのコネクターをメイン基板のソケットから手前に引いて接続を切り、バッテリーを上部ケースから取り外します。
-
100%になるまで充電します。充電後も最低2時間はプラグを繋げたままにします。それからプラグを外して、通常通り使用しながら、自然に放電させます。バッテリー残量小のサインが表示されたら、これまでの作業を保存して、スリープ状態になるまで放置してください。スリープ状態に入ったら、少なくとも5時間置きます。それから一気に100%まで充電します。
-
新しいバッテリーを装着後、通常通り作動しない場合は、MacBook ProのSMCをリセットしなければならない可能性があります。
I'm having the same problem as previous commenters: the battery now drains much faster. It's the original factory unit—I only replaced the HD, which is working great.
Is there something I am missing with the battery reconnection? Maybe it's loose?
I just want to make sure before I crack open my laptop again.
Fast battery drain problems might be due to a corrupted power manager circuit on the logic board. To reset it, remove the battery, press the power button for about 5-10 seconds, then reinstall the battery. I know the problem might have been partly due to removing the battery in the first place, but this is the procedure for resetting what might have gone wrong. It might also help to do a PRAM reset, by holding down Command-Option-P-R at power (not just from a restart), and let the Macbook chime twice after its initial powerup chime.
Buen tutorial, solo advertir una cosa: los tornillos de la batería (Tri-point), en mi caso estaban muy duros.. atención si se usan destornilladores baratos.. mucho cuidado porque puedes dejar el tornillo imposible de extraer..
fserranolv - 返信
-
-
-
-
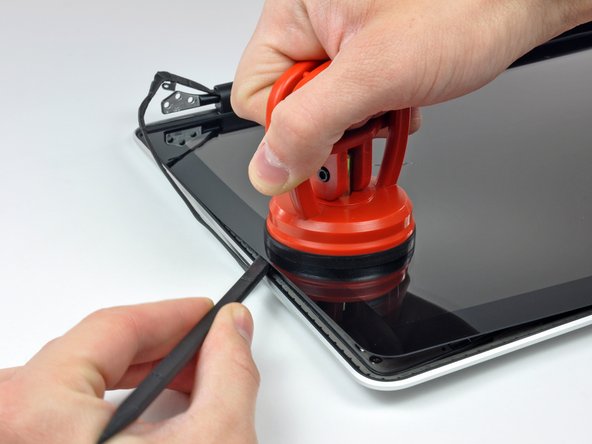
作業を始める前に、ディスプレイガラスを湿らせたリントフリーの布で綺麗に拭き取ってください。こうすることで、吸盤カップが装着しやすくなり、再組み立ての際、汚れチェックが簡単になります。
-
ヒートガンを弱にして、ガラスパネルの上部右側端附近の黒色ボーダーの外側から温めます。
Another caution is needed - the heat gun is capable of discoloring the LCD panel (giving uneven coloration) if it overheats. This is possible on the low setting. Proceed cautiously, heating in increments until the glass releases.
I was wondering the same, is absolutely necessary to disassemble the screen to change the glass? Can I jump to step 21?
caholzmann - 返信
To change just the glass I used a hair dryer it gives off enough heat to do the job. Stand the computer up on its cover with the key board standing up.start at a corner heat the adhesive as you go along. I Put credit cards in as I went along so the adhesive doesn't stick again. take your time . Its easy.
-
-
-
パネルに十分熱が当てられたら、重量用吸盤カップをディスプレイガラスの上部右側端にしっかりと取り付けます。
-
ディスプレイアセンブリからディスプレイガラスをゆっくりと丁寧に引き上げます。
Sufficiently heated is a meaningless phrase here. Is it two minutes? Three? Fifteen? An hour? I have tried doing this for increasing amounts of time while avoiding doing damage to the machine, and nothing is working. Sufficient heating needs definition.
Hi Keith, the key here is that you want to warm the adhesive that's spread thoroughly behind the masked-black area of the glass around the screen to release, but not put enough heat at the rubber gasket that seals the closed top lid to the base. Too much heat, too soon, will deform the rubber. Too much and you'll never get the glass to release. The 2x that I have done this, however, even with sufficient (and significant) heat, I remember the glass taking a surprising amount of leverage to pull clear. A tactic: using your heat gun warm all the sides of the display from the front, in a circulating/racetrack fashion - about 20 rpm. After 30sec, focus on the left and top sides, seesawing from bottom left, to top left, to top right, and back. Do that at the same pace, about 5-10 passes. Then spend about 10 sec waving over the whole top left corner. That should get enough heat to enough places to help the glass separate to start placing picks, and you can continue to heat the margins as you progress.
johnkimmel - 返信
-
-
-
ディスプレイガラスの角を丁寧に持ち上げて、ディスプレイアセンブリとディスプレイガラスの間にスパッジャーを差し込みます。
-
スパッジャーの平面側先端を使って、ディスプレイとフロントガラスを固定している接着剤をこじ開けます。
-
右側上部の角からディスプレイ上部と右側端に沿って、ガラスパネルを約4〜5cm持ち上げて外します。
Be patient and work slowly or else you will crack the glass like me.
I can not get the glass to come up despite two tries and dicsoloring the LCD with too much heat. Why can't I get the glass to budge at all?
bollucks66 - 返信
It is better , instead of using the suction cup , to use small flat end spudger . The suction cup should be used first to detach the window from the gasket , not furthermore as it may brake the glass.
I didn’t have large suction cups and the small ones didn’t work for me. Instead, I used an opening tool to pry up the glass slightly and got a guitar pick under it. Then I slowly worked the pick around the top three sides of the glass, heating sections of glue as I went.
I’ve managed to do it using hair dryer on max. First corner was though and took a lot of time to lift it. I decided to heat not only a corner but whole length and then it came off. I’ve put so much heat that was afraid I’ve damaged LCD, but it works fine. As BillyRachel1 said: patience is the way. In order to assemble it back I used old glue heated again. It’s easy but takes time.
Note: Don’t do this at home if you have cats otherwise you going to spend next hour or so trying to remove their fur from between glass and LCD. It’s because they all levitate after using hot air and just wait to stick to the screen again.
To be honest hardest thing was replacing clutch cover, took me so much time and I eventually cracked it.
-
-
-
ヒートガンを使って、フロントガラスパネルの右側に沿って熱を当て、黒いストリップの下に留められた接着剤を柔らかくします。
-
吸盤カップをフロントガラスパネルの右側沿いに取り付けます。
-
スパッジャーの平面側先端を使ってディスプレイアセンブリの残り部分からガラスパネルを外しながら、パネルを引き上げます。
-
ディスプレイからフロントディスプレイガラスが外れるまで、ディスプレイガラス右側端に沿ってスパッジャーでこじ開けます。
I used old credit cards
-
-
-
これでガラスの上部、左、右がディスプレイから解放されました。ゆっくりとガラスパネルの上部端を持ち上げて、ディスプレイから外します。
If you will be reusing the glass, with new adhesive, then you will want to remove the old adhesive. This is a bit of a pain, as alcohol doesn't work, and you need to be careful to avoid damaging the black screen border, which is black paint on the back (adhesive) side of the glass.
To remove the adhesive, note that it is actually a thin film with rubber cement on both sides. First, use a razor to carefully pull up one corner of the film and gently peel it off of the glass. If you are gentle and slow, the underlying adhesive may also come off; if not, then rubbing with your finger or a hard rubber eraser will do the trick.
If this is a rubber cement based glue, then would rubber solvent / thinner like N-Heptane help the removal process without damaging the black paint ?
Sandman619 - 返信
Don’t remove glue. Just reuse it by heating and sticking it again.
-
-
-
フロントベゼルにLCDパネルを取り付けている2.9 mmプラスネジを6本外します。
Hey guys, I need to get the part where the screws are on, whats its name or where could I find it? That part on my Computer broke.... Do you guys think its possible to guet it somewhere?
-
-
-
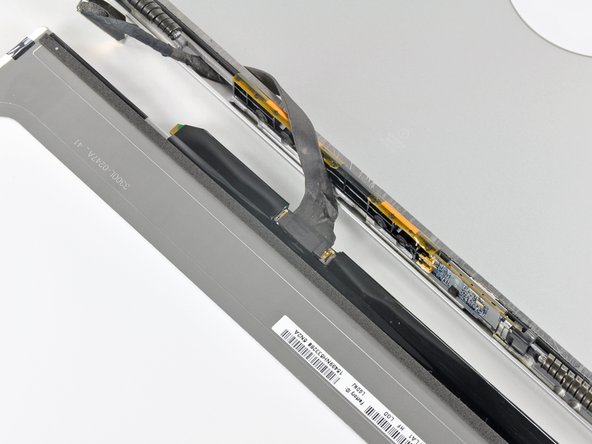
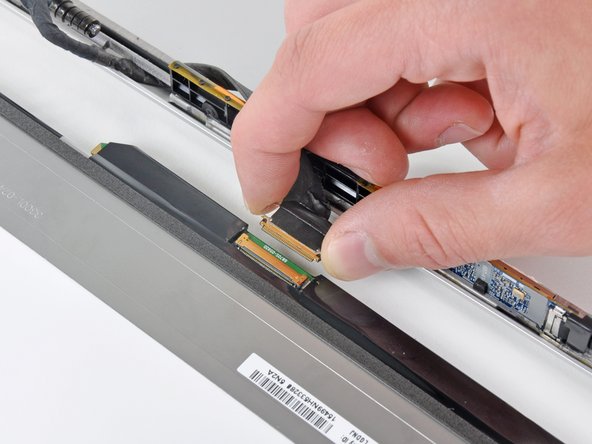
スパッジャーの先端を使って、LCD上のソケットにディスプレイのデータケーブルを固定している薄いスチール製の固定クリップを裏返します。
-
ディスプレイデータケーブルをLCD上のソケットからまっすぐ引き抜きます。
-
LCDをディスプレイアセンブリから持ち上げて、デバイスの脇に置きます。
Danke für das Bereitstellen der Anleitung dadurch konnte ich mein MacBook nach 12 Jahren Einsatz, für die nächsten Jahre fit machen.
Thanks you for providing this Manuel. It helped me, after 12 year of use to make my MacBook fit for the coming years.
-


デバイスを再組み立てする際は、これらの手順を逆の順番に従って作業を進めてください。
デバイスを再組み立てする際は、これらの手順を逆の順番に従って作業を進めてください。
39 の人々がこのガイドを完成させました。
以下の翻訳者の皆さんにお礼を申し上げます:
100%

Midori Doiさんは世界中で修理する私たちを助けてくれています! あなたも貢献してみませんか?
翻訳を始める ›

8 件のコメント
Everything in this guide is simple, except for tearing the glass plate off. I tried with a hairdryer (1200 Watt) first, without success. Then I used a hot air gun (at 400 deg. Celcius, about 750 Fahrenheit). It worked like a charm, but my rubber edge is somewhat shiny, and in one area there's a fingerprint now. Nevertheless, this operation saved me 400 Euros and I'm happy I did it.
arnebakker - 返信
I followed the guide and it worked very well. However, after heating the glass for removal I found the lower right corner to be the easiest. Then I used an old credit card to separate the glass from the frame by sliding it around. The hardest part was installing the new LCD panel and glass because of dirt particles and fingerprints. Great tutorial and guide.
For each step in the disassembly process, put the different screws into different shotglasses. Don't leave the screws lying around your desk unless you are a pro.
On a piece of paper, write the step #, and place the shotglass on it. If you have cats who might knock over your shotglasses, label them (the shotglasses, not the cats) using a piece of scotch tape. Then put them where they will not get destroyed by mischievous felines like a roll of toilet paper when you forget to close the bathroom door.
Read all comments in this section; they helped me a lot. DISCLAIMER: I am an idiot, and I confused the shotglasses containing cable restraints. I then spent about an hour trying to figure out where I'd gone wrong before I realized that the restraint in the photo was not the one in my hand. No wonder my father always gives me that look of disappointment when he sees me. Good luck!
Thank you ifixit for making this sound easy. I just shattered my display.
Think you from algeria
One more thing, replacing the screen when the translucent 'Apple' icon on the top case seems to have failed adhesive or bond and the old failing screen seems to be failed around this Apple area with a bright smudgy corona presently noticeable at centre screen. Can the white plastic of the Apple be 're-sealed' at the same time as any LED panel replacement?
Thanks again
Step 1 (technically step 9 - replacing the base plate) Apparently one of my screws was a micron or two smaller than the others. This screw belongs to the hole above the optical drive, which is also apparently a couple of microns smaller than the others. It took seven attempts to figure which screw had originally been in that hole; all the other screws were too large, but fitted perfectly everywhere else.
Bizarre much?
Will - 返信
It might be a matter of how the screws are driven in, and not that they're slightly different sizes. When I reassembled my MacBook, a couple of the screws, including the one over the optical drive you mention, were hard to drive in and jutted up a little bit instead of sitting entirely flush. Swapping screws didn't help. The solution was to unscrew them and drive them in at a bit of an angle - perpendicular to the slightly curved surface of the back plate where the screw holes were, instead of fully vertical with respect to the ground the Macbook is sitting on. Doing it that way, the screws were easier to drive in and they all ended up flush in their holes. Didn't matter which screws they were. (I swapped a few around just to check after reading this.)
Andrew Janke -
I had no such screw issues. Either there are differences in manufacturing lots or I just got incredibly lucky during reassembly!
xtophr -
I discovered a great way of organizing the screws. I used an ice cube tray and added the screws in order, keeping the different kinds together. So when it came to reversing the steps, the screw order was an added control step to returning everything in its place.
leonie - 返信
Great advise! Love it! :)
Ririds -
I used to do that and that worked really great until I bumped it by accident and the entire tray went on the rug! I spent the next day sorting things out.
Now I use these:
http://www.sciplus.com/p/50-114-CLEAR-PL...
The lower ones 50 to a package. I mark them w/ blue tape. Often if it's part like the fans, or the optical drive I'll tape the screws into/near the holes where they belong. I did this a lot especially w/ the bottom screws from MBPs until I'd done so many I knew exactly where the longer ones went.
Richard Sato -
I wrapped the screws in a piece of blue masking tape and wrote the number on the little pouch I made. Then I stuck the blue tape pouches on the underside of the case bottom in order.
Roscoe -
I take double-sided tape, put that on a piece of paper, stick the crews to that, and label them.
jelimoore -
Best I've found is a bead sorting tray. They're like $5 at Wal-Mart and they have a lid that seals up and won't let them jump between containers.
maccentric -
I take a sheet of paper, pierce the screws through the paper, take a pen and box the screws and write out what step they belong to.
Nils -
@Will, in my case I had the same result as you did. As a reminder to myself the next time I need to open the computer, I put a dot of white paint on those two screw's head and a very, very thin ring of white on the very edge of each hole, that way I'll know they go into those two holes.
Roger - 返信
Actually the four screws on the bottom were not threaded all the way up. I didn't check to see if the thread gauge was the same on them, but it wasn't until I had about four screws out (I didn't take them out in the order that the bottom all came out first) that I noticed a difference. I then took out the rest of the bottom ones to see if they matched the two that were already out that weren't threaded to the top. They did. So I went under the assumption that those were all bottom screws and when I put it back together everything went fine with no resistance.
So there are three types of screws: Four for the bottom, three long ones as indicated and three others that might be slightly smaller than the bottom ones.
wresnick - 返信
Hi,
Although its more than a year since your contribution, I thought you might be amused to know that it is not just that the screws go in more easily when at an angle, Apple actually drilled and tapped the holes at a 15% angle. I too had tried to drive them in straight. An Apple "genius" - I was in for something else - clarified the design for me. It was done so that the screws lay flush on the angled part of the lower case. Nice design, but since Apple encourages DIY memory and drive changes, they could have mentioned this little ... trap.
H Stahl -
MacBookPro8,2
Intel Core i7, 2,2 GHz, RAM 16 GB
Mountain Lion
May someone help me?
I have installed the second drive with ssd 840 evo, but when I try to copy the file from the new drive to the main hd this in not allowed (errore -36)
Piero - 返信
To my knowledge you can't transfer a single file more than 4gb. I advise compressing to a bunch of rars to split the file size and moving them individually
1982sketcher -
Hey everyone, here's the very best way to PERFECTLY organize your screws AND keep track of the order of the procedure: Get a piece of plain corrugated cardboard and a pen (I like using a Sharpie). For EACH step of the disassembly, draw a simple diagram of the layout of the computer on the piece of cardboard, with dots or Xs where the screws are located. Right after you remove each screw from the computer, poke a hole in the cardboard in its corresponding diagram position with your screwdriver and place the screw in that hole. If there are other non-screw related parts to be removed, you can add notes below each step diagram to remind you of where they go or how they should be placed. This cardboard method is great not only because your screws will not go flying or get mixed up by accident if bumped, but each screw goes EXACTLY back where it came from and you can keep the cardboard as a template for future use if necessary!
- zerø K
zeroK - 返信
a video of these steps
https://www.youtube.com/watch?v=SS9is40C...
julie56 - 返信
These instructions worked great for me. I ordered a replacement battery from Key Power (on Amazon) for my 15" Macbook Pro (mid-2010). Cost was $74 shipped.
Battery came with 3 different screwdrivers to help with installation. I just needed the one size though, since my 2010 seemed to use all the same size screws.
Thanks!
Marcos - 返信
During re-assembling (put the screws back in), it is important to note that the 3mm threaded holes are not completely vertical, but bent a little bit such that the hole direction is rectangular to the tapered surface. The force of the screwdriver must point towards the direction of the hole. Otherwise the screw gets jammed
kusi - 返信
There is a FOOLPROOF WAY TO ORGANIZE ALL SCREWS and other parts removed.
Print the repair guide.
Yes, the actual photo of the bottom of the laptop with the circles around the screws.
When you remove the screw, tape it to the photograph.
You will tape the screw to the exact location that you just removed it from.
Same thing with any part you remove.
splashzoneent - 返信
Thanks Splash!!! I used your suggested method, and it was perfect: kept all my screws, and i was able to, very easily, put them back in their correct place. I greatly appreciated your feedback. Thank you for sharing!!
Tommy Kedar -
Thank you!!! This worked fabulously - even the I.T. people at my workplace were excited as they never thought to do that before. Replacing the battery took about 10 minutes!
nclarke36 -
Worked like a charm! Took less than 20 minutes.
It's Oct. 2015, and the fan cost me about $10. it was the same brand/model...
SUNON MG62090V1-Q020-S99 .
SOME TRICKS -
1- no T6 screwdriver- was careful using needle nose players to loosen 2 screws protruding up, then use a small phillips to push real hard into the T6 slots, SLOWLY turn , also used a small flat head screwdriver (for eye glass repair) was able to grab thread on T6's, made a small mark with screw driver across the top so I could see when it started to turn.
2- no spudger -made one; cut a little strip 1/2" x 1 1/2" of plastic. couldn't get it to slide under plug, there's an edge where plug fits. so lifted old fan out, pulled upward on the plug it popped right out with very little effort. I used my home made spudger to push the new plug into place.
3- download free "Macs Fan Control" This is how I was alerted to the fan not working in the first place. Program shows temperature of all key components in the computer.
cheers- Durango CO!
Dgodrummer - 返信
Watch the video first, read the entire tutorial and all the comments before you start, and spread a white towel on the floor so you can find screws when you drop them. Watch this first -- http://www.youtube.com/watch?v=qiBxhA29e...
kevicoll409 - 返信
The link above is no longer available.
Kristina Graham -
I will be buying a battery from you and using your instructions. I just installed a new CD/DVD using your instructions and 1) I feel like I owe you something and 2) Although more expensive, I have the confidence your battery will work. My current battery is the original with 1399 cycles in 7.2 yrs. A tech buddy had bought me a replacement and I installed it. I had just installed a new OS and the kernel_task went going nuts, using 90% of the CPU. Hours on the phone with Apple did not resolve the issue. On a whim, I put the old battery back in and Voila! But I cannot risk my battery swelling and going south on me. I am also going to buy your installation tools. Yeah, I already have them. But you can never have enough tools…or beer. And you don’t sell beer.
Pete Banks - 返信
The instructions say that I am removing PH00 screws. I found that my MBP, mid ‘12, Retina has pentalobe screws instead!
jsandersonq - 返信
This laptop definitely originally shipped with Phillips screws—but, Apple has been known to replace Phillips screws with pentalobes when one of their devices is brought in for service. Sorry for the rude surprise! Fortunately the correct driver is easy to find nowadays. [Blatant self-promotion alert!] If you support free repair manuals, consider picking one up from iFixit. Good luck!
Jeff Suovanen -
Me, too, and it’s plausible that this machine has been serviced by Apple in the past, replacing the screws as Jeff Suovanen suggests.
iFixit shipped a pentalobe bit with the kit, but it’s too large for the actual screws, so it looks like I now need to get another bit. But what size?
Jeff’s link is to a driver with a P5 bit, and that page links to a P2 screwdriver, but since I don’t know what size I actually need (and I don’t have a micrometer to hand) I’m reluctant to buy two on spec.
Norman Gray -
(The bit in the kit appears to be a P6, so I’m inclined to order a P5 and see what happens)
Norman Gray -
You’re using the wrong repair guide. This guide is for the 2012 NON-Retina MBP. You have a Retina MBP. The stock case screws in the 2012 NON-Retina are all Phillips, just as the guide says.
Steven Wymor -
To keep track of screws, I used the suggestions above by taping a photo of the lower case to a piece of corrugated cardboard and inserting/taping the screws in place. Also, as some have noted, the screws go back in at a slight angle; they are angled toward the center of the unit.
Kristina Graham - 返信
If your vision, like mine, is getting too fuzzy to be able to distinguish between a tiny Phillips screwdriver and a tiny Tri screwdriver, there’s an easy way. With a Phillips (or a Pozidrive) you can get two opposite wings to reflect the light from a lamp or window straight towards your eye at the same time. With a Tri (or Penta) you can only get one wing to reflect at a time, however much you twiddle it.
Alan Waller - 返信
There’s a very easy way to avoid cross-threading a screw thread, any size.
Put the screw into its hole and start by turning it gently, slowly BACKWARDS. When you hear a little “Click!” sound, the male thread has just passed the opening in the female thread and is in exactly the right position to enter into it correctly when you start to turn in the correct forward direction.
Remember, all drivers except hex (Allen key) and TorX need pressure to avoid slipping out and damaging the head. So even when you want to turn it in with LOW moment/torque, keep the CONTACT PRESSURE high.
Alan Waller - 返信
The keep the pressure on is on point. In my case once I loosened my first screw I thought I could relief my initial pressure. It was a mistake. I was doing the whole thing very slowly as a precaution. That helped me notice that the Phillips screw driver was sliding up out of the screw head. Not being sure why, I put pressure back on the screw driver until almost all the screw was out of the hole. Once out, I examined closely to find out that the threads have some sort of coating. It looks to me like some kind of locktite. Then I understood the importance of keeping the pressure on all the way through. It made me uneasy having to keep so much pressure on such tiny screws, but I found it was the only way to prevent damage to the “slots” on the heads. Anyway, all of them suffered some degree of damage, but I was able to successfully remove them and reinstall all of them back in their original holes.
Martin Mejia -
After reading this page on iFixit several times, I just could not face all the work of replacing the Logic Boards on two MacBookPro 2011s even if I was prepared to pay approx 400 USD (which I wasn’t). Then I read the reviews of a couple of folks who’d stripped down their machines and put their logic boards in the oven and, it worked! I wondered, if I just used my new Steinel Hot Air Tool (heat gun in my language) recently delivered from iFixit, on the logic board in-situ, without removing it? So I removed the battery, hard drive, and RAM and unplugged all the leads I could see WITHOUT removing anything else physically. Then using the 500 degrees set on the gun (setting 2) I ‘played’ the gun over the logic board for about 60 seconds on machine one with the restart problem (plus latterly, not completing start-up). Long story short… it worked! I spent a long time getting the s/w to load, but the commentary is too short to let me relate that part… ping me if I can help you do the same! blackaye@gmail.com
Ian Black - 返信