はじめに
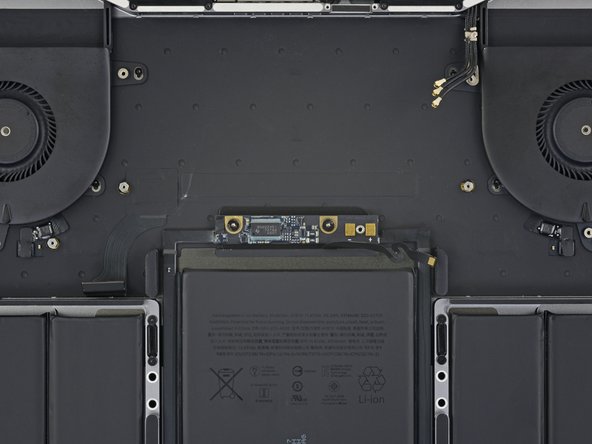
このガイドを使って、MacBook Proの接着剤で固められたバッテリーをiFixitの接着剤リムーバーを使用して交換します。接着剤リムーバーを使用すれば、消耗したバッテリーを固定している接着剤を弱めることができます。
iFixitの接着剤リムーバーは可燃性が高いです。このリムーバーを使って作業をする際は、通気性のよい場所で行ってください。作業中、付近で喫煙したり、火器のある場所で行わないでください。
ダメージのリスクを軽減するため、この作業を始めるにバッテリーを完全に放電してください。充電したリチウムポリマーバッテリーに穴を開けてしまうと、危険かつ手に負えない火事を引き起こしかねます。バッテリーが膨張している場合は、特に注意を払って適切な方法で処理してください。
ご注意: リムーバーはMacBook Proのプラスチック製スピーカーエンクロージャ(筐体)などのような、ある箇所のプラスチックにダメージを与えてしまうことがあります。リムーバーを散布する際は丁寧に作業を行ってください。
必要な工具と部品
-
-
Macを起動し、ターミナルを開きます。
-
以下のコマンドをターミナルにコピー(または正確にタイプ)します。
-
sudo nvram AutoBoot=%00
-
[return]キーを押します。パスワードを求められたら、管理者パスワードを入力し、 [return]キーを再度押します。補足: [return]キーは ⏎ や "enter"として印字されている場合もあります。
-
sudo nvram AutoBoot=%03
-
-
-
P5ペンタローブドライバーを使って、下部ケースに固定された6本のネジを外します。
-
6.2 mmネジー2本
-
3.4 mmネジー4本
Sur le mien A1708 EMC3164 j’ai 4 vis de 6,2 (les coins) et 2 vis de 3,4 celles au milieu en bas
Ce tutoriel n’est pas dans la bonne section !
c’est le 13” avec touch bar et non celui avec les touches de fonction .
l’autre tuto nommé “écran complet” est le bon
Bonjour Vincent,
Si vous cherchez le même tutoriel pour le MacBook 13” non Touch Bar, le voici : https://fr.ifixit.com/Tutoriel/Remplacem...
Before you start I suggest you get magnifier eyeware as screws and connectors are very small and good lightning are a big PLUS
Completed whole steps in over 4 hours….but worth it. Works back perfect and battery error message is gone….
-
-
-
吸盤ハンドルをMacBook Proの正面中央付近の下部ケース上に装着します。
-
吸盤ハンドルを持ち上げて、下部ケースと筐体の間にわずかな隙間を作ります。
-
-
-
下部ケースと筐体の間にできたスペースに開口ピックの先端を挿入します。
-
一番近いコーナー周辺に開口ピックをスライドして、ケースの片側サイド全体を移動させます。
The instruction implies that sliding the pick up to the side of the case releases the clip. This is far from the truth; it takes a pretty strong force to pop the clip open. The plastic pick is a good start, but you need to reach in and pull the middle of that side of the case pretty hard.
-
-
-
開口ピックを下部ケースの正面側端の下、中央部分にある2本のネジの一方付近に再び差し込みます。
-
ピックをしっかりと持って捻り、筐体と下部ケースを固定している3番目のクリップを外します。
-
この手順を繰り返して、中央部分にある2本のネジのうち、もう一方のネジ付近にも差し込んで、4番目のクリップを外します。
Look at Step 8 pics 2 and 3 to see exactly where the clips are that need to be released. Taking the bottom cover off my MBP took for ever because I didn’t realize the clips were not right around the edges as the wording suggests. Once I realized this, it came off quickly and easily.
-
-
-
MacBookの正面側に向けて下部ケースをしっかりと引き抜きます。(ヒンジから外します)ケースを固定している最後のクリップが外れます。
-
まず一方のコーナーを引っ張り、それから反対側のコーナーを引っ張ります。
On the 2018 model, there are two more clips that need to be popped on the sides in the middle. Then it slides out easily.
-
-
-
下部ケースを取り出します。
-
ディスプレイヒンジ付近のクリップの位置を揃えます。カバーをヒンジ側に押し込みます。クリップが装着されると、それ以上スライドできなくなります。
-
スライドしてクリップが完全に装着して、下部ケースが正しく揃ったら、下部ケースをしっかりと押させて、隠れた4つのクリップも装着します。カチッと音がして装着感があるはずです。
-
-
-
バッテリーに一番近いロジックボードの端上に付けられたバッテリーコネクタを覆う大型テープを慎重に剥がします。
-
テープを剥がします。
Please be VERY careful, I torn up my battery cable and had to replace all the battery.
-
-
-
バッテリーボードのデータケーブルコネクタを覆っている小さなテープ片を慎重に剥がします。
-
-
-
スパッジャーの先端を使って、ケーブルをコネクタに固定している小さな黒色のロッキングタブを持ち上げます。
Be very careful here. I had to repeat this procedure several times on my MacBook Pro to replace faulty monitors. Eventually, after being opened and closed so many times, the small black locking tab came right off of the connector. Now my battery connection is broken and I can only use my MacBook when it is plugged into the power supply. I’m trying to find a way to securely connect the battery cable without this little locking tab (maybe with tape or something), but so far no luck. Does anyone at iFixit have any advice for me?
Jamie Near - 返信
Like Jamie said, use mass amounts of caution here. The lever is very fragile, and mine came off as well - and I’m not exactly a muscular guy. Without it, the connection cannot be made to the data connector, and the computer will not think that a battery is installed. I had to finagle my connector with tweezers and a spudger back into place (and the picture above makes it look normal sized. The picture lies. It is TINY! We’re talking smaller than a small eyelash tiny), and then used some of the adhesive battery strip to hopefully keep it in place.
The previous comments are not exaggerated. There ain’t NOTHIN’ to that locking bar. I found it helpful to zoom in with my phone to work on it. It really requires no force to move, I imagine the tape is there to hold it down.
-
-
-
スパッジャーを使って、バッテリーの接続を外して、バッテリーパワーコネクタを慎重に持ち上げます。
-
コネクタを十分の高さに持ち上げて、ソケットから離します。修理中、アクシデントで接触しないようにご注意ください。MacBook Proにダメージを与えてしまう可能性があります。
Dies ist kein Stecker sondern eine Kontaktplatte, die nur leicht angehoben werden muss. Dann am besten mit etwas Tesafilm isolieren.
(Translation for myself and others; Thanks for the nice tip by the way!) This is not a plug but a contact plate that only needs to be lifted slightly. Then it is best to isolate with some scotch tape.
S Woo -
-
-
-
iOpenerを温めて、トラックパッドリボンケーブルの上に1分ほど置き、トラックパッドリボンケーブルをバッテリー上部に固定している接着剤を柔らかくします。
-
iOpenerをお持ちでない場合は、ドライヤーでケーブルを温めてください。ケーブルは触っても熱すぎない程度にします。バッテリーを温め過ぎないように注意してください。
I was able to extremely gentle peel (just applying a little bit of continuous tension and waiting for the adhesive to release) the cable off without heating. It came off relatively easy, probably due to age or heavy usage in the past.
-
-
-
T3トルクスドライバーを使って、キーボードコネクタのブラケットから1.9 mmネジを2本外します。
-
-
-
スパッジャーを使って、ロジックボードからキーボードコネクタの接続をまっすぐ引き抜いて、接続を外します。
-
-
-
T3トルクスドライバーを使用します。
-
左側Thunderboltポートコネクタブラケットの1.4 mmネジを2本外します。
-
右側Thunderboltポートコネクタのブラケットから1.4 mmネジを2本外します。
If you are trying to replace the Thunderbolt port boards, you have to finish removing the entire logic board in order to get to the 2 screws holding each board in place. You can leave the battery and track pad in place though.
Apple used poor quality boards for the thunderbolt boards so they will definitely wear out over time. Make sure you replace them with metal boards and your USB C cable will click in nice and tight for a really long time.
-
-
-
-
スパッジャーを使って、左側Thunderboltポートコネクタをロジックボードからまっすぐ引き上げて、接続を外します。
-
コネクタをゆっくりと傍に寄せてください。ロジックボードを取り出す作業に影響しないようにします。
-
-
-
T3トルクスドライバーを使って、Touch IDを固定しているカバーブラケットと、3.5 mmオーディオジャックコネクタから1.9 mmネジを2本外します。
-
-
-
3.5 mm オーディオジャックのフレックスケーブルを、ロジックボードからまっすぐ持ち上げて接続を外します。
-
慎重にフレックスケーブルを傍に寄せます。
-
-
-
中程度に温めたiOpeneやヒートガンもしくはヘアドライやを使って、電源ボタン/Touch IDフレックスケーブルの下の接着剤を温めて柔らかくします。
-
-
-
開口ピックをフレックスケーブルの下に慎重に差し込んで、ロジックボードから乖離します。それからゆっくりと傍に寄せてください。
-
作業がうまく進まない場合は、無理やり行わないでください。若干熱を加えて、接着剤を温めてから再試行してください。
First let me thank you for this AMAZING guide which helped me a lot to achieve an almost successful battery replacement… I’m saying “almost” because, as you write in red letters, I wasn’t careful enough and my Touch ID cable got damaged.
Do you have any idea on how much should such a repair cost?
I know that only apple stores or authorized service providers can perform such a repair…
Thanks again!
Boy that’s a tough one :( It’s among the most problematic of all components to replace, because the fingerprint sensor is cryptographically paired to the logic board. The best option might be to get in touch with a skilled microsolderer and ask if they can take a look at the cable and try to repair the traces. Apart from that, the only options I’m aware of would be to pay Apple whatever they demand for a repair (no idea, but most likely a lot), or replace both the sensor and the entire logic board with another set that is already paired and undamaged. Wish I could be more help. Good luck!
Difficult though it may be, as a retired fixer, and amazed at the new tiny tiny parts, I am even more amazed at this new cooperative culture of fixers. The depth of helpful detail is amazing. The new environment of cheap special tools, and amazingly detailed hires pics is a powerful new repair meme. I used i-fixit for my first MBAir, but haven’t the skills for this, my current mac. But this addition, the carefully inserted comments of users, and the skills and cooperative attitude of you all, is quite amazing. And I watch and admire. Well done, you.
This cable has a metal plate that is PART OF THE CABLE. It is initially invisible, and can easily be mistaken for part of the logic board upon which it is adhered. As you begin to try to peel it up, make certain that your tool is also making its way beneath that integral thin metal plate. There are chip components that will delaminate from the cable if you attempt to lift it, or if your prying tool happens to not make it under the plate.
-
-
-
T3トルクスドライバーを使って、Touch Barデジタイザーのコネクタブラケットより1.9 mmネジを1本外します。
-
-
-
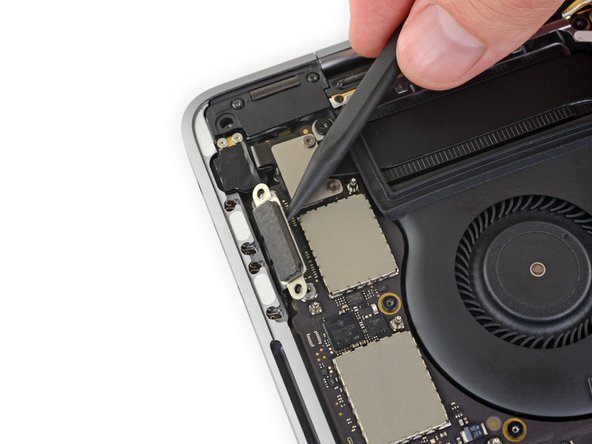
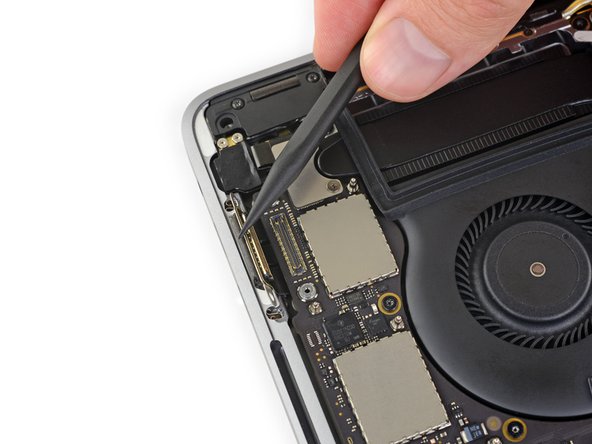
左側メインスピーカー用のソケットを覆っているテープがあれば、剥がしてください。
For me, the main speaker tape on both sides tore loose, which is a real shame, because those are the two hardest to get back in - they're very short and stiff.
Important safety tip: On my laptop, the cables have two semicircular notches near the end. You can tell when they're fully-inserted when the notches are inside the connector.
-
-
-
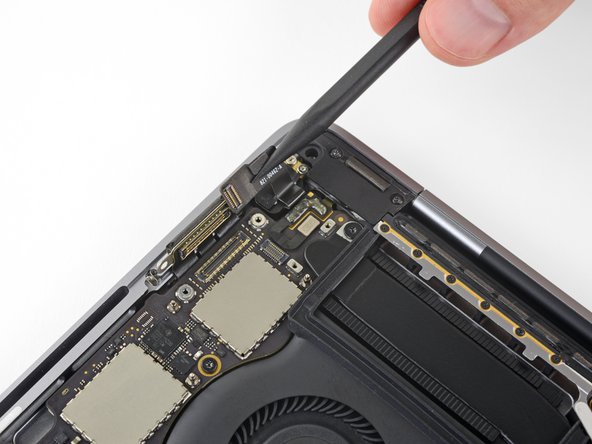
前の6つの手順を繰り返して、反対側のツイーターと右側のメインスピーカーの接続も外します。
-
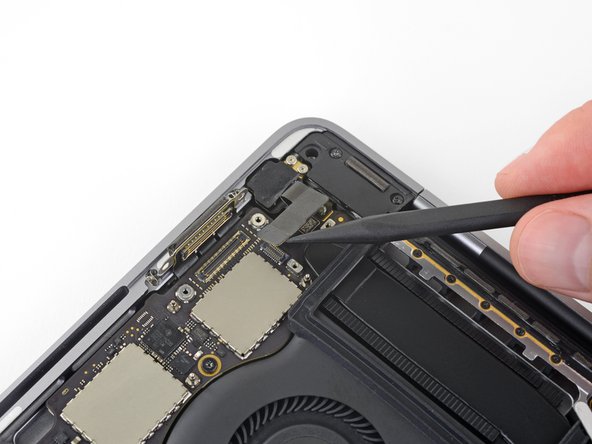
ツイーターコネクタを覆っているテープがあれば剥がしてください。
This step seems redundant as those six steps get repeated in detail anyway after this step.
-
-
-
最初のアンテナケーブルを、ソケットからまっすぐ持ち上げて接続を外します。
-
ピンセットもしくはスパッジャーの平面側先端を慎重にケーブルの下でスライドして、ソケット付近で止めます。それから慎重にツールでひねったり、こじ開けて、接続を外します。
-
-
-
前の手順を繰り返して、残りのアンテナケーブル2本についても接続を外します。
Reconnecting is very tricky. It doesn't take much force to push down, but the connectors have to be perfectly aligned. You won't really feel it snap into place, but it will stay put and resist wiggling.
Agreed, very tricky step. I found the two slightly longer leads easier to reattach. Then I used them as a visual guide to attach the small lead. It helped to slightly bend the lead. Glenn is correct, it doesn’t take much pressure to attach but the leads have to be perfectly aligned. Be careful if you test the fit, very easy to pry back off.
-
-
-
ロジックボードアセンブリを固定している10本のネジを外します。
-
2.5 mm トルクスT3ネジー3本
-
2.9 mm トルクス T5ネジー5本
-
3.0 mm トルクス T5ネジー2本
-
-
-
2つのゴム製ファン用振動減衰ストリップをファンに固定するための接着剤から剥がします。(完全に外さないでください)
-
必要に応じて、iOpener、ヘアドライヤー、ヒートガンで中程度の熱を当てて、接着剤を柔らかくすると、剥がす作業がスムーズになります。
Mine had no adhesive on them at all. You only need to make sure they are loosened from the fan shroud. They come out with the logic board assembly.
-
-
-
ロジックボードアセンブリを取り外すには、左側から持ち上げます。
Wichtig !!
Vorher den Display Anschluß (hinten mitte) Abschrauben und lösen.
2x bleche mit jeweils 2 Scxhrauben
Ist nachgetragen. Danke!
What just happened… While I was removing the logic board one of the small black boxes from the bottom right just fell off. I am not sure but I think it is a capacitor - it says KO 336 16K 723. It just fell, I did not even touch this part… Maybe it was broken when I opened up the case in the beginning, but I did not notice it then.
Did I just break my laptop?
Translation
Important !!
First unscrew and loosen the display connection (rear center).
2x plates with 2 screws each
glendstone - 返信
@Glendstone You are absolutely right. This is a key feature they forgot to explain.
The feedbacis has possibly already been addressed in step 27 as it was already fully disconnected when I got to this step.
-
-
-
ゴム製振動ダンパーの位置が揃っているか調整しながら確認します。
-
アンテナケーブルのバンドルをロジックボードとヒートシンク間の隙間に通して、ボードを取り付けた時にケーブルが正しく繋がっているか確認してください。
-
インストールする際に、ケーブルがボードの下に閉じ込められていないか確認してください。特にマークしたエリアをよく確認してください。
-
-
-
T5トルクスドライバーを使って、バッテリーボードから3.2 mmネジを2本外します。
Terrible time to lose screws, but that is exactly what ended up happening to me. I lost the battery board screws and ended up crazy glueing down.
-
-
-
ディスプレイを保護するため、作業中はディスプレイとキーボードの間にアルミフォイルシートを装着してください。
-
さらに、ペンキ用などの剥がしやすいテープをトラックパッドエリアに装着してください。オプションとして、余分な接着剤リムーバーが飛び散らないように、トラックパッドエリアの下に直接紙タオルなどを載せてください。
From here onward I just used the plastic cards provided without the adhesive. It just cut through the tape and took them off in 2-3 mins without any issue. I tried the floss and it just kept breaking and I didn't want to use the adhesive remover liquid if I could find another way. Using the cards was the best for me.
-
-
-
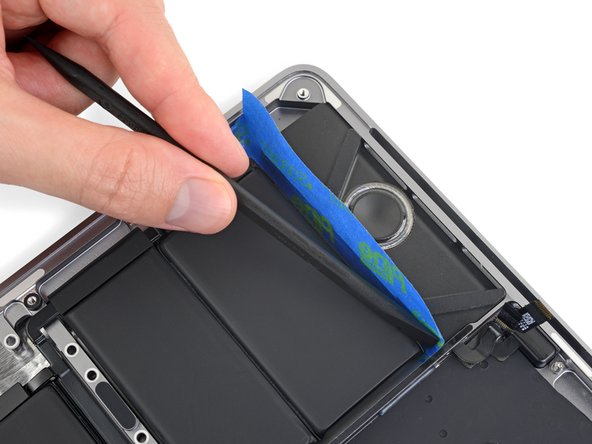
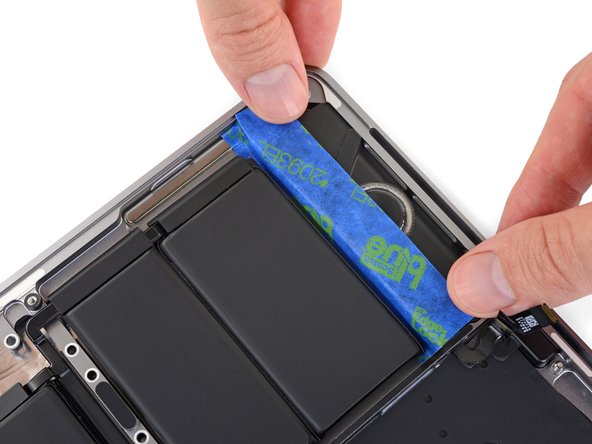
ペイント用のテープを適切な長さに切って、左側のバッテリーとスピーカーの間の端に差し込みます。
I didn’t have packing tape or painter’s tape so I tried to use some of the packing materials, but that was a bad idea. What ended up working for me was to elevate one side and used the plastic card to to direct the acetone away from the speaker. Worked a-ok.
-
-
-
前の手順と同じ作業を反対側でも行い、バッテリーからスピーカーをシールで遮断してください。
Note that no matter how well you tape off the speakers and elevate the sides of the laptop, there is not a lot of space between the battery and the speaker, and adhesive remover WILL wick under the speakers. Yay for capillary action, I guess? . . ..
-
-
-
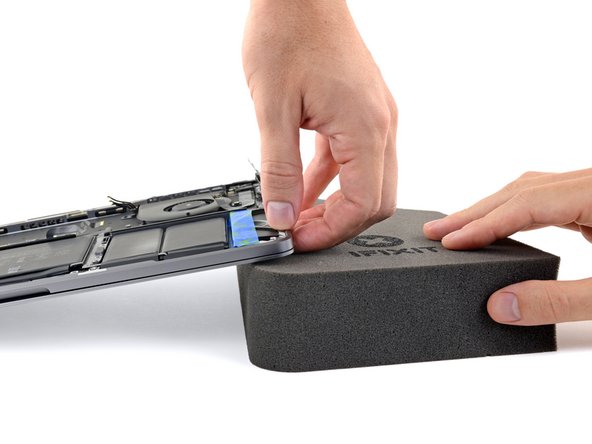
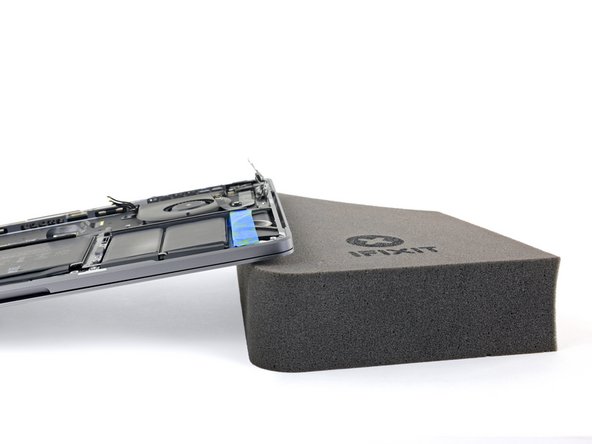
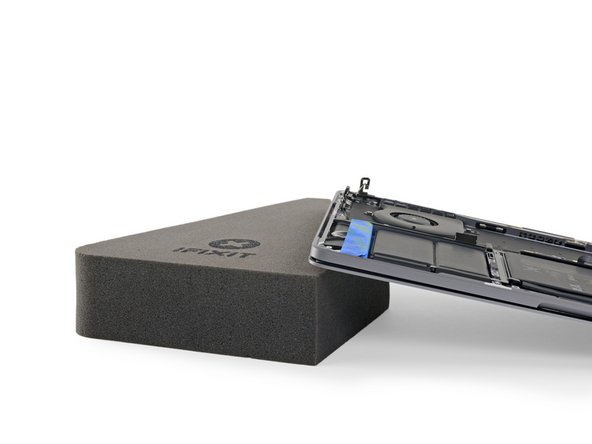
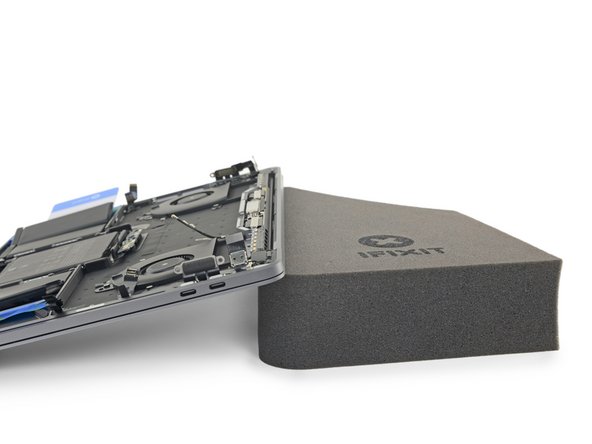
接着剤リムーバーの流れをコントロールするには、MacBook Proの裏側端(ヒンジ側)の下に本やホーム製ブロックなどを置くなどして、5cm程度傾斜させてください。
The Fix Kit box is the perfect size for this job. I stuck a little packing tape from the metal case to the box to stop it accidentally sliding off.
-
-
-
MacBook Proの作業準備が完了です。次は、あなた自身を安全装備しましょう。
-
接着剤リムーバーを塗布する際は、保護メガネを着用してください。(保護メガネはキットに含まれます。)
-
保護メガネを装着せずにコンタクトレンズの装着はしないでください。
-
保護グローブもキットに含まれています。肌荒れや敏感肌の方は、ここでグローブを装着してください。
-
-
-
黒いゴム製ストッパーを接着剤リムーバーから引っ張って外します。
-
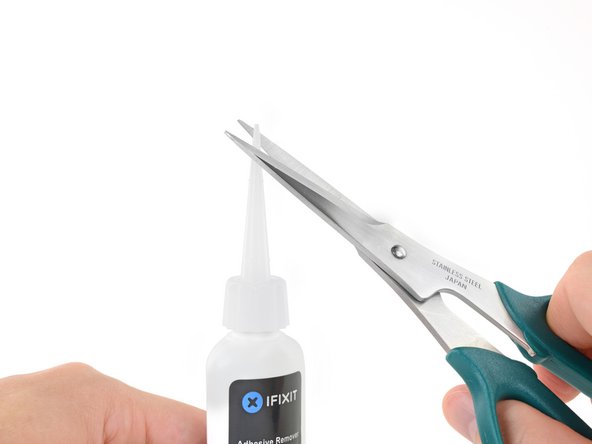
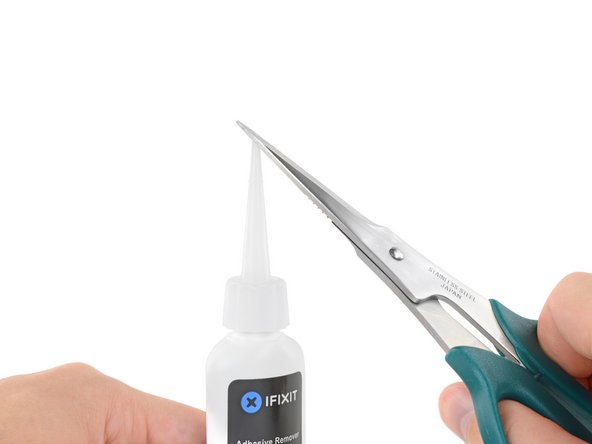
ハサミを使ってアプリケーターのシールされた先端をカットします。
-
先端を細くカットすると、少量のリムーバーをコントールよく塗布できます。
-
-
-
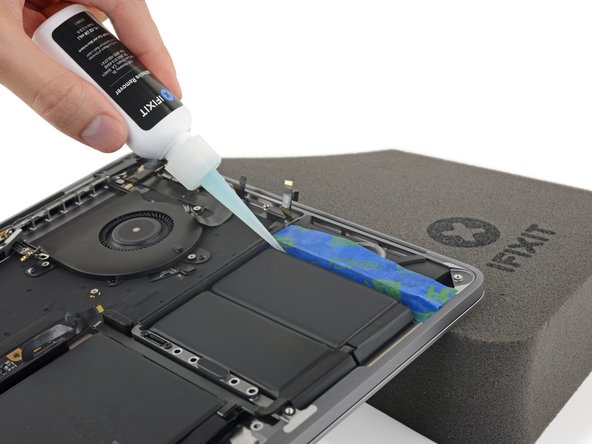
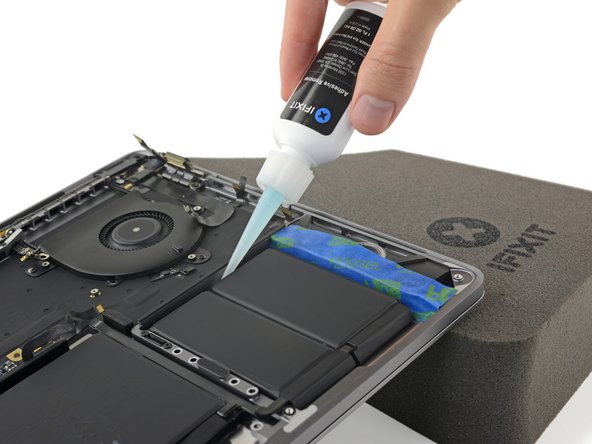
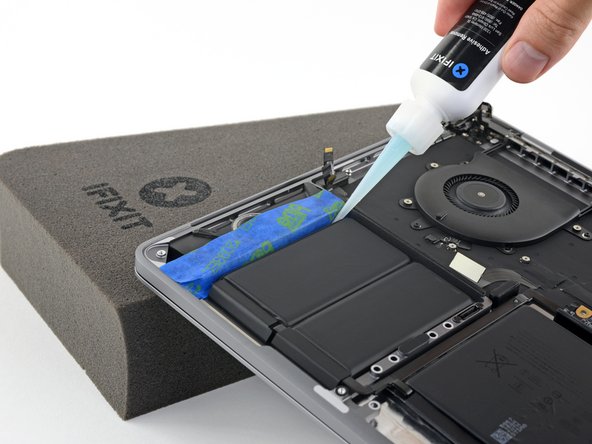
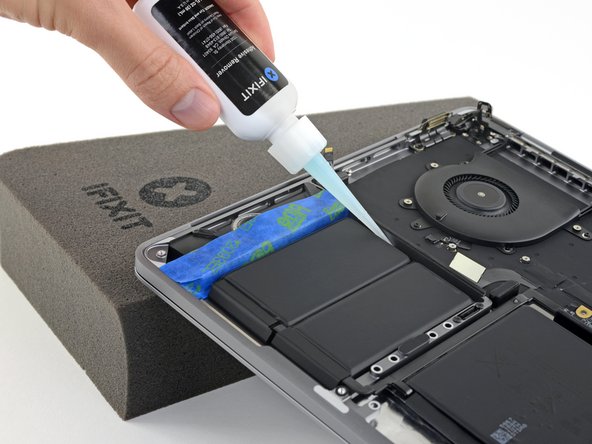
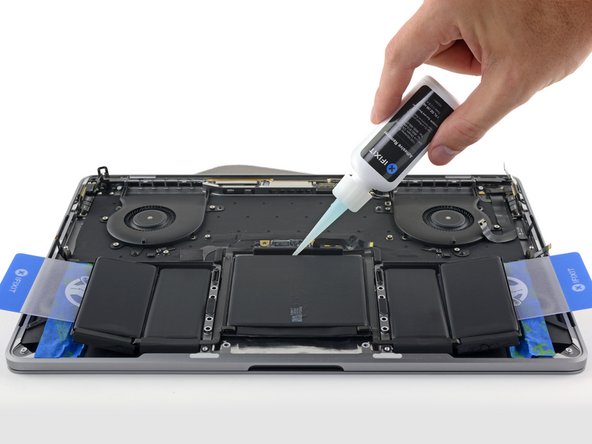
接着剤リムーバーを2つの右側バッテリーセルの下に塗布します。
-
液体接着リムーバーが浸透して、接着力が弱まるまで、約2分間待機してください。それから次の作業に進みます。
It REALLY IS strong solvent! I accidentally got some on the rubber strip between the battery and the logic board compartment and it peeled right off! I had to replace this with some spare rubber feet I had for another device.
-
-
-
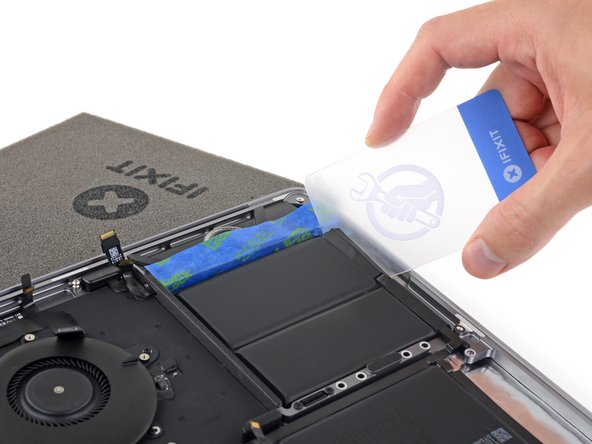
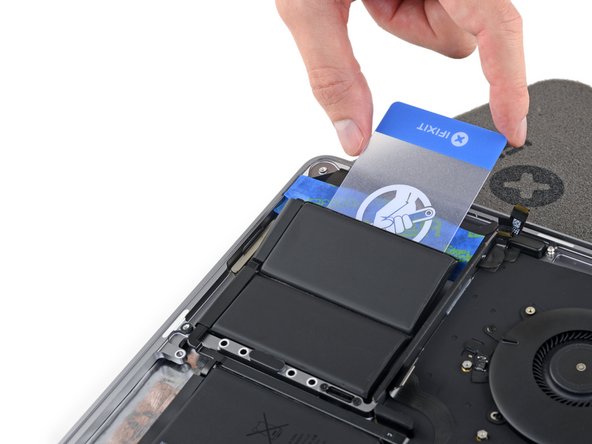
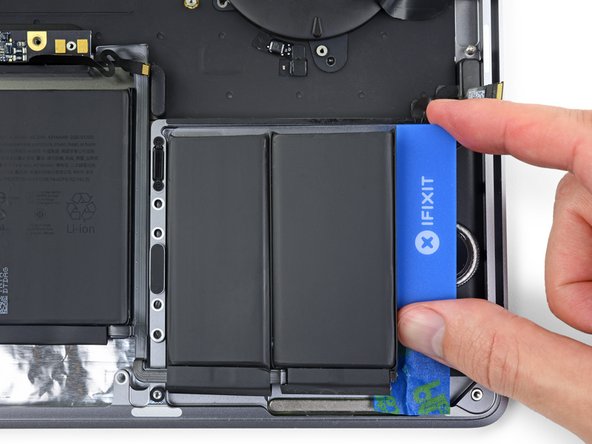
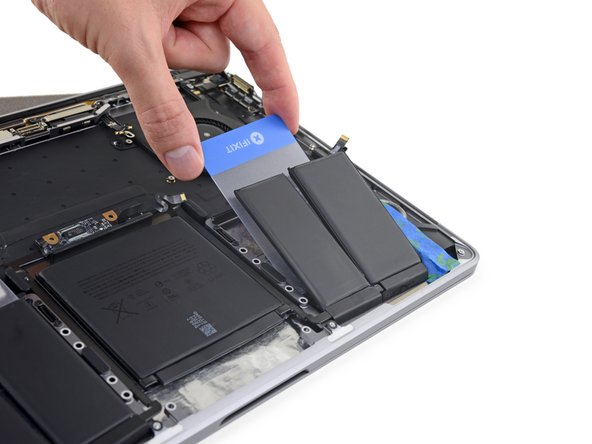
2、3分経過後、プラスチックカードの角をバッテリーの下に差し込みます。一番右側のセルの下側端から作業を初めてください。
-
カードを左右に揺らしながら、2つのバッテリーセルの下全体をスライドします。
-
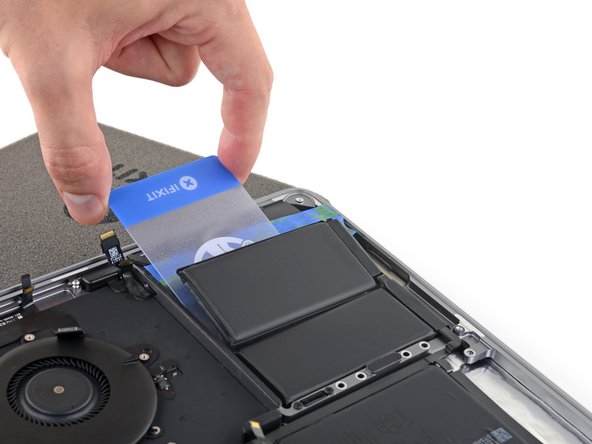
接着剤を完全に剥がせたら、バッテリーを持ち上げますが、MacBookから完全に取り出さないでください。
-
プラスチックカードを一時的にバッテリーの下に残します。次の作業に進んだ時、接着剤が再装着するのを防ぐためです。
-
-
-
バッテリーセルの下のカードが上手くスライドできない場合、フロスやワイヤを使って、バッテリーセルの下に通し、鋸を引くように交互に左右へ引きます。
Bei der Entfernung der Akkus mit Zahnseide oder Maurerschnur jeden Akku seperat lösen.
Wie im Bild gezeigt von hinten einfädeln und dann zwischen den beiden Akkus nach vorne lösen.
Dabei die Zahnseide wie eine Säge nach rechts und Links bewegen.
Bei den kleineren Akkus sind die Klebestreifen von hinten nach vorne. Somit ist das auch die Richtung wie man sie einfach lösen kann.
Der Mittlere Akku ist von links nach rechts verklebt. Somit sollte man dort die Richtung ändern.
Danke für die Erläuterungen!
Translation (Google) : When removing the batteries with dental floss or masonry cord, loosen each battery separately. Thread it in from the back as shown in the picture and then release it to the front between the two batteries. Move the floss to the right and left like a saw. On the smaller batteries, the adhesive strips are from back to front. So this is also the direction how to solve them easily. The middle battery is glued from left to right. So you should change direction there.
-
-
-
前の2−3の手順を繰り返して、一番左側のバッテリーセルを乖離します。
-
MacBook Proの左側を上げて、接着剤リムーバーがスピーカーに流れこまないようにします。
-
-
-
一番左側バッテリーセルの下に、プラスチックカードの1つのコーナーをスライドして、バッテリーを固定している接着剤を慎重に剥がします。
-
作業中にセルが再接着しないように、プラスチックカードをセルの下に一時的に置いておきます。
-
-
-
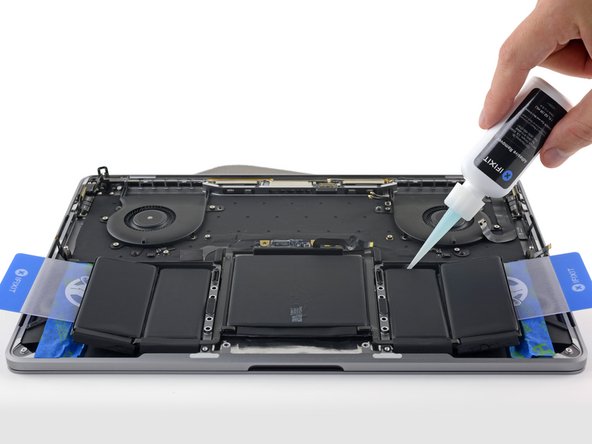
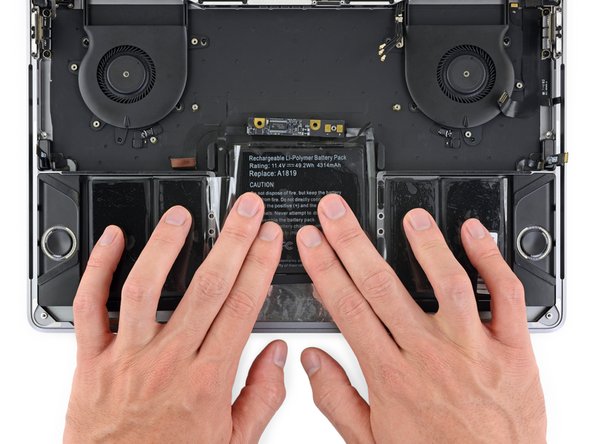
残り3つのバッテリーセルの下に、接着剤を数滴落とします。
-
リムーバーの漏れに注意し、必要に応じて次の手順で接着剤リムーバーを追加してください。
-
次の手順に進むまでに、約2分間置いてください。
-
-
-
前の手順で既に分離した左端バッテリーセルの下にプラスチックカードを完全にスライドさせ、残り左側のバッテリーセルとMacBook Proのアルミケースの間に慎重に差し込みます。
-
-
-
プラスチックカードの一角を、一番大きい中央のバッテリーセル上部の下に差し込みます。
-
カードを左右に揺らしながら、バッテリーセルの下をスライドして、固められた接着剤から完全に乖離します。
-
-
-
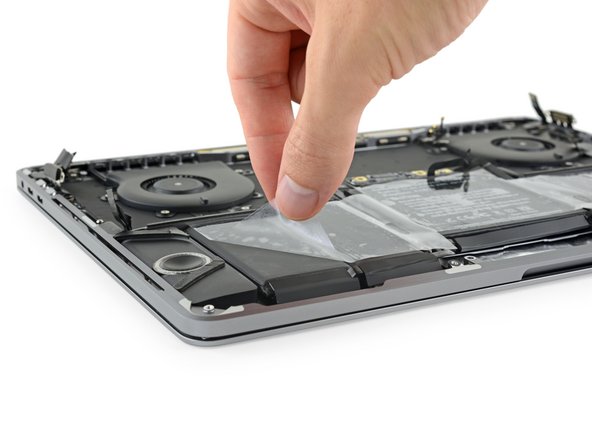
バッテリーを持ち上げて取り上げます。
-
新しいバッテリーを装着する前に、MacBook Proのケースに残っている接着剤を全て綺麗に取り除いてください。
-
手袋をはめた指先もしくはピンセットを使って、接着剤の長いストリップを剥がします。
-
プラスチック製ツールで残りの接着剤の塊を削ぎ取ります。イソプロピルアルコールもしくは接着剤リムーバーを使ってバッテリー下のエリアを綺麗に拭き取ります。前後ではなく、一方向のみに拭いてください。
-
作業終了後は、保護用テープをスピーカーから慎重に剥がします。
-
-
-
旧モデルではバッテリーデータケーブルが、バッテリボードの下に挟まっていないか確認してください。
-
バッテリーの底側にプレインストールされた接着剤が付いている場合は、裏返して、慎重にシールを剥がして、接着面を露出させます。バッテリーに接着シールが付いていない場合は、Tesa 61395のような両面接着テープを使ってバッテリーを固定します。
-
バッテリーの装着位置を確認したら、定位置に取り付けます。
-
バッテリーをしっかりと5−10秒間、下部ケースに押し込んで、固定させます。
Step 88 is a bit . . . . sparse. “Carefully position the battery and set it into place.“ Ha! Be prepared for mass amounts of swearing (and I don’t usually swear). iFixIt sends you a battery that has the adhesive strips covered with one long very thick piece of plastic. And by “battery” I mean five discreet sections held together with thin ribbon cables that make the entire thing as wriggly as a toddler and as unstable as my girlfriend in college. If you take it off the thick plastic and try to maneuver the battery into its very specific places while the battery’s strong adhesive strips stick to everything but what it should you will rue the day. Rue, I tell you! I cut the top piece of thinner plastic into three sections (middle, left side, right side) so I was able to place one section at a time, and it made it much easier (well, “much” may be a stretch. How about, “only slightly less-sweary”).
I feel sorry for Wayne though happy for his comment. I got my battery pack delivered with 5 separate plastic covers on the adhesive strips under, and one long plastic sheet holding the five parts together at the top. Thanks to the latter, I could easily position the 5-pack, remove the cover from the bottom parts one by one, and the holding sheet at last.
Thank you Wayne and thank you iFixit :-)
Thank YOU for this comment to Wayne because I too was confused about the purpose and proper use of the aligning plastic and adhesive pads. I originally thought it was meant to be the tape/pads to hold the new battery in place in the macbook, albeit they were a lot thicker and the way they were arranged etc made no sense for how to use it that way. Once I read your comment it all made sense and with the addition of some 3M double-sided I was all set. Thanks Paul!
-
交換用のパーツとオリジナルのパーツを見比べてください。残りのコンポーネントを移植する必要があるか、パーツを取り付ける前に接着剤の裏張りを取る必要があります。
デバイスを再組み立てする際は、これらの手順を逆の順番に従って作業を進めてください。
e-wasteを処理する場合は、認可済みリサイクルセンターR2を通じて廃棄してください。
修理が上手く進みませんか?基本的なトラブルシューティングを参照するか、アンサーフォーラムを検索してください。
交換用のパーツとオリジナルのパーツを見比べてください。残りのコンポーネントを移植する必要があるか、パーツを取り付ける前に接着剤の裏張りを取る必要があります。
デバイスを再組み立てする際は、これらの手順を逆の順番に従って作業を進めてください。
e-wasteを処理する場合は、認可済みリサイクルセンターR2を通じて廃棄してください。
修理が上手く進みませんか?基本的なトラブルシューティングを参照するか、アンサーフォーラムを検索してください。
82 の人々がこのガイドを完成させました。
以下の翻訳者の皆さんにお礼を申し上げます:
100%
Midori Doiさんは世界中で修理する私たちを助けてくれています! あなたも貢献してみませんか?
翻訳を始める ›
37 件のコメント
Amazing, Thanks
does this also work for the 2018 model?
Why do you remove the logic board? There are videos on youtube that demonstrate that there is no need to remove the logic board or the trackpad to replace the battery ...
no need to remove the logic board .
Cosmin -
Just finished replacing - stopped at step 23 after removing the Track Pad. Did not have to remove Logic Board. You don’t even need to remove the Track Pad, but because of the glue on the center cell, it’s probably a good idea and a pretty easy step to keep Track Pad safe when prying the cell off the case. It does take a bit of careful “jiggling” to remove the old battery and to slide the new one under the LB, but IMO definitely much (MUCH!) easier than removing all of the components after step 23.
Vadique -
I just replaced my battery without removing the board. However that requires a dangerous wiggle dance to run the battery controller ribbon cables under the mainboard without breaking them.
For anyone attempting this: first slide the left corner in by angling the whole battery pack so that it goes in. Arrange the battery packs but don’t glue them in yet. For the right corner, angle the mainboard’s battery connector straight up to keep it out of the way and then carefully bend the ribbon cable almost vertically to slide it in between the mainboard and the case. I’ve used the pick to carefully push it in along its length from left to right.
When Eugene says the RIGHT side, is that the right side as you look down on the battery or that actual right side of the computer?
leorob -
The instructions are missing one step: Disconnecting the display cable. It is located in the top center. If you look closely in the images, the cable is still connected in step 19 but then it is disconnected in step 39 (on the top-left at the very edge of the picture you see half of the loose cable. The disconnected cable is fully visible in the picture for step 58)
hy
i have an issue with a macbook pro 13 2018
battery condition: replace now
cycle count 2
charge remaining (mAh) 0
full charge capacity (mAh) 5169
amperage (mA) 0
voltage (mV) 4330,
battery is not charging
does any one know how to solve this ?
is there a way to charge the battery disconected from the mainboard? like jump start
i think that thr battery is under the charging designated voltage and the macbook does not charge it due to this low voltage.
the laptop is new , was not used from 2018!
tried smc resset and it does not work
thank u
I have a similar problem, I have a 2017 MB Pro with TouchBar 4ports with the problem of the battery not exceeding 1%, and this is the second original battery from apple, the second battery lasted about 40 charge cycles ... now out of guarantees and campaigns, I had to change the battery for a non-original one. I opted for a SLODA (which comes with everything you need and looks pretty good). Once changed successfully following this guide, the macbook boots on battery, but there is no way to get the battery to charge with the original charger...it detected it at 80% charge, the mac detects the original charger, giving all the information on the charger and power, but in none of the 4 USB-C ports does the battery charge. Even trying 2 different Mac chargers I am able to get it to charge. Next week I will try another brand of battery, but it gives me that the motherboard of my macbook pro 2017 with 4 ports is damaged. It is not normal that the 2nd battery replaced by apple lasted only 40 cycles. Greetings and THX
Daniel -
Followed each of the steps and the battery install was successful but now I’ve lost the mic and the touchbar. I’ve gone back and removed and reattached the connections with no luck. Any ideas?
Excellent and very detailed guide. I did this on the mid 2018 model and had no problems. However, I must note that removing the logic board is not needed to remove the battery. saves a lot of work if once you remove the trackpad, you just skip to battery removal.
Wunderbar, danke, erfolgreich ausgeführt. Auch ohne das Logic Board auszubauen, nur das TrackPad musste raus. Etwas schwierig die Leitungen unter das Board zu schieben beim Einbau des Akkus…vielleicht auch eine kleine Gefahr der Beschädigung der Leitungen vorhanden, hat aber gut geklappt und spart sehr viel Arbeitsschritte
Success - the patient is alive and well! The instructions are awesome. I did all 88 steps forward and back. Allowed me to avoid the chance of getting adhesive remover on the circuit card or in the trackpad. I also took the opportunity to clean any dust off the fans, logic board, and inside the case. In surgery for 5 hours but spent time cleaning all the adhesive from the battery compartment. Did not have the iOpener so heated a metal bar with my heat gun and applied that. Those antenna connectors were tough to go back on (tough to align to get them to snap - and I’ve used them before on other projects). All features related to connectors removed and reapplied seem to work perfectly.
Success too! I was very nervous during all the process. Took me around 3 hours and two mugs of coffee.
My old battery had vastly inflated (over 2cm thick). With patience I got rid of the Apple's glue and stickers.
Everything is working like a charm now: bluetooth, wifi, trackpad, touchbar, fingerprint, audio, mic.
Thank you so much for your guide!
PS: I also do not understand why I needed to remove the logic board but it needed de-dusting anyway!
Like Cosmin and Vadique, I decided not to remove the logic board. Instead, I stopped at step 27 and removed the 10 logic board screws that allowed me to lift the logic board enough to sneak the PCB in between the raised aluminum case and the logic board. Like I also mentioned in step 11, be very careful with the battery data connector. It is very easy to damage (ummm, or so I’ve heard . . .) and this repair could make your laptop tethered to a charger for the rest of its life. How I managed to sneak it back into place after breaking it off is a mystery to me.
At step 30, 33, and 63, I ended up using a T4 Torx screwdriver instead of a T3 since it was slipping on the screws. Other than that, it was an amazing guide.
I can see why you wouldn’t have to remove the logic board but it did make things easier at the end when that was out of the way.
I just finished my 2017 MBP retina with touch bar, I couldn’t remove the LB because one of the Torx screws was stripped. I was able to slip the battery under the LB, add the trackpad back, and put everything back together. Much easier than removing all of the components, however a bit more risk. Btw, drain your battery before removing it, mine started sparking and I thought it was going to catch on fire … oops.
Sean Heath - 返信
Isn’t the display cable removal missing? I followed this guide a few time and every time I forgot to unscrew it. It is highlighted in step 66, though.
I followed this guide exactly, except for removing the logic board, which is unnecessary. The new battery I purchased from iFixit, and I used the kit from iFixit, which we used on a previous battery replacement in a 2015 MacBook Pro. Everything went extremely well like before, just over 2 hours for something that was nearly impossible in the past without iFixit.
However, I boot it up and macOS says the new battery from iFixit needs service and is not charging. The Mac system report shows it’s a new battery with zero cycle count, so I get Coconutbattery for more details. Coconutbattery says the “new” battery is actually 1619 days old, manufactured in 2017, and current charge capacity is 50.8% of design capacity!
Wow, the part I bought from iFixit is actually worse than the old one I spent over 2 hours replacing. I sent an urgent, frustrated email to support asking what they are going to do, because our customer needs this back ASAP. We’re going to have to do it again at no charge.
Excellent guide, I was able to complete the repair without drama, thank you!
This was a lot of work but paid off handsomely. Happy to say everything worked when I put it all back together. On the whole this guide is amply detailed and well-illustrated!
I’d recommend repeating the link to the swollen battery instructions in step 8. I missed it in the intro and my battery was swollen enough to pop the center and side clips while I was removing the pentalobe screws in step 2. (Fortunately the guide as-is advised enough caution that I didn’t get in trouble!) I’d also recommend moving the warning about the trackpad washers ahead to step 22. It was at that point that one of the circular washers went MIA on me, before I realized there were washers. The third image in step 66 was highly valuable in making sure all the cables were in the right place before screwing down the logic board!
To keep the screws organized I screen-grabbed all the images of screw locations and printed them 4-up and covered the screw locations with double-sided tape to hold the screws as I removed them.
Sorry Leute, aber ich verstehe den Aufwand nicht, den ihr da treibt. Ich habe heute so einen Akku erfolgreich getauscht und musste nur das Kabel des Trackpads lösen. Der ganze restliche Bohai ist unnötig! Und auch das Lösungsmittel kann man sich sparen, wenn man den Akku mit einem breiten Spatel langsam löst.
Perfect both the product and the instructions. Thanks so much.
Perfect both the product and the instructions. Thanks so much.
Just finished the battery surgery on my 2017 MB Pro 13" Touch Bar. I elected to not use the liquid adhesive remover and thus did not bother to remove the logic board. As others said, get to step 23 and then skip ahead to removing the battery. I used one of the plastic cards included in the kit to fairly easily separate the battery from the adhesive. The key is to push the card through the adhesive and to not try to pry the battery away from the adhesive. For the logic board, I simply removed all the screws that secure it to the chassis so that it could be slightly lifted to pass the battery connector into place.
Completed the replacement of my battery. Tried to turn it on and only the right fan was on super loud. I have no idea what happened or what to do.
Just finished replacing the battery. I stopped after step 21, so didn't remove the trackpad. And continued with step 69. I removed most of the Logic Board screws to be able to lift the LB a bit to get the battery out and replace it with the new one. It took some time to remove the batteries and I used alcohol 70%. For the battery in the middle I didn't use alcohol because the trackpad was still underneath. Instead I used two plastic cards, the bottom one to protect the trackpad and the top one to "jiggle'' through the glue. I'm aware I took more risks than when you follow all steps of this very good instruction. My compliments to the iFiXiT team and thanks for the translation of Thomas Keulemans.
I follow step by step, plus an ammendment published by @Glendstone on Step 62, and at the moment, everything worked o.k.
Ich habe auch das Logic Board drin gelassen. Lediglich beim Einfädeln der Flachbandkabel zwischen einem sinnfreien Plastikklotz oberhalb des Trackpads hatte ich Probleme. In diesem Moment muss man bereits mit den neuen, klebrigen Batterien jonglieren, die für diesen Moment eben noch nicht irgendwo festkleben dürfen. Dazu war es hilfreich, die Schrauben des Logic Boards (vom Trackpad gesehen aus zu den Lüftern) zu entfernen, damit man etwas mehr Spielraum zum Unterschieben der Kabel hat.
Ansonsten: Prima Anleitung! Der Klebstoffentferner ist wirklich SEHR wirksam. Vorsicht beim Verteilen. Das kleine Flaschen "spuckt" gerne. Eine kleine Spritze zu benutzen ist jedoch eine noch weniger gute Idee. Besser ein Wattestäbchen tränken und dies im mehren Schritten an den richtigen Stellen auspressen.
Excelent guide and replacement went smoothly (Took me about 1.5 hours because I did it without removing the motherboard). Until I turned the machine and the ssd is not detected, not even in recovery mode. I dont know what to do so any help will be greatly appreciated
Juan Pablo - 返信
If you left the mobo screwed down there isnt much to troubleshoot. Just check all of the cables around the perimeter of the device, 2 of the corners of the laptop have dual ribbon cable connections underneath each other. Make sure the ribbon connection on top of the battery "connecting plate"(held down by a large head screw), is there and screwed down all the way.
Just finished to reinstall, everything run fine except that the new battery status is "fully charged" but the computer shutdown when I unplug the USB-C cable, no battery icon in the toolbar either.
I just followed this document on replacing the battery as well as the type-c charging ports on both sides of a Macbook A1706 2017 with Touch bar. I've always bought the replacement ports from amazon, and I've never gotten one complaint. After installation the "snap" you feel/hear when you plug in a charger feels and sounds like a quality part. As always, this "How-to" guide was stellar, and I followed it to a "T". Replacing battery & both charging ports took me 3.25 hours total, which is an hour more than I estimated!
I own a PC repair business, and I quickly learned that when doing repairs on Apple products you need to have a large screw/parts organizer WITH LABELS or else you're going to really screw up someone's device! I really hate fixing Apple products, but SO THANKFUL I have IFIXIT guides like this to reference.
Huge thanks from Carrollwood Computers ~Tampa Bay Area
Stopped after completing step 20. Then, when installing battery just followed what Eugene Pankov mentioned looking down at the battery. Easy-peasy. Used only the screwdriver, tweezers, glue removal card, one guitar pick, 4 q-tip and acetone for clean up from the kit. The old adhesive removal took the longest to do slowly removing with the tweezers. Then using some acetone on the q-tip to remove any leftover foam adhesive.



























Is this step necessary? I can’t perform this step as I am attempting to repair water damage and need to remove logic board & most likely replace the battery.
Macrepair SF - 返信
@mac_medic You definitely don’t want the power coming on while the board is wet. In your case, I think powering on the machine to disable Auto Boot would do more damage than it prevents. I agree, skip this step and be prepared to disconnect the battery quickly if the laptop automatically powers on. Good luck!
Jeff Suovanen -
Thats right! You don't want power running while working on your logic board.
Dan -
This did not work when running High Sierra.
Kyle B - 返信
Tried this on a 2018 MBP 13” Touchbar (there’s no iFixit guide for this model yet). Need to replace a broken screen.
Luckily I managed to connect to an external screen (Cmd-Down Brightness to switch displays) and enter above command. Seems to work, but there’s another problem with this model - it powers up as soon as any key is pressed……. ffs <gnashes teeth>
Cool_Breeze - 返信
I unscrew the battery first and wrap electrical tape over the logic board battery connector before attempting any repairs to the board. Haven’t had any problems yet and I’ve worked on about 10 of these models already. Also when you open the bottom case use a suction cup at the bottom and pull up then run a plastic spudger along the edges to disconnect the clips. Also only use a plastic spudger on the board. Saw a youtube video from a repair shop and he did not disconnect the power and used all metal tools during the entire process of removing the board. His last step was to disconnect the battery terminal.
Brian - 返信
Is this step necessary if my mac can turn on? Battery fully dead(
Nursat b - 返信
BEFORE YOU START: The included torx head stripped off before I was done (and you might need an additional T4) so stop now and go buy a good one. Also they fail to warn you above to get some blue threadlocker ahead of time.
Jason Sherron - 返信
This command did not work for me and I read that sometime in later 2020 Apple stopped this command from working…any ideas on a work around?
Patrick Machacek - 返信
Not able to do that with damaged screen
richardjgreen - 返信
If you have a damaged screen you can still use a converter from thunderbolt (USB 3) to HDMI and plug your Macbook Pro to your TV as monitor display. Just make sure to chose the right Source (HDMI IN) in your TV. I did it and to make it work I unplug and plug again in my Macbook and so I could disable the Auto boot
Roberto Sanchez Bustos -
Hi. This does not work on 2018 13” MacBook Pro with Touch Bar. I did exactly this to disable auto boot. But when I check by using nvram -p it says: auto-boot true. Am I doing something incorrectly? I did everything step by step. Copied and pasted the sudo command, pressed enter and then entered my password. I have Big Sur 11.1 installed. Is there any other way since I need to replace the screen. Thank you. Adrian
Adrian Vizik - 返信
Hi everyone. This is also a little pointless if you can’t see anything on the screen, and you don’t have a display adapter to USB C to display it. I agree with Brian about removing the back and disconnecting the battery cable before you even think about opening the lid of the MacBook. Applying the insulation tape is also a handy little tip that just makes sure there is no way to discharge from either the board or battery.
Roberto Enrieu - 返信
running `nvram -p | grep 'AutoBoot'` in terminal verifies that it was accepted
result: `AutoBoot %00`
Marek Polák - 返信
Running Big Sur 11.6.7 on a 2019 16" MBP, it's "auto-boot". So it's:
nvram -p | grep 'auto-boot'to display the current state, the default istrue- and then to change it,sudo nvram auto-boot=falsewhich turns it off.Ed Mechem -
This step is completely unnecessary if you follow the guide to disconnect the battery properly. Just put some tape between the battery and logic board connection to prevent it from accidentally touching and therefore powering on the laptop.
Grant Ormsby - 返信
It took me a few tries to make this command work, as I was able to copy and paste the command into Terminal, but could not type in my laptop’s password. I finally typed my password into a text document, copied it (command C), and then pasted it into Terminal and it worked.
tommy404 - 返信
I didn’t do this. Mine never auto-booted before I replaced the battery. Now it does.
hatuxka - 返信
BEFORE YOU DO ANYTHING - CHECK THE BATTERY!
I-fixit sent me a bad battery, which I didn’t realize until it was already install. They sent me a new one, but I wasted hours uninstalling and reinstalled.
Get a volt meter and measure the voltage on the output of the battery pack. If it reads 0 V, SEND IT BACK. It should read over 2 V.
bcardanha - 返信
I've just received my replacement battery and it reads 0,042V between the two main connectors. Do you think it's dead?
peter sussex -
When I did this from Terminal.app within Recovery Mode, the “sudo” was not recognized but I could invoke it without the sudo part. It seems to have been accepted when looking at “nvram -p”
johann beda - 返信
When in Recovery Mode, you already have superuser powers. So you don't need to prefix commands with the sudo command to invoke them with root privileges; you already have them. Do a
pwd(print working directory) after opening Terminal in Recovery Mode, and you'll see that you're in the root user's directory.Ed Mechem -
I received the battery kit for my 2018 MacBook Pro and as per the above comment from bcardanha - Oct 12, 2021, I checked the voltage on the pads marked + and - . It was zero volts so I panicked a bit.
I sent a message on the iFixiT Facebook page and I got no reply. I finally found the customer service email for Ifixit Europe and sent them an email voicing my concern as I was not keen to work for couple of hours just to discover that the battery is faulty. I had an almost instant reply on the email (kudos to them) and they adviced me to go ahead and install the new battery as the voltage measured when battery is not connected is not relevant.
I took a leap of faith and after two hours… the new battery showed 50% charge and everything seems to be working just fine. I am happy it worked.
Mircea Comanici - 返信
After removing the old battery and installing the new battery I powered up the MBP before screwing the bottom on. I discovered the my keyboard would not function. It took a few hours of investigation and frustration that I discovered the track pad power ribbon had become partially dislodged from the trackpad. I was able to see that this through the little machined slot where the battery sat. I had to remove the trackpad to reinsert the power ribbon back into the connector in the trackpad. after reassembling and reinstalling the battery etc the keyboard worked. Just food for thought if your run into the keyboard issue.
Ed Mease - 返信
This should be the default. IMO I tell you to power on - not the lid.
G Sena - 返信
Est ce que cela fonctionne sur un macbook pro 2017 sans touchbar ?
maël muzelet - 返信
Bonjour Maël, oui, ce tutoriel concerne "les MacBook Pro 2016 (et plus récents) et les MacBook Retina 12" 2017 (et plus récents)"
Claire Miesch -
Excellent instructions. I was able to follow and install the new screen. I recommend that you get a good set of tools before you begin. I started with an inexpensive repair kit bought online. The Penta and torx bits failed. I bought an IFIXIT kit with quality bits and I was able to do everything I needed.
Tom Markham - 返信
If you're not running an admin account the sudo command won't work (which honestly, you should not be running admin). Rather than logging in to your admin amount via the OS, in the terminal type "login [admin username]," then the password and you'll be able to do the sudo command as described above. Once you're complete, type "logout [admin username]" and you'll be good to go. Obviously replace [admin username] with whatever the account name for your admin user is.
arichard2401 - 返信
For those unable to complete this step because the screen is too damaged I recommend leaving your macbook on until the battery dies.
Nicholas R Licato - 返信
Just replaced my 2018 15" MBP battery. Running Sonoma.
I found no way to disable AutoBoot (The status can be checked in the Power section of system report).
Anyway, i left my battery completely drain before opening the MBP, and had no issues during the process.
Cédric Bontems - 返信
After sending this command in terminal when I checked what happens if I now open the lid, instead the screen lit slightly up (still black) then a battery symbol showing the charging state showed up.
Now, after replacement of the battery, this is all I get to see.
No reset of NVRAM nor PRAM helped.
Currently the new battery charges (58% atm) and it feels like it‘s mocking me.
webrockers - 返信
I suspected the keyboard or TouchID sensor wouldn’t work, so I went on and checked every connector.
I missed connecting the left TouchID sensor from step 31.
webrockers -