メインコンテンツにスキップ

MacBook Pro 13" Retina Display Mid 2014 Right Speaker Replacement

必要な工具と部品

  1. MacBook Pro 13" Retina Display Mid 2014 Right Speaker Replacement, Lower Case: 手順 1、 1の画像 1
    この手順で使用する道具:
    Magnetic Project Mat
    $19.95
    購入する
    • Remove the following ten screws securing the lower case to the upper case:

    • Two 2.3 mm P5 Pentalobe screws

    • Eight 3.0 mm P5 Pentalobe screws

    • Throughout this repair, keep track of each screw and make sure it goes back exactly where it came from to avoid damaging your device.

  2. MacBook Pro 13" Retina Display Mid 2014 Right Speaker Replacement: 手順 2、 1の画像 1
    • Wedge your fingers between the upper case and the lower case.

    • Gently pull the lower case away from the upper case to remove it.

  3. MacBook Pro 13" Retina Display Mid 2014 Right Speaker Replacement: 手順 3、 2の画像 1 MacBook Pro 13" Retina Display Mid 2014 Right Speaker Replacement: 手順 3、 2の画像 2
    • The lower case is connected to the upper case with two plastic clips near its center.

    • During reassembly, gently push down the center of the lower case to reattach the two plastic clips.

  4. MacBook Pro 13" Retina Display Mid 2014 Right Speaker Replacement, Battery Connector: 手順 4、 1の画像 1
    • If necessary, remove the plastic cover adhered to the battery contact board.

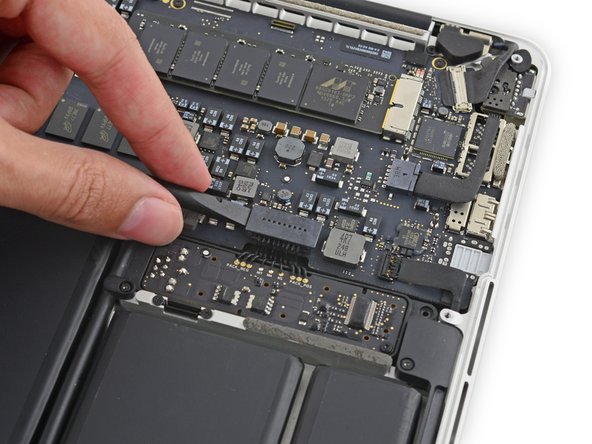
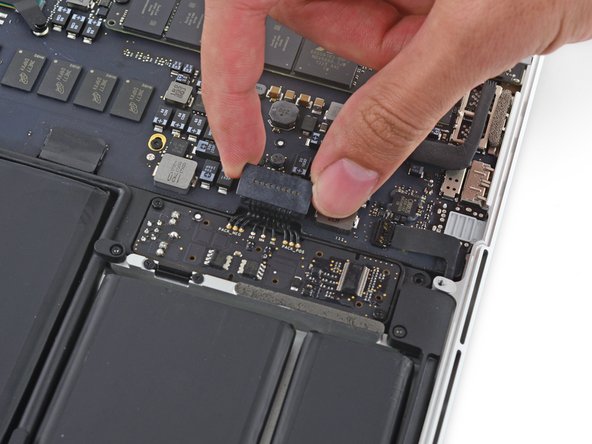
  5. MacBook Pro 13" Retina Display Mid 2014 Right Speaker Replacement: 手順 5、 2の画像 1 MacBook Pro 13" Retina Display Mid 2014 Right Speaker Replacement: 手順 5、 2の画像 2
    • Use the flat end of a spudger to lift the battery connector straight up out of its socket on the logic board.

    • Be sure you lift up only on the connector itself, not the socket, or you risk permanent damage to the logic board.

  6. MacBook Pro 13" Retina Display Mid 2014 Right Speaker Replacement: 手順 6、 1の画像 1
    • Bend the battery connector up out of the way to prevent accidental contact with its socket during your repair.

  7. MacBook Pro 13" Retina Display Mid 2014 Right Speaker Replacement, Right Speaker: 手順 7、 1の画像 1
    • Remove the two 2.1 mm T5 Torx screws securing the logic board end of the I/O board cable bracket.

  8. MacBook Pro 13" Retina Display Mid 2014 Right Speaker Replacement: 手順 8、 1の画像 1
    • Grasp the I/O board cable bracket with a pair of tweezers and remove it from the MacBook.

  9. MacBook Pro 13" Retina Display Mid 2014 Right Speaker Replacement: 手順 9、 2の画像 1 MacBook Pro 13" Retina Display Mid 2014 Right Speaker Replacement: 手順 9、 2の画像 2
    • Use the flat end of a spudger to pop the I/O board connector straight up off its socket on the logic board.

    • Be careful to only pry up on the I/O board cable, not on the socket itself or you risk damaging your logic board.

  10. MacBook Pro 13" Retina Display Mid 2014 Right Speaker Replacement: 手順 10、 2の画像 1 MacBook Pro 13" Retina Display Mid 2014 Right Speaker Replacement: 手順 10、 2の画像 2
    • Lift the logic board end of the I/O board cable straight up to bend it out of the way.

    • To avoid damage to the cable, fold only at the bend in the I/O board end of the cable.

  11. MacBook Pro 13" Retina Display Mid 2014 Right Speaker Replacement: 手順 11、 2の画像 1 MacBook Pro 13" Retina Display Mid 2014 Right Speaker Replacement: 手順 11、 2の画像 2
    • Carefully tuck the tip of a spudger under the right speaker cable near the connector and lift it up out of its socket on the logic board.

  12. MacBook Pro 13" Retina Display Mid 2014 Right Speaker Replacement: 手順 12、 3の画像 1 MacBook Pro 13" Retina Display Mid 2014 Right Speaker Replacement: 手順 12、 3の画像 2 MacBook Pro 13" Retina Display Mid 2014 Right Speaker Replacement: 手順 12、 3の画像 3
    • Carefully peel the right speaker cable off the upper case.

  13. MacBook Pro 13" Retina Display Mid 2014 Right Speaker Replacement: 手順 13、 1の画像 1
    • Remove the following screws securing the right speaker to the upper case:

    • One 5.7 mm T5 Torx screw

    • One 6.5 mm T5 Torx screw

    • One 3.8 mm T5 Torx screw

  14. MacBook Pro 13" Retina Display Mid 2014 Right Speaker Replacement: 手順 14、 3の画像 1 MacBook Pro 13" Retina Display Mid 2014 Right Speaker Replacement: 手順 14、 3の画像 2 MacBook Pro 13" Retina Display Mid 2014 Right Speaker Replacement: 手順 14、 3の画像 3
    • Lift the right speaker from the cable end and pull it free from the case.

終わりに

To reassemble your device, follow these instructions in reverse order.

45 の人々がこのガイドを完成させました。

作成者

4人の作成者と共同で作成されました。

Sam Goldheart

メンバー登録日: 10/18/12

465,647 ポイント

538のガイドは作成済み

チーム

iFixit iFixit人のメンバー

Staff

135 メンバー

16,732のガイドは作成済み

コメント 1 件

Ottima guida. La sostituzione dello speaker destro nel MacBook Mid Pro 2014 è semplice. Direi che non occorrono più di 20 minuti.

Grazie all'autore!

flavio - 返信

コメントを追加

統計データ:

過去 24時間: 3

過去 7 日: 50

過去 30 日: 217

今までの合計 34,925