メインコンテンツにスキップ

MacBook Pro 13" Retina Display Late 2012 の左側ファンの交換

必要な工具と部品

  1. MacBook Pro 13" Retina Display Late 2012 の左側ファンの交換, 下部ケース: 手順 1、 1の画像 1
    この手順で使用する道具:
    Magnetic Project Mat
    $19.95
    購入する
    • 底ケースと上部ケースを留めている次のネジを10本外します。

    • 2.3 mm P5ペンタロープネジー2本

    • 3.0 mm P5 ペンタロープネジー8本

    • この作業中、外した各ネジの管理を安全に行ってください。再組み立ての際は、デバイスのダメージを防ぐため、正しい位置に装着してください。

    If don’t have one of those neat project mats, then you can use small pieces of flattened blu-tack to hold the screws. If you arrange them in the shape of your mac book cover, and put the screws down methodically, you can get a one-to-one mapping of the screws to the correct screw holes.

    Toby Thurston - 返信

    Or you can use an ice tray where you put the screws and the parts in separate bays in the same order as they come in the instructions.

    timofej.se -

    This is great! I used a small magnetic white board, and wrote on it to identify the parts as I went. This whole process, from the fast shipment to the great instructions to the complete, high quality, tool kit has been great. I’m typing this comment on my resurrected laptop. Thank you! Sue

    Susan Greer - 返信

    It would be a good idea if people recorded in the comments which screws go where so that, if someone lost their screw positions, they could recover them from the comments.

    Raymond Shpeley - 返信

  2. MacBook Pro 13" Retina Display Late 2012 の左側ファンの交換: 手順 2、 1の画像 1
    • 上部ケースと底ケースの間に指を差し込みます。

    • 丁寧に底ケースを上部ケースから外していきます。

    • 完全に底ケースを取り出します。

  3. MacBook Pro 13" Retina Display Late 2012 の左側ファンの交換: 手順 3、 3の画像 1 MacBook Pro 13" Retina Display Late 2012 の左側ファンの交換: 手順 3、 3の画像 2 MacBook Pro 13" Retina Display Late 2012 の左側ファンの交換: 手順 3、 3の画像 3
    • 再組み立ての際、下部ケースの中央を軽く押して、2つのプラスチッククリップを再度取り付けます。

    • 下部ケースは中央で上部ケースと2つのプラスチック製クリップで接続されています。

  4. MacBook Pro 13" Retina Display Late 2012 の左側ファンの交換, バッテリーコネクター: 手順 4、 1の画像 1
    • バッテリーボードに装着されているプラスチックカバーを外します。

    The replacement cover doesn't seem to have the formed pads attached. I re-installed the original.

    Adrien - 返信

  5. MacBook Pro 13" Retina Display Late 2012 の左側ファンの交換: 手順 5、 1の画像 1
    • ロジックボードにバッテリーボードを取り付けている次のネジを外します。

    • 2.8 mm T6トルクスネジー2本

    • 7.0 mm T6トルクス肩付きネジー1本

  6. MacBook Pro 13" Retina Display Late 2012 の左側ファンの交換: 手順 6、 2の画像 1 MacBook Pro 13" Retina Display Late 2012 の左側ファンの交換: 手順 6、 2の画像 2
    • ピンセットを使って、バッテリーコネクターボードの右側底付近にある小さいプラスチックカバーを取り出します。

    Is adhered to screw beneath, so lift firmly and slowly.

    Andrew - 返信

    when doing this with metal tweezers as instructed in the video, it was difficult to get off and apparently while i was trying to do it, the tweezers went too far under and i believe made contact with the screw underneath? there was a zzz noise, an orange flicker and a little stream of smoke that came out. i freaked out and put everything back together to see if the laptop even still worked, it turned on and everything but died right away (i drained it before doing the repair anyway, so i was surprised it turned on at all).

    i finished the battery repair and did several other things while in there. i have charged it all the way as recommended and will use it later on to see how everything is, im hoping that it’s a okay, but could someone explain to me what happened and the possible consequences?

    Kait D - 返信

  7. MacBook Pro 13" Retina Display Late 2012 の左側ファンの交換: 手順 7、 1の画像 1
    • バッテリーコネクターをロジックボードアセンブリに留めている広幅の6.4 mm T6トルクスネジを外します。

    When reinstalling, be careful that the board lines up correctly and is completely seated in order for this screw to thread properly.

    Adrien - 返信

  8. MacBook Pro 13" Retina Display Late 2012 の左側ファンの交換: 手順 8、 2の画像 1 MacBook Pro 13" Retina Display Late 2012 の左側ファンの交換: 手順 8、 2の画像 2
    • 丁寧にロジックボードからバッテリーコネクターボードを引き上げます。

    • 若干バッテリーケーブルを曲げてください。ボードがロジックボード上で引き上げられた状態にして、作業の邪魔にならないようにします。

    • ボードを完全に折り曲げたり、ケーブルにしわを入れないでください。バッテリーにダメージを与えてしまいます。

  9. MacBook Pro 13" Retina Display Late 2012 の左側ファンの交換, バッテリーボード: 手順 9、 2の画像 1 MacBook Pro 13" Retina Display Late 2012 の左側ファンの交換, バッテリーボード: 手順 9、 2の画像 2
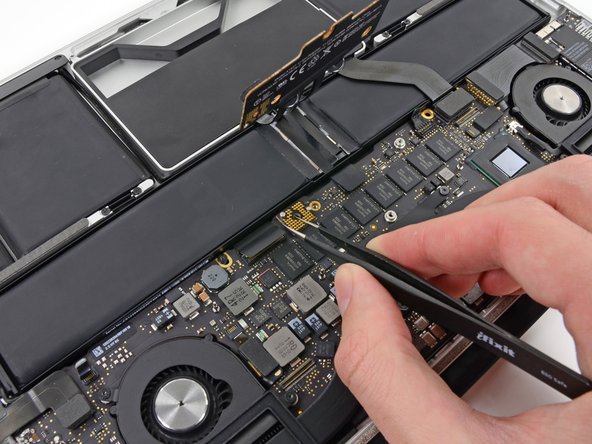
    • ピンセットでインターポーザーを掴みます。

    • インターポーザーとはLSI間の接続を担う役割を持つインターフェイスの名称です。この修理ではバッテリーとロジックボードを接続しているボードを対象とします。

    • インターポーザーをロジックボードから引き上げて外します。

    • このボードを取り外す際は修理作業中、バッテリーが完全に外されているか確認してください。コンピューターがアクシデントにより再起動しないようにご注意ください。バッテリーを取り出しておく事もおすすめです。

    How can I remove interposer I m not able to remove it

    Raunak - 返信

    you must lift it absolutely vertically, or it fouls against the locator pin in the corner- you can easily get the impression that it won’t come over the end of this pin- almost like it’s rivetted in. it isn’t. get a good grip on it with the tweezers in the centre hole & one of the sides, & lift it STRAIGHT up.

    duncan rmi -

    I would recommend to use plastic tweezers in order to reduce risk of damage.

    Martin Sippel - 返信

    Second that. If you have thin heat shrink tubing, form some over the tweezer tips. If the tubing is thin and small enough in diameter you’ll see the serrations of the tweezer tips.

    Raymond Shpeley -

    wat is the model this SSD

    thierry.wilow - 返信

  10. MacBook Pro 13" Retina Display Late 2012 の左側ファンの交換, ヒートシンクアセンブリ: 手順 10、 1の画像 1
    • ロジックボードに留められたヒートシンクから次のネジを外します。

    • 2.4 mm #00プラスネジー1本

    • 3.4 mm T5トルクスネジー1本

    • 2.7 mm T5トルクスネジー4本

    Hi,

    found 4 rubber spacers on the 4 2,5mm screws

    ddagonetroppo - 返信

    Also found the rubber caps on the 4x2.7mm - didn't bother to replace the caps and didn't have any problems with them.

    Rand Bell - 返信

  11. MacBook Pro 13" Retina Display Late 2012 の左側ファンの交換: 手順 11、 2の画像 1 MacBook Pro 13" Retina Display Late 2012 の左側ファンの交換: 手順 11、 2の画像 2
    • ヒートシンクをロジックボードアセンブリから持ち上げて取り出します。

    • ヒートシンクを再インストールする際は放熱グリスを表面に塗ってください。もし放熱グリスを今まで使用したことがない方は、分かりやすい次のガイドをご覧ください。

  12. MacBook Pro 13" Retina Display Late 2012 の左側ファンの交換, 左側ファン: 手順 12、 2の画像 1 MacBook Pro 13" Retina Display Late 2012 の左側ファンの交換, 左側ファン: 手順 12、 2の画像 2
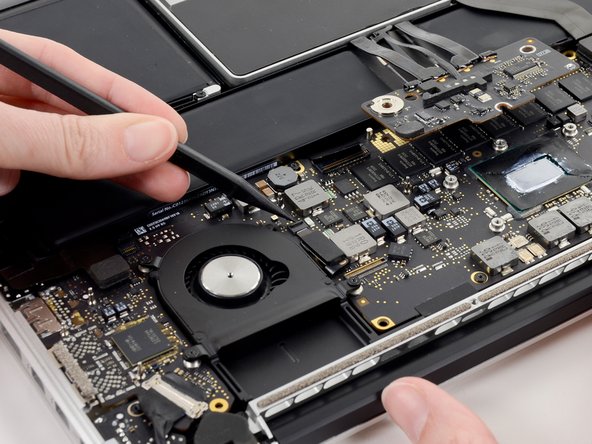
    • スパッジャーの先端を使って、左側のファンリボンのケーブルZIFソケット上にあるフラップ全てを持ち上げます。

    • 丁番のフラップのみに接触するようご注意ください。ソケット自体には触らないでください。

  13. MacBook Pro 13" Retina Display Late 2012 の左側ファンの交換: 手順 13、 1の画像 1
    • ロジックボードアセンブリに留められた左側のファンより3.1 mm T5 トルクスネジを3本外します。

  14. MacBook Pro 13" Retina Display Late 2012 の左側ファンの交換: 手順 14、 2の画像 1 MacBook Pro 13" Retina Display Late 2012 の左側ファンの交換: 手順 14、 2の画像 2
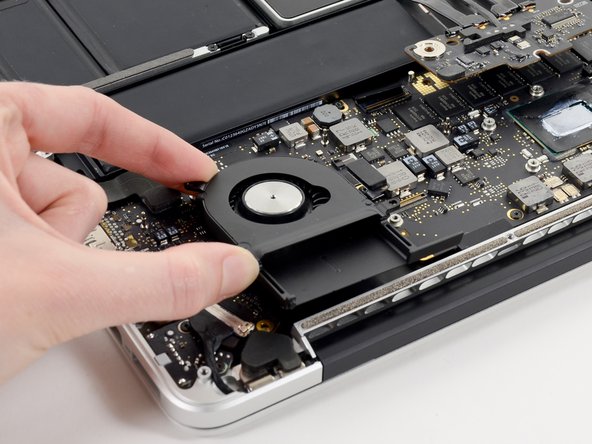
    • 上部ケースから左側ファンを持ち上げて外します。

    • 左側のファンをまっすぐ持ちあげると同時に、左側のファンリボンケーブルもロジックボード上のソケットから持ち上げます。

終わりに

デバイスを再組み立てする際はこれらのインストラクションを逆の順番に従って作業を進めてください。

7 の人々がこのガイドを完成させました。

以下の翻訳者の皆さんにお礼を申し上げます:

en jp

100%

Midori Doiさんは世界中で修理する私たちを助けてくれています! あなたも貢献してみませんか?
翻訳を始める ›

作成者

5人の作成者と共同で作成されました。

Walter Galan

694,561 ポイント

1,203のガイドは作成済み

0 件のコメント

コメントを追加

統計データ:

過去 24時間: 1

過去 7 日: 6

過去 30 日: 18

今までの合計 6,910