はじめに
ディスプレイアセンブリを交換するにはこのガイドをご利用ください。
必要な工具と部品
-
-
底ケースと上部ケースを留めている次のネジを10本外します。
-
2.3 mm P5ペンタロープネジー2本
-
3.0 mm P5 ペンタロープネジー8本
-
この作業中、外した各ネジの管理を安全に行ってください。再組み立ての際は、デバイスのダメージを防ぐため、正しい位置に装着してください。
-
-
-
バッテリーボードに装着されているプラスチックカバーを外します。
-
-
-
ピンセットを使って、バッテリーコネクターボードの右側底付近にある小さいプラスチックカバーを取り出します。
when doing this with metal tweezers as instructed in the video, it was difficult to get off and apparently while i was trying to do it, the tweezers went too far under and i believe made contact with the screw underneath? there was a zzz noise, an orange flicker and a little stream of smoke that came out. i freaked out and put everything back together to see if the laptop even still worked, it turned on and everything but died right away (i drained it before doing the repair anyway, so i was surprised it turned on at all).
i finished the battery repair and did several other things while in there. i have charged it all the way as recommended and will use it later on to see how everything is, im hoping that it’s a okay, but could someone explain to me what happened and the possible consequences?
-
-
-
-
ピンセットでインターポーザーを掴みます。
-
インターポーザーをロジックボードから引き上げて外します。
you must lift it absolutely vertically, or it fouls against the locator pin in the corner- you can easily get the impression that it won’t come over the end of this pin- almost like it’s rivetted in. it isn’t. get a good grip on it with the tweezers in the centre hole & one of the sides, & lift it STRAIGHT up.
I would recommend to use plastic tweezers in order to reduce risk of damage.
Second that. If you have thin heat shrink tubing, form some over the tweezer tips. If the tubing is thin and small enough in diameter you’ll see the serrations of the tweezer tips.
wat is the model this SSD
-
-
-
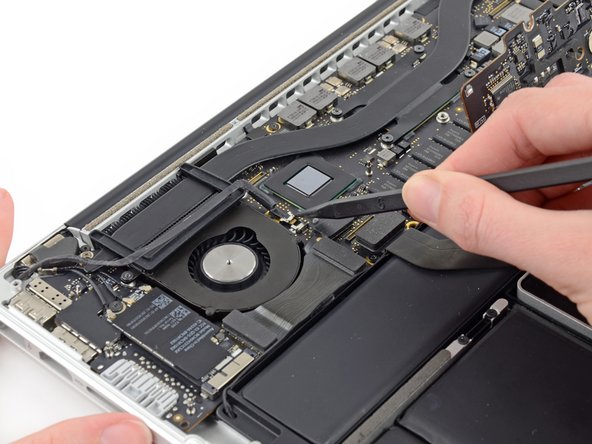
スパッジャーの先端を使って、iSight カメラケーブルコネクターをロジックボード上のソケットからまっすぐ押し出します。
This was the hardest part of the repair for me. The iSight cable was really lodged in its socket. "Walking" the connector as the guide suggests -- i.e. pushing on each side alternately at a 45 degree angle (with more force than I expected) -- eventually worked.
-
-
-
スパッジャーの平面側先端を使ってAirPortボードから3つのアンテナケーブルコネクターの接続を外します。
-
3つのケーブルは異なる長さで黒色のスリーブでコーティングされています。再組み立ての際は次の点にご注意ください。
-
長いスリーブのケーブルをポートに一番近いソケットに接続します。
-
短いスリーブのケーブルはネジの隣に接続します。
-
最後のケーブルにはスリーブはありません。ファンの隣にある最後のソケットに接続します。
The long-sleeved and short-sleeved antenna cables are switched compared to this guide, on my Macbook Pro A1425. Maybe note which order they are in on your machine, since apparently they differ. http://i.imgur.com/r9g9ZXS.jpg
Be very careful with these, I wasn't and two of the cables detached from the connectors!!
As two other users have mentioned, the long-and short-sleeved cables for my late 2012/early 2013 A1425 were not in the order mentioned in the guide. If the laptop is positioned with fan in the upper left corner, the order (left to right) is short sleeve, long sleeve, no sleeve. If it is positioned as it is in the photo with the fan in the lower right, the order (left to right) is no sleeve, long sleeve, short sleeve.
I also found my cables were not as described in the guide. They were as @kagnew described.
-
-
-
アンテナケーブルをAirPortボードから離して作業の邪魔にならない位置に置きます。
The display assembly has a metal retaining clip attached to the airport cables. I didn’t notice how this was positioned during disassembly, and it wasn’t mentioned in the guide. When I was reassembling the device, I found that it fit perfectly over the Torx T8 screws holding the display to the case. Attaching it here holds the airport cables nicely in place and out of the way.
bigfish333 - 返信
-
-
-
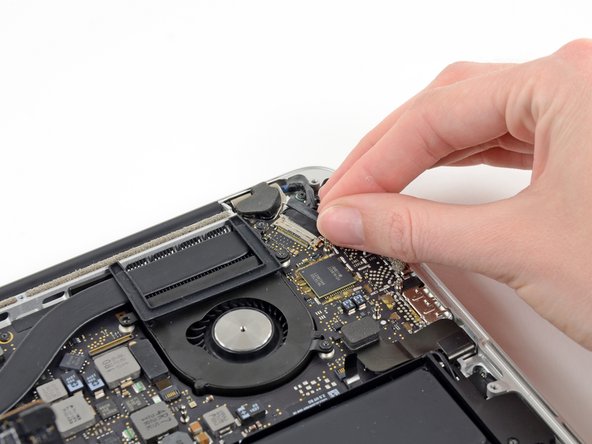
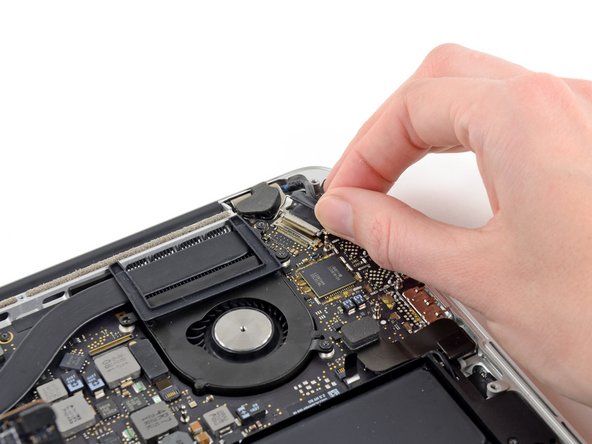
ディスプレイデータケーブルに装着されている黒色のプルタブを掴み、コンピューターのDC電源の方に向かって回転させます。
-
ディスプレイデータケーブルをまっすぐロジックボードのソケットから引っ張ります。
-
-
-
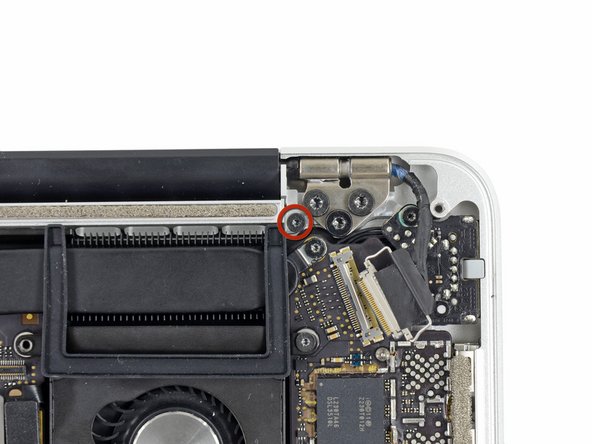
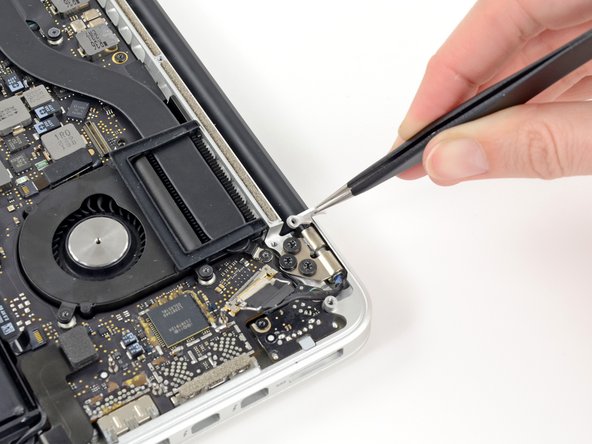
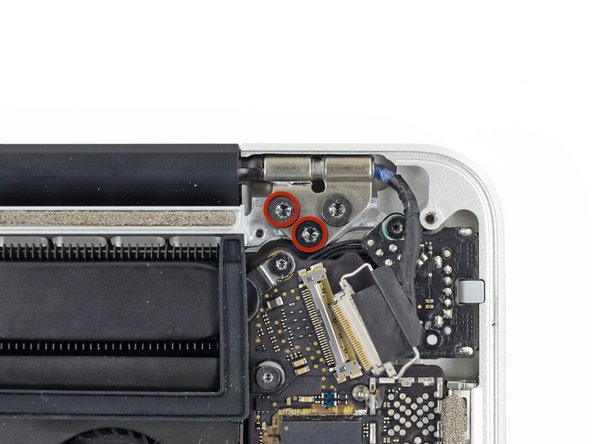
アルミニウム製の丁番ブラケットに留められた3.1 mm T5 トルクスネジを2本外します。
I ended up stripping one of these out and had to use a T6 and some delicate pressure to get it out. Be careful.
The T6 and a lot of downward pressure ended up doing the trick for me. YMMV
-
-
-
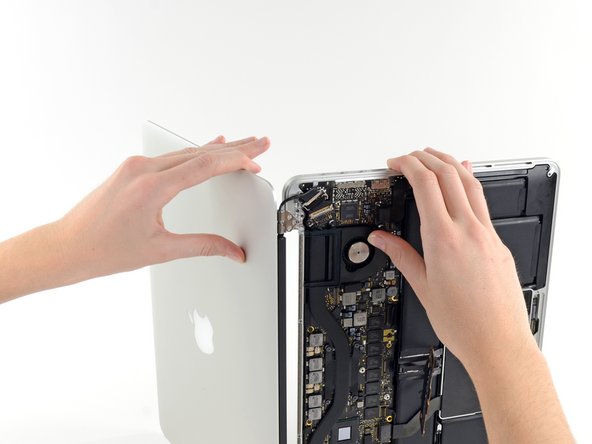
上部ケースとディスプレイを留めている5.3 mm T8 トルクスネジ(両側に2本ずつ)を4本取り外します。
There is a retainer for the airport cables that goes beneath the left and center screws.
maccentric - 返信
My screws were covered with a thin tape, much like scotch tape. I used tweezers to remove it.
-


デバイスを再組み立てする際は、これらのインストラクションを逆の順番に従って作業を進めてください。
デバイスを再組み立てする際は、これらのインストラクションを逆の順番に従って作業を進めてください。
34 の人々がこのガイドを完成させました。
以下の翻訳者の皆さんにお礼を申し上げます:
100%

Midori Doiさんは世界中で修理する私たちを助けてくれています! あなたも貢献してみませんか?
翻訳を始める ›


8 件のコメント
This worked really well. The only issue I had was uninstalling the camera. The instructions to pull the data display cable parallel to logic board made sense in step 14. Unfortunately I didn't understand the similarities in step 10. Is it possible to repair the camera now that the slot is completely broken?
Walk through worked perfect. Did it twice. The first time was just to make sure that wasn’t anything disconnect or any wires damage. The second time was to replace the screen. Works perfect.
Hi,
can I replace an damaged display of a MacBook Pro 13” late 2013 with a display from the early 2013 version?
I compared the high-def pictures of each cable connection and they seem to be identical, or am I wrong?
Thanks for the help.
Cheers
L
Hans Wurst - 返信
Hi there! Unfortunately as listed on the product page, the Late 2013 13” display is not compatible with the Early 2013, only the Mid 2014.
Can a late 2012 MacBook Pro 13” Retina display be used with an early 2013 MacBook Pro 13”?
I really don’t know the answer, I am new to fixing EVERYTHING so my learning curve is steep. I successfully replaced my screen but I was careful to read what fit. It’s been awhile now. Good luck finding your answer
If don’t have one of those neat project mats, then you can use small pieces of flattened blu-tack to hold the screws. If you arrange them in the shape of your mac book cover, and put the screws down methodically, you can get a one-to-one mapping of the screws to the correct screw holes.
Toby Thurston - 返信
Or you can use an ice tray where you put the screws and the parts in separate bays in the same order as they come in the instructions.
timofej.se -
This is great! I used a small magnetic white board, and wrote on it to identify the parts as I went. This whole process, from the fast shipment to the great instructions to the complete, high quality, tool kit has been great. I’m typing this comment on my resurrected laptop. Thank you! Sue
Susan Greer - 返信
It would be a good idea if people recorded in the comments which screws go where so that, if someone lost their screw positions, they could recover them from the comments.
Raymond Shpeley - 返信