メインコンテンツにスキップ

MacBook Pro 13 英寸配备 Retina 显示屏2015年早期版SSD更换

必要な工具と部品

  1. MacBook Pro 13 英寸配备 Retina 显示屏2015年早期版SSD更换, 背板: 手順 1、 1の画像 1
    この手順で使用する道具:
    Magnetic Project Mat
    $19.95
    購入する
    • 拆下以下10个固定在上壳体上的螺丝

    • 两个 2.3毫米 的梅花五角螺丝

    • 八个 3.0毫米 的梅花五角螺丝

    • 在本次维修中,要对每个螺丝做好记录以便准确装回,避免对设备造成伤害。

  2. MacBook Pro 13 英寸配备 Retina 显示屏2015年早期版SSD更换: 手順 2、 1の画像 1
    • 把你的手指放在上下壳体中间

    • 轻轻地把上下壳体拉开

  3. MacBook Pro 13 英寸配备 Retina 显示屏2015年早期版SSD更换: 手順 3、 2の画像 1 MacBook Pro 13 英寸配备 Retina 显示屏2015年早期版SSD更换: 手順 3、 2の画像 2
    • 上下壳体中间有两个塑料卡扣相连

    • 在组装期间,温柔地从中间推下机壳,重新扣上这两个塑料卡扣。

  4. MacBook Pro 13 英寸配备 Retina 显示屏2015年早期版SSD更换, 电池连接器: 手順 4、 1の画像 1
    • 如有必要,可拆卸粘在电池接触板上的塑料盖。

  5. MacBook Pro 13 英寸配备 Retina 显示屏2015年早期版SSD更换: 手順 5、 2の画像 1 MacBook Pro 13 英寸配备 Retina 显示屏2015年早期版SSD更换: 手順 5、 2の画像 2
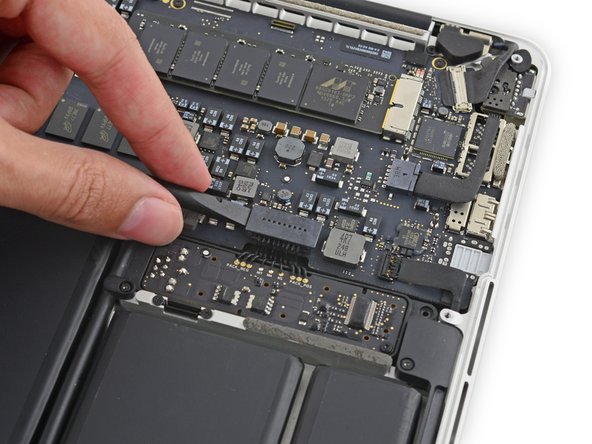
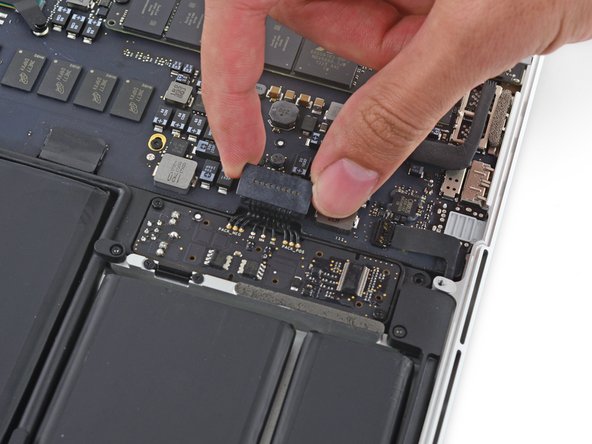
    • 用撬棒的平端,将电池连接器从主板插座上直着往上撬起。

    • 确保您只抬起了连接器本身,而不是插座,否则您可能会对主板造成永久性的损坏。

  6. MacBook Pro 13 英寸配备 Retina 显示屏2015年早期版SSD更换: 手順 6、 1の画像 1
    • 在维修过程中,将电池连接器弯曲,以防止意外接触其插座。

  7. MacBook Pro 13 英寸配备 Retina 显示屏2015年早期版SSD更换, SSD(固态硬盘): 手順 7、 1の画像 1
    • 拆卸一个固定SSD的2.9毫米T5 Torx螺丝。

  8. MacBook Pro 13 英寸配备 Retina 显示屏2015年早期版SSD更换: 手順 8、 3の画像 1 MacBook Pro 13 英寸配备 Retina 显示屏2015年早期版SSD更换: 手順 8、 3の画像 2 MacBook Pro 13 英寸配备 Retina 显示屏2015年早期版SSD更换: 手順 8、 3の画像 3
    • 將SSD的尾端向上抬起,並將SSD直接從主機板上拉出。

    • 只將SSD的尾端拉到足以讓你把它拉出——1/4左右。

終わりに

重新安装只需要按照指南反向操作即可。

425 の人々がこのガイドを完成させました。

以下の翻訳者の皆さんにお礼を申し上げます:

en zh

100%

これらの翻訳者の方々は世界を修理する私たちのサポートをしてくれています。 あなたも貢献してみませんか?
翻訳を始める ›

作成者

4人の作成者と共同で作成されました。

Andrew Optimus Goldheart

メンバー登録日: 10/17/09

502,710 ポイント

407のガイドは作成済み

チーム

iFixit iFixit人のメンバー

Staff

135 メンバー

16,731のガイドは作成済み

97 件のコメント

If not disconnecting battery before replacement of ssd, will ssd be damaged for sure, or is it just a precaution and not likely?

Chris - 返信

This is recommendation. I never disconnect battery and no issues occur so far.

Oleg -

Yes, damage can occur. Always disconnect any kind of power before removing different boards. After removing battery connector, it can be a good idea to discharge capacitors by pressing the power button on your mac. This ensures theres no latent current passing through the circuits.

andrehedegaard -

I know this is an old comment but it is the top one, so this is a note for other people :)

You don’t only risk the SSD, you also risk damaging the rest of the computer.

Also please only use a plastic tool to lift off the battery connector, shorting out the pins can damage your SMC!

Slot1gamer -

Which SSD can i use for upgrade? Can it be a normal like from Samung or else? Or has it to be from Apple?

karimi1993 - 返信

コメントを追加

統計データ:

過去 24時間: 102

過去 7 日: 613

過去 30 日: 3,257

今までの合計 806,448