はじめに
必須条件のみー解体や修理用に、ロジックボードとヒートシンクを一つのアセンブリとして取り外します。
必要な工具と部品
-
-
スパッジャーを使って、ロジックボードからキーボードコネクタの接続をまっすぐ引き抜いて、接続を外します。
-
-
-
T3トルクスドライバーを使用します。
-
左側Thunderboltポートコネクタブラケットの1.4 mmネジを2本外します。
-
右側Thunderboltポートコネクタのブラケットから1.4 mmネジを2本外します。
If you are trying to replace the Thunderbolt port boards, you have to finish removing the entire logic board in order to get to the 2 screws holding each board in place. You can leave the battery and track pad in place though.
Apple used poor quality boards for the thunderbolt boards so they will definitely wear out over time. Make sure you replace them with metal boards and your USB C cable will click in nice and tight for a really long time.
-
-
-
スパッジャーを使って、左側Thunderboltポートコネクタをロジックボードからまっすぐ引き上げて、接続を外します。
-
コネクタをゆっくりと傍に寄せてください。ロジックボードを取り出す作業に影響しないようにします。
-
-
-
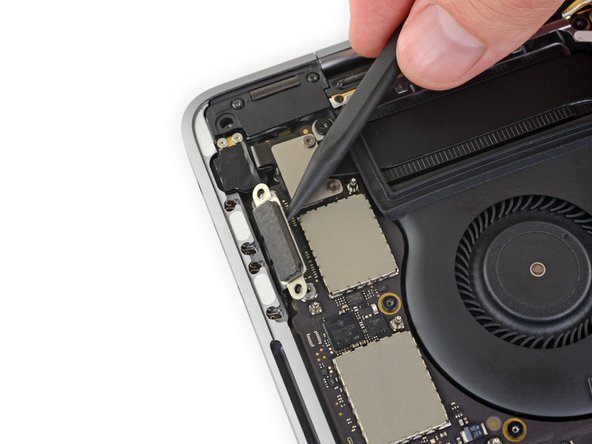
T3トルクスドライバーを使って、Touch IDを固定しているカバーブラケットと、3.5 mmオーディオジャックコネクタから1.9 mmネジを2本外します。
-
-
-
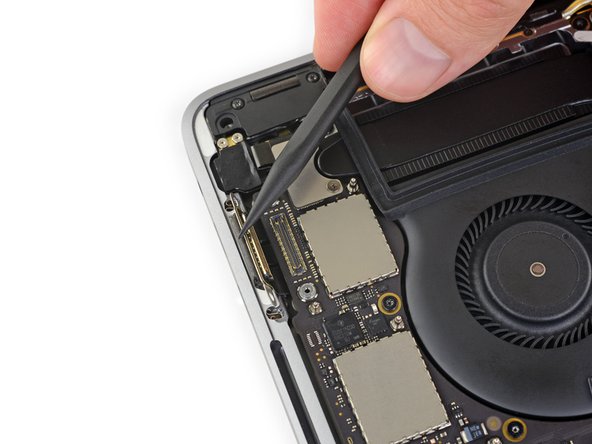
3.5 mm オーディオジャックのフレックスケーブルを、ロジックボードからまっすぐ持ち上げて接続を外します。
-
慎重にフレックスケーブルを傍に寄せます。
-
-
-
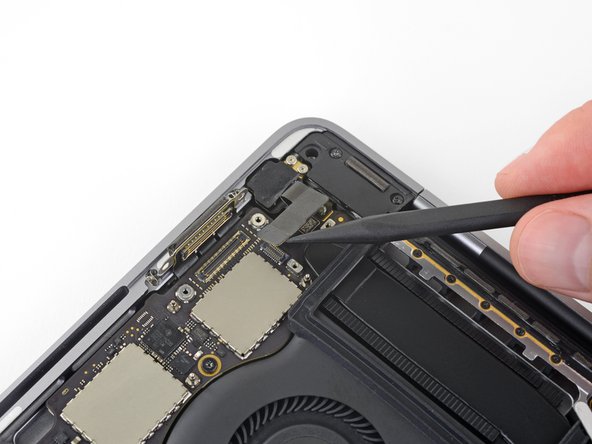
中程度に温めたiOpeneやヒートガンもしくはヘアドライやを使って、電源ボタン/Touch IDフレックスケーブルの下の接着剤を温めて柔らかくします。
-
-
-
開口ピックをフレックスケーブルの下に慎重に差し込んで、ロジックボードから乖離します。それからゆっくりと傍に寄せてください。
-
作業がうまく進まない場合は、無理やり行わないでください。若干熱を加えて、接着剤を温めてから再試行してください。
First let me thank you for this AMAZING guide which helped me a lot to achieve an almost successful battery replacement… I’m saying “almost” because, as you write in red letters, I wasn’t careful enough and my Touch ID cable got damaged.
Do you have any idea on how much should such a repair cost?
I know that only apple stores or authorized service providers can perform such a repair…
Thanks again!
Boy that’s a tough one :( It’s among the most problematic of all components to replace, because the fingerprint sensor is cryptographically paired to the logic board. The best option might be to get in touch with a skilled microsolderer and ask if they can take a look at the cable and try to repair the traces. Apart from that, the only options I’m aware of would be to pay Apple whatever they demand for a repair (no idea, but most likely a lot), or replace both the sensor and the entire logic board with another set that is already paired and undamaged. Wish I could be more help. Good luck!
Difficult though it may be, as a retired fixer, and amazed at the new tiny tiny parts, I am even more amazed at this new cooperative culture of fixers. The depth of helpful detail is amazing. The new environment of cheap special tools, and amazingly detailed hires pics is a powerful new repair meme. I used i-fixit for my first MBAir, but haven’t the skills for this, my current mac. But this addition, the carefully inserted comments of users, and the skills and cooperative attitude of you all, is quite amazing. And I watch and admire. Well done, you.
This cable has a metal plate that is PART OF THE CABLE. It is initially invisible, and can easily be mistaken for part of the logic board upon which it is adhered. As you begin to try to peel it up, make certain that your tool is also making its way beneath that integral thin metal plate. There are chip components that will delaminate from the cable if you attempt to lift it, or if your prying tool happens to not make it under the plate.
-
-
-
-
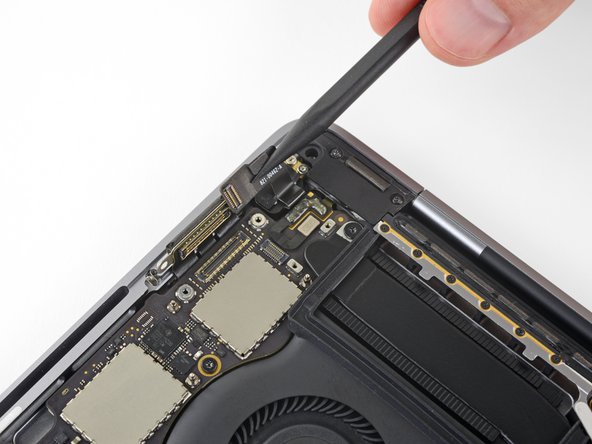
T3トルクスドライバーを使って、Touch Barデジタイザーのコネクタブラケットより1.9 mmネジを1本外します。
-
-
-
左側メインスピーカー用のソケットを覆っているテープがあれば、剥がしてください。
For me, the main speaker tape on both sides tore loose, which is a real shame, because those are the two hardest to get back in - they're very short and stiff.
Important safety tip: On my laptop, the cables have two semicircular notches near the end. You can tell when they're fully-inserted when the notches are inside the connector.
-
-
-
前の6つの手順を繰り返して、反対側のツイーターと右側のメインスピーカーの接続も外します。
-
ツイーターコネクタを覆っているテープがあれば剥がしてください。
This step seems redundant as those six steps get repeated in detail anyway after this step.
-
-
-
最初のアンテナケーブルを、ソケットからまっすぐ持ち上げて接続を外します。
-
ピンセットもしくはスパッジャーの平面側先端を慎重にケーブルの下でスライドして、ソケット付近で止めます。それから慎重にツールでひねったり、こじ開けて、接続を外します。
-
-
-
前の手順を繰り返して、残りのアンテナケーブル2本についても接続を外します。
Reconnecting is very tricky. It doesn't take much force to push down, but the connectors have to be perfectly aligned. You won't really feel it snap into place, but it will stay put and resist wiggling.
Agreed, very tricky step. I found the two slightly longer leads easier to reattach. Then I used them as a visual guide to attach the small lead. It helped to slightly bend the lead. Glenn is correct, it doesn’t take much pressure to attach but the leads have to be perfectly aligned. Be careful if you test the fit, very easy to pry back off.
-
-
-
ロジックボードアセンブリを固定している10本のネジを外します。
-
2.5 mm トルクスT3ネジー3本
-
2.9 mm トルクス T5ネジー5本
-
3.0 mm トルクス T5ネジー2本
-
-
-
2つのゴム製ファン用振動減衰ストリップをファンに固定するための接着剤から剥がします。(完全に外さないでください)
-
必要に応じて、iOpener、ヘアドライヤー、ヒートガンで中程度の熱を当てて、接着剤を柔らかくすると、剥がす作業がスムーズになります。
Mine had no adhesive on them at all. You only need to make sure they are loosened from the fan shroud. They come out with the logic board assembly.
-
-
-
ロジックボードアセンブリを取り外すには、左側から持ち上げます。
Wichtig !!
Vorher den Display Anschluß (hinten mitte) Abschrauben und lösen.
2x bleche mit jeweils 2 Scxhrauben
Ist nachgetragen. Danke!
What just happened… While I was removing the logic board one of the small black boxes from the bottom right just fell off. I am not sure but I think it is a capacitor - it says KO 336 16K 723. It just fell, I did not even touch this part… Maybe it was broken when I opened up the case in the beginning, but I did not notice it then.
Did I just break my laptop?
Translation
Important !!
First unscrew and loosen the display connection (rear center).
2x plates with 2 screws each
glendstone - 返信
@Glendstone You are absolutely right. This is a key feature they forgot to explain.
The feedbacis has possibly already been addressed in step 27 as it was already fully disconnected when I got to this step.
-
-
-
ゴム製振動ダンパーの位置が揃っているか調整しながら確認します。
-
アンテナケーブルのバンドルをロジックボードとヒートシンク間の隙間に通して、ボードを取り付けた時にケーブルが正しく繋がっているか確認してください。
-
インストールする際に、ケーブルがボードの下に閉じ込められていないか確認してください。特にマークしたエリアをよく確認してください。
-


デバイスを再組み立てする際は、これらの手順を逆の順番に従って作業を進めてください。
デバイスを再組み立てする際は、これらの手順を逆の順番に従って作業を進めてください。
以下の翻訳者の皆さんにお礼を申し上げます:
100%

これらの翻訳者の方々は世界を修理する私たちのサポートをしてくれています。 あなたも貢献してみませんか?
翻訳を始める ›


T4 worked best here for me.
Benjamin Bradshaw - 返信