はじめに
トラックパッドを交換するにはこのガイドをご利用ください。この手順はバッテリーを取り出すために接着剤リムーバーを使用します。取り出したバッテリーの再利用は絶対にしないでください。バッテリー を取り出す際のストレスによって、バッテリー セルに見えないダメージを与えています。このため、バッテリー には危険が潜んでいます。新しいバッテリー と交換してください。
iFixitの接着剤リムーバーは可燃性です。 この作業は換気の良い場所で行ってください。 また作業中は、喫煙を控え、火気のある所で作業しないでください。
ダメージの軽減のために、作業を始める前にMacBookの電源を入れてバッテリーを放電してください。充電されたリチウムイオンバッテリーに穴を開けてしまうと大変危険で、制御できない引火をアクシデントで起こしてしまいます。バッテリーが膨張している場合は、 適切な方法で処理してください。
必要な工具と部品
-
-
底ケースと上部ケースを留めている次のネジを10本外します。
-
2.3 mm P5ペンタロープネジー2本
-
3.0 mm P5 ペンタロープネジー8本
-
この作業中、外した各ネジの管理を安全に行ってください。再組み立ての際は、デバイスのダメージを防ぐため、正しい位置に装着してください。
-
-
-
バッテリーボードに装着されているプラスチックカバーを外します。
-
-
-
ピンセットを使って、バッテリーコネクターボードの右側底付近にある小さいプラスチックカバーを取り出します。
when doing this with metal tweezers as instructed in the video, it was difficult to get off and apparently while i was trying to do it, the tweezers went too far under and i believe made contact with the screw underneath? there was a zzz noise, an orange flicker and a little stream of smoke that came out. i freaked out and put everything back together to see if the laptop even still worked, it turned on and everything but died right away (i drained it before doing the repair anyway, so i was surprised it turned on at all).
i finished the battery repair and did several other things while in there. i have charged it all the way as recommended and will use it later on to see how everything is, im hoping that it’s a okay, but could someone explain to me what happened and the possible consequences?
-
-
-
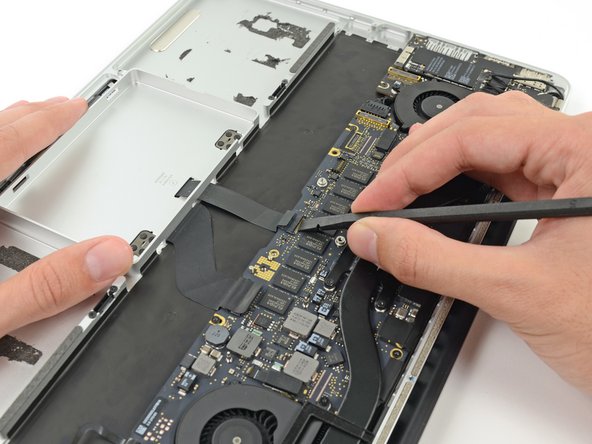
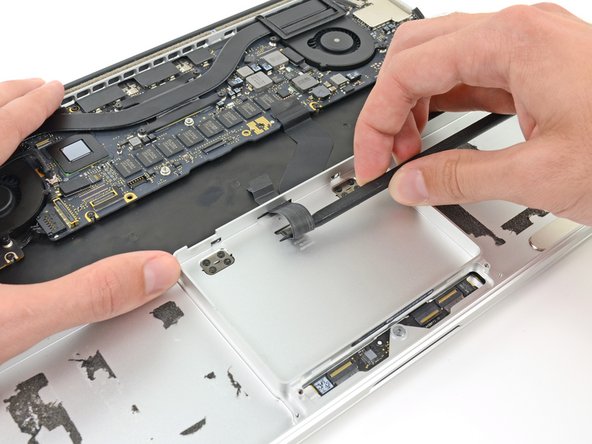
ピンセットでインターポーザーを掴みます。
-
インターポーザーをロジックボードから引き上げて外します。
you must lift it absolutely vertically, or it fouls against the locator pin in the corner- you can easily get the impression that it won’t come over the end of this pin- almost like it’s rivetted in. it isn’t. get a good grip on it with the tweezers in the centre hole & one of the sides, & lift it STRAIGHT up.
I would recommend to use plastic tweezers in order to reduce risk of damage.
Second that. If you have thin heat shrink tubing, form some over the tweezer tips. If the tubing is thin and small enough in diameter you’ll see the serrations of the tweezer tips.
wat is the model this SSD
-
-
-
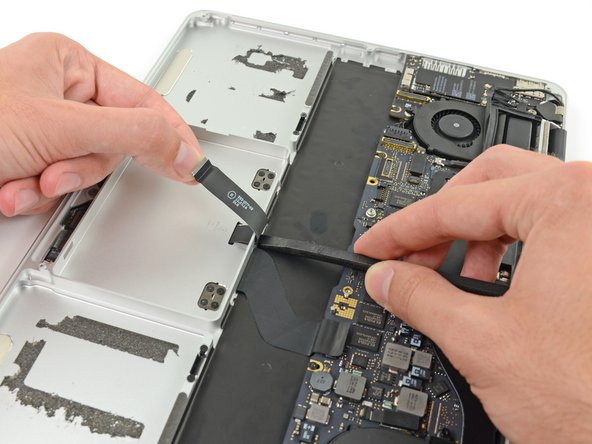
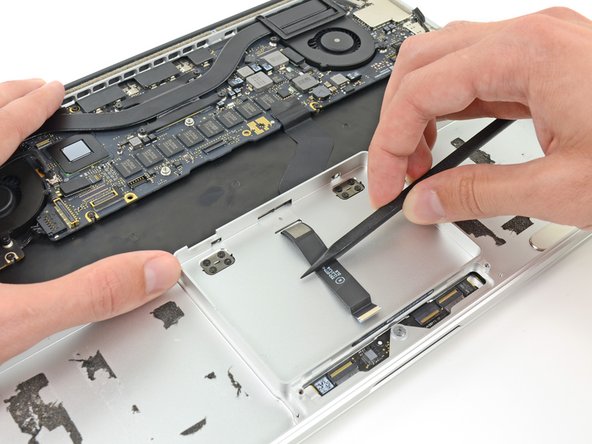
スパッジャーの平面側先端を使って、出入力ボードデータケーブルコネクターの右側を出入力ボード上のソケットから引き上げます。
-
-
-
スパッジャーの平面側先端を使って、出入力ボードデータケーブルコネクターの左側底に差し込みます。
-
丁寧にスパッジャーを曲げて、ロジックボード上のソケットから出入力ボードケーブルコネクターの接続を外します。
I also skipped this step as this data cable is not compromising the exchange of battery and less interaction with connectors is less risk of damage..
Diesen Schritt habe ich ebenfalls weggelassen, da das Datenkabel den Austausch der Batterie nicht behindert und weniger Manipulationen an Steckverbindern bedeutet ein geringeres Risiko für Beschädigungen
-
-
-
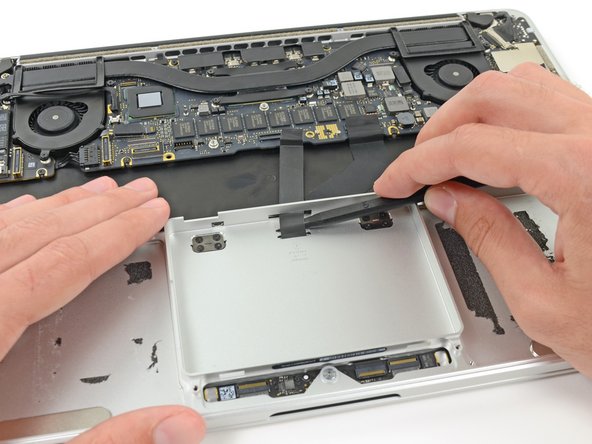
スパッジャーの平面側先端を使って、SSDケーブルコネクターをロジックボードのソケットから引き上げます。
-
SSDケーブルコネクターを作業の邪魔にならない位置に動かします。
As per my comment on step 10, this is also not required. When you remove the SSD in step 22, you can just fold it over out of the way.
This step is easy enough that I’d just remove it to be out of the way. I 100% agree with your other comments though. While you’re here, might as well do step 21 and remove the drive, just takes a sec.
I also strongly recommend not to unmount the speaker plugs, just flip them out of the way, same as with the SSD drive. Makes it much less complicated and less risky. It worked perfect for me.
Ich empfehle ebenfalls, die Platinenstecker der Lautsprecher nicht zu lösen sondern die Lautsprecher einfach, so wie das SSD-Laufwerk, einfach aus dem Weg zu legen. Das macht die Sache weniger kompliziert und weniger risikoreich. Es hat bei mir super funktioniert!
-
-
-
スパッジャーの鋭利側先端をスピーカーケーブルコネクターの右側下に差し込みます。
-
右側スピーカーケーブルのコネクターをロジックボードのソケットから丁寧に引き上げます。
-
-
-
T5トルクスドライバーを使って、上部ケースに右側スピーカーを固定している次のネジを外します。
-
黒 6.8 mmネジー1本
-
シルバー 6.3 mmネジー1本
-
黒 4.89mmネジー1本
If you manage to misplace any screws, particularly one of the speaker retaining screws, look under the speakers - they are magnetic and great at hiding missing screws :)
-
-
-
-
上部ケースから右側のスピーカーを引き上げて取り出します。
For those who don’t realize it, the speakers you are removing really are the plastic corner pieces that look like they’re just there to fill the space.
-
-
-
スパッジャーの平面側先端を使って、ヘッドフォンジャックケーブルコネクターをロジックボード上のソケットからまっすぐ引き上げます。
For an easier, lower-risk repair, skip this step and step 18 - go straight to step 19 and fold the speaker out of the way.
Agreed, this is the way
-
-
-
スパッジャーの先端を左側スピーカーケーブルコネクターに差し込みます。
-
左側のスピーカーケーブルコネクターをロジックボード上のソケットから引き上げます。
It's easier to follow Step 19 & 20 first and then come to Step 18 (this step). Doing so will make it easier to remove that speaker connector easily holding the cable of speaker without having to use a pry tool.
-
-
-
T5トルクスドライバーを使って、左側スピーカーを上部ケースに固定している次のネジを外します。
-
黒 6.8 mmネジー1本
-
シルバー 6.3 mmネジー1本
-
黒 4.9mm ネジー1本
Be very careful on this step. If you aren’t you can snap the plastic on the corners where the screws go in. Remember to go slowly when spinning the screws back in, it doesn’t take gorilla torque to tighten them, just take it easy!
-
-
-
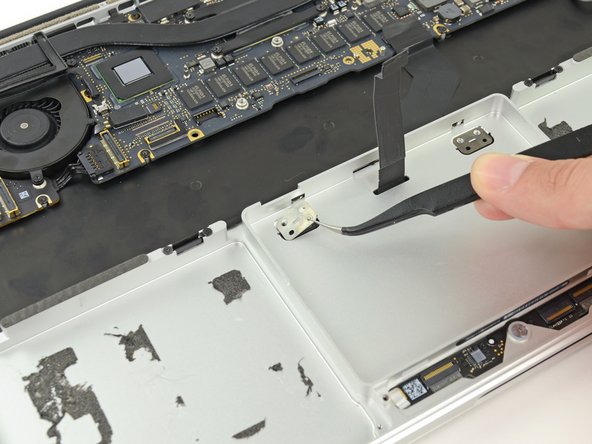
親指を使ってSSDトレイ上のプラスチック製バネ付きバーを曲げ、デバイスの正面側にある2つのクリップを外します。
-
バネ付きバーを押さえながら、SSDアセンブリをスペースから外すように前向き押し上げます。
-
-
-
バッテリーの両側から2.2 mmの T5トルクスネジを3本外します。(合計6本)
If I were to do this again, I think I would leave unbolting the transverse battery until after ungluing the other four. That way one can tip the laptop on to one of its short sides and so run adhesive remover along the long edge of each battery and let gravity assist penetration without the transverse battery falling out.
I think this is good advice.
I just did one of these that didn’t have these screws installed from the factory. Odd
maccentric - 返信
-
-
-
ディスプレイを保護するために、作業中はディスプレイとキーボードの間にアルミホイルシートを差し込んでください。
You can use a heat gun to remove the adhesive. Remember you can always add more heat so don’t over do it. I put my heat gun on high for less than 10 seconds at a time
Using a heat gun on a lithium-ion battery is not a good idea. You can get away with it if you are careful, but a solvent is much safer. ;)
-
-
-
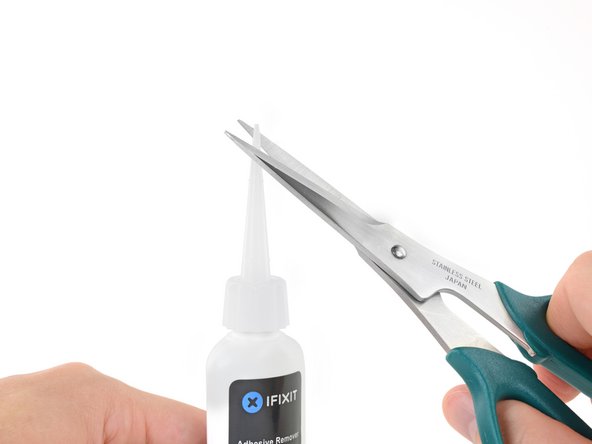
接着剤リムーバーの容器から、黒いゴム製のキャップを引き抜きます。
-
ハサミを使ってアプリケーターの先端をカットします。
-
-
-
バッテリーセル左端の下に、接着剤リムーバーを数滴、均等に注入します。
-
わずかな量で十分です。この小さなボトルには搭載された全バッテリーセルを外すのに必要な量の倍が入っています。
-
液体状の接着リムーバーがバッテリーセルの下に浸透するまで、約2–3分間待機してください。それから次の手順に移ります。
If you use a heat gun be sure to point the heat gun away from the motherboard. After heating for 10 seconds or less use the blunt end of the metal pry tool as you don’t want to puncture the battery. You don’t need much force as after you have enough heat you will hear it unsticking when you pry at it lightly with the BLUNT end of the metal pry tool. Repeat this step on the other side. You don’t need to heat the cells near the motherboard as they are secured with small screws
I replace a lot of glued in Macbook batteries and you really do not need ISO to get them out. These wide blade plastic spudgers are brilliant and cheap. https://www.aliexpress.com/item/32824615... Image here https://imgur.com/a/0Y0Yvyj
May not need it to remove the battery, but it sure helps for removing the leftover residue and black VHB that’s left behind. I found that dousing the VHB and using a metal flat spatula helped.
Some good advice:
Use a iFixit plastic card/credit card (work from the short side of the computer) and stick it under the battery towards the glue strip and hold the card approx 45° (or whatever angle is appropriate) and drip the glue remover on the card so it slides/runs down the card underneath the battery. In this way the glue remover is aimed straight to the glue under the battery to ‘eat its way’ onto the glue. Let it do its job for a minute or two. Then you can dig in the card even more underneath (the angle of the card will obviously be less and less as you get further in; the idea is just to somehow slide the liquid under), add a bit more remover, dig a bit more, etc…
Otherwise the glue remover can get a bit all over the place but this way it is more easily directed towards the glue.
Goo Gone, applied with a pipette, is a non-flammable alternative solution for releasing the adhesive that won’t harm plastics if it seeps past the battery cavities. It does take a bit longer, 30-45 mins, but is much safer. An additional benefit is that the adhesive will be completely separated from the top-case, so cleanup is super quick.
Hi John,
We don’t recommend using Goo Gone because it’s a petroleum distillate based remover, which leaves an oily residue. The residue can prevent replacement adhesive from fully bonding with the surface. Be sure to clean any Goo Gone surface with a detergent-based cleaner.
Isopropyl alcohol and iFixit’s adhesive remover are formulated to evaporate quickly and leave little residue, which allows replacement adhesive to bond properly to the surface.
Note, per my later cleanup, I found that 2-3 drops may not be enough, or else, 2-3 minutes is too long to wait before trying to pry. Once the remover starts to dry, it is not as easy to work the adhesive. I ended up using maybe 1/10 of the bottle overall and most of that was liberally dousing the residue a few times to fully clean the case.
-
-
-
スパッジャーの平面側先端かプラスチックカードをバッテリーセルの一番左側の底に差し込みます。
-
バッテリー周囲の下に沿ってスパッジャーをスライドさせながら、接着剤を剥がします。
This is the most difficult step. The tip of my spudger got bended and the aluminum case damaged it.
I also broke a spudger trying to do this. Eventually I figured out it is easier to go in diagonally from the corner, just to one side of the screw hole, and lever until you hear the adhesive pad tear and give way.
we use a hair dryer and gently blow hot air in between the battery for a good minute before trying to lift it with a spunger. It worked wonderfully! When lifting, just give it constant force upward and you'll hear the battery slowly breaking away from the macbook, and we don't even see glue residues on our macbook at all. Just be patient. :)
Just a note to say that the above comments were written before the liquid adhesive remover was added to the guide—you should definitely NOT be breaking any spudgers using the current procedure, which requires very little force. I recommend using plastic cards rather than spudgers—it's pretty easy to slide them under each battery cell and separate the adhesive once the solvent has done its work.
This is much easier to do using a plastic card. Just slide the card under the side of the battery and rock it back and forth. The battery will separate pretty quickly with minimal residue.
by a plastic card, do you mean a credit card type thing? thanks in advance.
Exactly—one of these or an old credit card should work fine.
I second this, I also used an old credit card and it totally worked! I did not use any heat or liquid
Some good advice:
Use a iFixit plastic card/credit card (work from the short side of the computer) and stick it under the battery towards the glue strip and hold the card approx 45° (or whatever angle is appropriate) and drip the glue remover on the card so it slides/runs down the card underneath the battery. In this way the glue remover is aimed straight to the glue under the battery to ‘eat its way’ onto the glue. Let it do its job for a minute or two. Then you can dig in the card even more underneath (the angle of the card will obviously be less and less as you get further in; the idea is just to somehow slide the liquid under), add a bit more remover, dig a bit more, etc…
Otherwise the glue remover can get a bit all over the place but this way it is more easily directed towards the glue.
My MBP identifies as late 2012/early 2013, and don’t know where you come up with a separate identity.
Looking at both disassembly procedures, neither shows the aftermarket (probably NewerTech or OWC) battery I found in this MBP.
That’s disconcerting; finds one asking myself - “Am I using the right procedure??”
if you know this might be the case, please add note to this step if the user finds only 4 physical cased batteries.
Tnx!
Use the plastic credit-card shaped card.
-
-
-
反対側のバッテリーセルに作業を移します。MacBook Pro右側2つのバッテリーセルについても同じ作業を繰り返します。
-
数滴の液体接着剤リムーバーをバッテリーセルの下に注入してください。それからセルをこじ開ける前に、液体が浸透するまで約2−3分間待ちます。
Puncturing the battery’s protective covering can lead to release of caustic fumes or fire.
-
-
-
バッテリーを上部ケースから完全に取り出します。
-
運が良ければ、ゆっくりと指で各接着ストリップを剥がせます。
-
そうでない場合は、各バッテリーセルの下に接着剤リムーバーを少量ずつ付けます。2−3分間待った後、開口ピックやお持ちのツールで接着剤をこすり落とします。この作業には少し忍耐が必要です。
-
残りのバッテリーセルについても接着剤リムーバーを付けて同じ作業を繰り返します。それからMacBook Proを数分間、空気乾燥させます。
-
この修理ガイドを完成したら、新しく装着したバッテリーのキャリブレーションを行なってください。100%になるまで充電します。充電後も最低2時間はプラグを繋げたままにします。それからプラグを外して、通常通り使用しながら、自然に放電させます。バッテリー残量小のサインが表示されたら、これまでの作業を保存して、スリープ状態になるまで放置してください。スリープ状態に入ったら、少なくとも5時間置きます。それから一気に100%まで充電します。
During battery replacement take care to position the two left and right battery packs inwards and upwards towards the macbook center such, that there is sufficient space for reinstallation of the two speakers!
I second Fred’s suggestion. I had to “smoosh” the right speaker in since my battery replacement was a little bit too far over. It was fine, but the “heads up” note is warranted.
If you're replacing the top case that includes a new battery, can't you skip removal of the battery?
Yes!! If uppercase Assembly(Includes Trackpad, keyboard, Palmrest & BATTERY) is being replaced, there is no need to remove battery from old uppercase assembly.
When you are at this step and before you put the new battery in, take the time to clean your computer really well. You will be surprised how much dust/dirt and even pet hairs have gotten into your computer. After I removed the battery, I use a little more of the acetone to clean the bays up and after it dried, I used a tiny bit of Isopropyl Alcohol to make sure there was a good clean area for the new bonding. Make sure you clean the fans. Don’t use a toothbrush or anything like that. If your have a Lowes or Home Depot, you can buy a shop vac attachment kit for about $20, it’s well worth it. Don’t use that air in a can crap, it will put moisture on circuits. Take your time, it’s not a hard task to do everything, just use a little patience.
Hi all,
After installing the new batteries, my mac is not powering up… Do i need to charge the battery first and then check again? Have anyone faced similar issue before?
My 1st battery from ifixit came out to be defective and it caused fire at the centre of the long battery. I have got a replacement for the defective piece which i have installed now. However, now i am worried that connecting to power could lead to any potential fire / harm to my mac???
Already i have spent lot of time in this and it would be very upsetting if this battery spoils my mac!!!
Any suggestion people???? thanks in advance!
BR,
Vijay
Hi Vijay!
Uh-oh, we’re sorry to hear about the battery trouble!
Our batteries come with a 1-year warranty, so this would definitely be something we can assist with. Please feel welcome to reach out via help.ifixit.com and provide our Support team with your order number so that they can look into these battery troubles with you.
Thanks!
Hi All,
Just replaced battery, and am typing this on the live MacBook. The unit fired up as soon as I plugged in the power adapter. Nice. The battery percentage indicator said the battery had approximately 85% power charge. Is this normal? If not, what steps should I take to ensure that this battery is properly calibrated?
Cheers,
James
Hi James,
Follow these steps to calibrate your new battery: https://help.ifixit.com/article/265-batt...
ご指摘ありがとうございました!訂正済みです。
Can someone tell me which model is written in the battery? I saw that is written the model a1437. Is this model compatible with the a1425? Thanks
Hi Mizuno,
The battery model is A1437, and it is compatible with the MacBook Pro model A1425.
These instructions are brilliantly concise! Thank you. And thank you everyone for your comments. As a final comment from me, it is much easier to assess the final position of the batteries if you place them gently in position, reinstall the speakers, adjust the battery position if needed and then press them firmly into place.
I did everything in the kit, but my computer won’t acknowledge the battery and is only running on my power adapter. Once I take off the power adapter it shuts down. I also tried resetting the snc, but unsure if it did anything. I reopened up the back to see if I missed anything. The batteries are warm, which means they were running. I’m very confused, anybody else run into similar issues?
My OEM adhesive was particularly persnickety and did not want to come up. I found a pick to be more useful than the flat spudger or the card. I also used several applications of remover and found that working with it wet was much more effective than letting it dry to dissolve the glue. A final few wipes with more remover and the cloth wipe that came with the kit did a good cleanup job.
So I just replaced the battery and reassembled everything and when plugging it into the power supply, the LED is not lighting up and computer is not turning on. Not sure what I did incorrectly as I basically followed the steps in reverse for reassembly after installing the battery. Any advice would be appreciated.
Bibihabibi - 返信
-
-
-
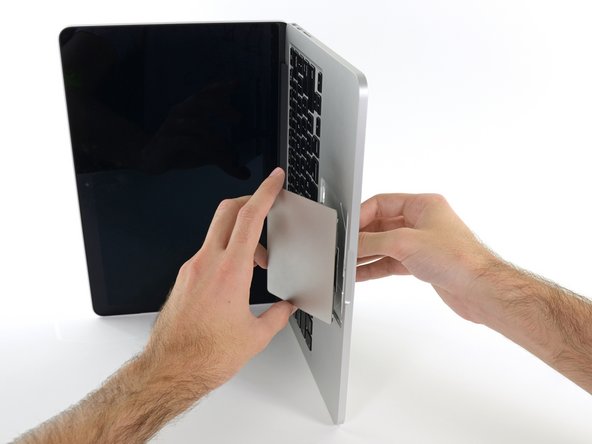
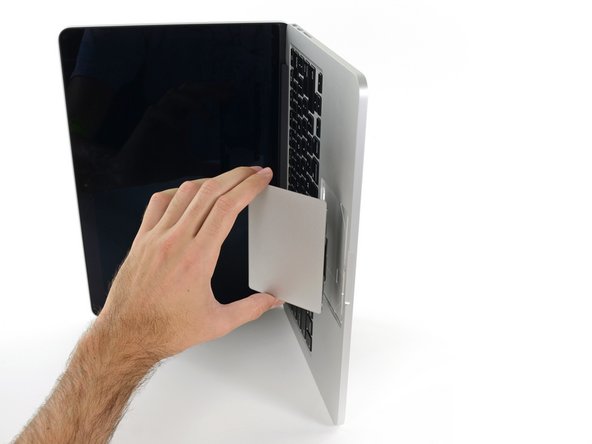
スパッジャーの平面側先端を使って、トラックパッド用リボンケーブルのZIFソケット上にある固定フラップを裏返します。
It looks like you could skip the entire battery removal procedure if you simply left the trackpad cable in place, disconnected it at the trackpad end, and used the old cable on the new trackpad?
You could try it, but there’s very little slack in that cable. I think you’ll have a hard time disconnecting the trackpad without straining or tearing the cable.
-


デバイスを再組み立てする際は、これらのインストラクションを逆の順番に従って作業を進めてください。
デバイスを再組み立てする際は、これらのインストラクションを逆の順番に従って作業を進めてください。
29 の人々がこのガイドを完成させました。
以下の翻訳者の皆さんにお礼を申し上げます:
100%

Midori Doiさんは世界中で修理する私たちを助けてくれています! あなたも貢献してみませんか?
翻訳を始める ›


8 件のコメント
This can be done without removing the battery. The touchpad ribbon cable can be disconnected on the logic board, then snaked (gently!!) back out its channel with the battery in place.
It won't thread back through when replacing the touchpad though - it's not stiff enough. Instead, cut a strip of material from a manila folder and thread that through the channel under the battery. Then use masking tape to attach the touchpad cable to the manila strip and pull the strip out towards the logic board. The touchpad ribbon threads through the channel and the masking tape can be removed once it's in place.
Only the battery connector, SSD cable, and SSD carrier need removed.
Steps 24-34 are UNNECESSARY for this repair! Removing the adhesive portion of the battery is not required to remove the trackpad. Just lift up the top part of the battery that is screwed in and unplug the trackpad cable.
bizwfshane - 返信
I agree with sinwillet’s comments above; I repacked the battery and trackpad and did not remove the speakers entirely or the I/O board data cable
Note that the replacement trackpad may not have the ribbon cable or it may be the wrong length. Ok because you can reuse the ribbon cable on the original trackpad, as Philippe suggested above.
How do you adjust the trackpad sensitivity? EG>.. the silver screw at the bottom?
You just need the proper driver bit (I believe it is a Torx 5/T5 ?) first, follow steps 1-4 to remove the bottom cover, then the set screw is at the lower portion of the unibody frame smack dab in the bottom middle of the trackpad edge. To “tighten” the click (if click is not occurring or too “loose”), turn the set screw 1/8th turn in a clockwise direction. Then test the click t see if it improves, if not go 1/8th turn at a time. If you turn it too much or turn counter-clockwise too much it will release from its mount hole and they are REALLY annoying to try to re-thread.
If don’t have one of those neat project mats, then you can use small pieces of flattened blu-tack to hold the screws. If you arrange them in the shape of your mac book cover, and put the screws down methodically, you can get a one-to-one mapping of the screws to the correct screw holes.
Toby Thurston - 返信
Or you can use an ice tray where you put the screws and the parts in separate bays in the same order as they come in the instructions.
timofej.se -
This is great! I used a small magnetic white board, and wrote on it to identify the parts as I went. This whole process, from the fast shipment to the great instructions to the complete, high quality, tool kit has been great. I’m typing this comment on my resurrected laptop. Thank you! Sue
Susan Greer - 返信
It would be a good idea if people recorded in the comments which screws go where so that, if someone lost their screw positions, they could recover them from the comments.
Raymond Shpeley - 返信