メインコンテンツにスキップ

MacBook Core Duo LCD Assembly Replacement

必要条件のみ
この修理ガイドは、他のガイドの前提条件として使用されます。それ自体は不完全で、単独で使用されることはありません。

必要な工具と部品

  1. MacBook Core Duo LCD Assembly Replacement, LCD Assembly: 手順 1、 2の画像 1 MacBook Core Duo LCD Assembly Replacement, LCD Assembly: 手順 1、 2の画像 2
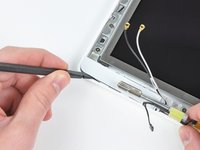
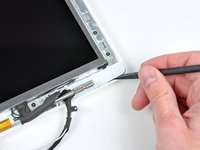
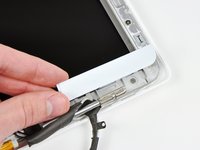
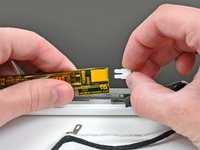
    • Remove the small piece of foam tape stuck down above each of the bezel covers, at the lower left and right corners.

  2. MacBook Core Duo LCD Assembly Replacement: 手順 2、 2の画像 1 MacBook Core Duo LCD Assembly Replacement: 手順 2、 2の画像 2
    • Use a spudger to slide the left bezel cover towards the LCD panel.

    • Do not lift up vertically on the cover! Unlike the large display bezel, this one has horizontal hooks to keep it in place. These will break easily.

    • Lift the left bezel cover off the display assembly.

  3. MacBook Core Duo LCD Assembly Replacement: 手順 3、 2の画像 1 MacBook Core Duo LCD Assembly Replacement: 手順 3、 2の画像 2
    • Use a spudger to slide the right bezel cover toward the LCD panel.

    • Lift the right bezel cover off the display assembly.

  4. MacBook Core Duo LCD Assembly Replacement: 手順 4、 2の画像 1 MacBook Core Duo LCD Assembly Replacement: 手順 4、 2の画像 2
    • Lift the inverter out of the display slightly and disconnect the backlight cable from its right side.

    • Place the inverter back down in its recess.

  5. MacBook Core Duo LCD Assembly Replacement: 手順 5、 1の画像 1
    • Remove the single 3.2 mm Phillips screw securing the display data cable to the right clutch hinge.

  6. MacBook Core Duo LCD Assembly Replacement: 手順 6、 1の画像 1
    • Move the display data cable out from under the mounting arm of the right clutch hinge.

  7. MacBook Core Duo LCD Assembly Replacement: 手順 7、 1の画像 1
    • Remove the twelve 4.2 mm Phillips screws securing the LCD assembly to the rear display bezel.

    • Make sure you pay attention to how the microphone cable (and antenna cable on some models) are routed around the outside of the two screws at the bottom left and right corners of the screen. It's easy to damage the cables if not routed properly when reinstalling these screws. To see the cable routing more clearly, click on the photo and zoom in.

  8. MacBook Core Duo LCD Assembly Replacement: 手順 8、 1の画像 1
    • Raise the bottom edge of the LCD assembly slightly, then slide it down slightly to free its upper edge from a slight overhang in the rear display bezel.

    • Lift it out of the rear display bezel, minding any cables that may get caught.

    • When reinstalling the LCD assembly back into the rear display bezel, before you tighten down any of its frame mounting screws, make sure the short brass posts, one each on the left and right sides of the bezel, fit into their corresponding holes in the LCD assembly frame.

  9. MacBook Core Duo LCD Assembly Replacement: 手順 9、 2の画像 1 MacBook Core Duo LCD Assembly Replacement: 手順 9、 2の画像 2
    • Be sure to keep track of the small magnet along the left side of the display. It may be stuck to the LCD frames or to the rear display bezel.

    • When the display lid is closed, this magnet comes in proximity to a sensor on a small circuit board at the bottom end of the I/O board, to tell the Macbook that the display has been closed, so that the Macbook can go into clamshell sleep mode.

    • To reinstall this magnet, press it back into its cavity in the rear display bezel, with its short side facing up (see photo 2), then place the LCD panel back into the rear display bezel and screw it down so that the magnet doesn't drop out and disappear.

終わりに

To reassemble your device, follow these instructions in reverse order.

作成者

6人の作成者と共同で作成されました。

Andrew Bookholt

585,500 ポイント

619のガイドは作成済み

0 件のコメント

コメントを追加

統計データ:

過去 24時間: 0

過去 7 日: 0

過去 30 日: 0

今までの合計 445