はじめに
このガイドを参照して、MacBook Air 13インチ Retina Display Late 2018 ディスプレイを交換します。
必要な工具と部品
-
-
MacBookにBig Sur v11.1以降がインストールされている場合、自動起動を無効にするとうまくいかないことがあります。通常通りに作業を進めることができますが、開口できたらすぐにバッテリーを外してください。
-
P5ドライバーを使って、次のネジを外します。
-
7.9mmネジー2本
-
7.1mmネジー2本
-
2.6mmネジー6本
-
-
-
指先をディスプレイと下部ケースの間に挟んで、Airから下部ケースを上向きに引き上げます。
-
下部ケースを取り出します。
Are there any suggestions to removing the pressure fasteners more easily?
-
-
-
スパッジャーを使って、バッテリーコネクタの下に差し込み、ロジックボードと並行にスライドして、ロジックボード上のソケットからコネクタを外します。
Before the battery can be fully disconnected, the battery disconnect button needs to be held down. There is a gold button just above the battery socket, along with a small LED much like the 12” machines. Once this has been held down and the LED has switched off it is safe to remove the battery.
This seems like an important step?
Also, seems like this should be done after the battery is disconnected, not before? Otherwise, wouldn’t the battery re-charge it?
What if the white LED dosent light up after pressing the yellow button again?
Iron05 -
I just performed this repair on my late 2018 mac air. I did click the gold button but saw no LED illuminated or otherwise. Question- after reassembly does the button get pressed again to connect the battery? Please clarify if this button is to be pressed and if it needs pressing again after the repair.
All said - I pressed again after the battery connector clicked, assembled the back and all worked perfectly. The original issue was one dead port (no charge, no communication). The battery charge lightening bold icon was acting funny too. Genuis bar guy in Naperville said it was likely a logic board too. But it was not. The port was apparently confusing the logic board with regards to the charge function. Thanks Adam for saving me $440 and sending my computer back to Apple. I am 71 yrs young - who says an old dog can’t learn new tricks with good training!!
I didn't see Aaron's comment before completing the battery replacement. Afterwards, the computer would not turn on despite multiple SMC reset procedures. Upon double-checking the comments I see the importance of pressing the gold button. I pressed the gold button before disconnecting the new battery, then pressed it again after reconnecting for good measure. Computer booted!
It would be good of iFixit to add this important step as most people probably don't open up every single comment on (seemingly) simple steps.
Seconding Corey's comment. If paid more attention to the comment section, I would have avoided 15-30 minutes of panic. (BTW I did not notice any LED, but the golden button was easy to find).
Where is the gold button? I replaced my battery and my laptop will not start
-
-
-
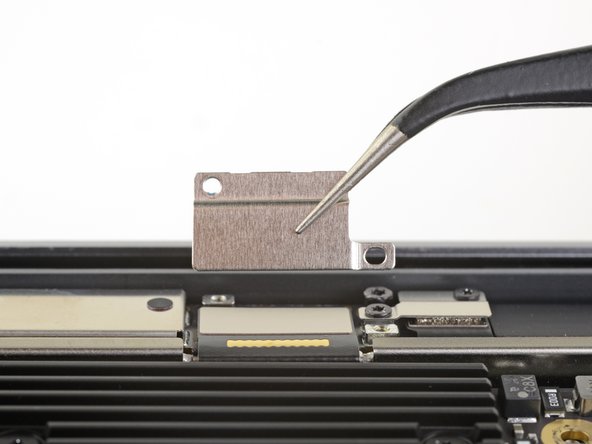
T3トルクスドライバーを使って、アンテナケーブルブラケットを固定している1.4mmネジを2本外します。
-
アンテナケーブルブラケットを取り出します。
-
-
-
-
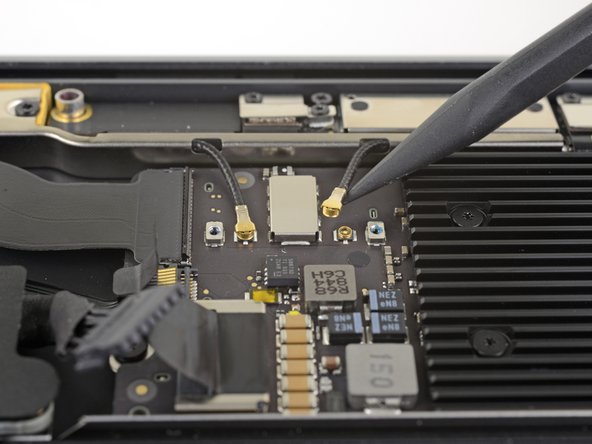
スパッジャーの先端を、コネクタ付近のアンテナケーブルの一つに差し込みます。
-
まっすぐ持ち上げて、ケーブルの接続を外します。
-
他のアンテナケーブルにも同じ作業を繰り返します。
As you are putting everything back together, it is a bit wonky trying to reconnect these antenna. Patience is necessary and it helps if you reshape the cables so that the cables are like the picture.
-
-
-
T5トルクスドライバを使って、次のネジを外します。
-
7.4mm ネジ−4本
-
4.5mm ネジー2本
-
-
-
ケースからアンテナバーをまっすぐ持ち上げて、取り出します。アンテナバーをケーブルやコネクタに引っ掛けないようご注意ください。
-
アンテナバーを取り出します。
Tip: keep the six big lid anchor screws in place until after you remove the antenna bar. You may have to use your plastics spudger to wedge underneath the vents and get leverage off the underside of the lid along the hinge area. I also had to remove the Logicboard so I could get the plastic spudger underneath the antenna bar and lift it up. It felt like it was going to break. Did not want to have to remove the logic board, but seemed that was the only way I could get underneath and pry the antenna out.
Felt like I was going to break it! It will come out but it requires patience and light touch
Go to 12:02 on this Video:
Subscribe to this dude’s channel! I donated because he has taught me a lot with his videos!
Lamar's suggestion to view the video is excellent. Though I saw it only in arrears, it was quite valuable. I found a spudge, used to GENTLY pry both side first, then begin lifting on your right side (with back of laptop facing you) while gently twisting slightly inward to do the trick.
Probably the worst moment in this repair.
DLC
dlcatftwin - 返信
-
-
-
T9トルクスドライバを使って、上部ケースにディスプレイヒンジを固定している4.9mmネジを6本外します。
This was a T8 Torx driver for me
It’s easier to leave 1 on each side in place open the MacBook fully and the remove them. This will help not damaging the bottom screen rim
Torx T8 for me too on a MacBook Air 2020
Paul Scott - 返信
T8 for me as well on a 2019 MacBook Air
-
-
-
MacBookを持ち上げ、上部ケースに対してディスプレイを90度まで慎重に回転させます。
-
ディスプレイをケースに対して90度に保ち、ケースを動かさずにディスプレイをまっすぐ下に移動させて、ヒンジがケースの底からスライドして外れるようにします。
Can i skip antenna screw and battery to reallign the screen lid ? My screen lid is misalligned with the body about half milimeters
can.cakmak - 返信
Yes. You can loosen the screen lid screws to re-align the top lid.
(quote)
"Keeping the display at a 90 degree angle with the case, move the display straight down while holding the case still, so that the hinges slide out the bottom of the case."
(end quote)
If you're moving the display straight down, how does it "slide out"? I do ge the point, but this instruction could stand a tad amount of re-wording.
dlcatftwin - 返信
Also, on installing the new screen, the hinges on the new screen are very tight. It is easier to the install if you use some needle-nose or some tweezers to open the hinges to 90 degrees before trying to slot the new screen.
-


オリジナルのパーツと交換用パーツをよく見比べてください。交換用パーツに付いていない残りのコンポーネントや接着シールなどは、インストールする前に新パーツに移植する必要があります。
デバイスを再組み立てする際は、これらの手順を逆の順番に従って作業を進めてください。
e-wasteを処理する場合は、認可済みリサイクルセンターR2を通じて廃棄してください。
修理が上手く進みませんか?まずはベーシックなトラブルシューティングを試してみるか、このモデルのアンサーコミュニティに尋ねてみましょう。
オリジナルのパーツと交換用パーツをよく見比べてください。交換用パーツに付いていない残りのコンポーネントや接着シールなどは、インストールする前に新パーツに移植する必要があります。
デバイスを再組み立てする際は、これらの手順を逆の順番に従って作業を進めてください。
e-wasteを処理する場合は、認可済みリサイクルセンターR2を通じて廃棄してください。
修理が上手く進みませんか?まずはベーシックなトラブルシューティングを試してみるか、このモデルのアンサーコミュニティに尋ねてみましょう。
25 の人々がこのガイドを完成させました。
以下の翻訳者の皆さんにお礼を申し上げます:
100%

Midori Doiさんは世界中で修理する私たちを助けてくれています! あなたも貢献してみませんか?
翻訳を始める ›

11 件のコメント
So…….. Which one of those flexes is the camera flex? It seems you skipped over a lot of the connectors in your guide.
I would like to know this as well same issue with Camera not detected as other comments.
I’m also interested in this. After a LCD swap, de iSight camera / webcam isn’t working.
Jochem -
Y’all need to give bonus points for putting it all back together again. Those T3 screws in steps 5 and 7 are awful hard to get back into place while holding the brackets in place. Not to mention the replacement display I purchased (from a third party) didn’t have the other two brackets in place, so I had to move those over from the original display as well.
The high res images in this guide are very helpful, and the guide is very well written and straightforward. Thanks.
Thank you. Very clear guide. The antenna bar removal IS a tense moment and and I’d suggest everyone carefully look at all three photos in this stage just to facilitate the display logic board falling through the gap. With this guide, this is at the low end of ‘moderate difficulty’.
Antenna bar removal_Felt like I was going to break it! It will come out but it requires patience and light touch
Go to 12:02 on this Video:
Subscribe to this dude’s channel! I donated because he has taught me a lot with his videos!
Anybody can solve the problem of the “no camera detected” after replacing the screen? I also don’t have the auto bright function.
Juan Pablo - 返信
Step 5 mentions using a T3 Torx screwdriver - not so on my unit - magnification reveals 2 Pentalobe screws, what size I know not, though they are not P5. Any advice?
dlcatftwin - 返信
Is it possible to replace just the display cable? There is a replacement display cable sold by ifixit that’s supposedly compatible with MacBook Air 2018, but I haven’t seen any instructions for it specifically.
SunMin Kim - 返信
Just tried this unsuccessfully. My two 4.5 mm screws that hold the antenna bar on were stripped, so I couldn’t complete the repair. I reassembled everything, but when I tried to turn my computer on again, it wouldn’t turn on. Any advice would be much appreciated
If the first thing you do is disconnect the battery, is it really an issue if you don’t (or can’t) disable auto-boot?
maccentric - 返信
I agree, why disable Auto-Boot when the lid is closed and the battery is disconnected immediately? – I've never had an issue since 2016 when the feature was introduced.
stevebsiegel - 返信
On my machine, the longest two screws were in the corners, while the other two long screws were in the middle. Perhaps previous service in the past had them replaced into the wrong place? In any case, the longest screws do seem to fit in either place. I guess 0.8mm is not very much of a difference. Seems like poor design if they could have used one size of screw.
johann beda - 返信
Just did one, and it also had longest screws in the corners.
maccentric -
Just did another, and the long ones were in the middle. Definitely poor design and quality control.
maccentric -