はじめに
このガイドを参照して、ロジックボードを交換します。
必要な工具と部品
-
-
P5ペンタローブドライバーを使って、下部ケースをはずしてください。ネジは次の長さに分かれます。
-
9mm ネジー 2本
-
2.6mm ネジー 8本
-
-
-
ディスプレイと下部ケースの間に指を入れ、上に引っ張って下部ケースを本体から外します。
-
下部ケースを取り外して脇に置きます。
There is a nub on the inside of the case which is attached to the battery. When you try to pull it open, it appears to be attached to the plastic casing of the battery, which sometimes splits. I gently unhooked the nub from the battery before removing the case fully. This seems to happen if the battery has suffered some drop damage (plastic parts broken around screws and parts of plastic frame split). Just an FYI in case your lower case doesn't pull away easily.
To add - the slim 1cm tab “nub” is on the centre of the back cover & fits into a hole in the battery frame. I ran my fingers around the whole of the cover to eventually here it click out.
nijafe -
So this is a legit back cover for MacBook Air?
I bought the part and tools from iFixit and followed the directions. The mechanical part went smoothly - maybe 10 minutes to disassemble/replace/reassemble.
Getting Catalina (the current MacOS) to install was not working until I used Cmd-Opt-R (as noted in the OWC paper sheet that came in the box) which brought up the proper installer - I believe from a pre-prepared bootable SD card but it’s hard to say. From there the install succeeded taking ~1.5 hours.
Beware that (a) the install requires a working internet connection for verification and updates, and (b) the system must have been running at least macOs 10.13 (High Sierra) before the install in order to have an EFI BIOS that recognizes the SSD.
Lance Berc - 返信
Thanks for the detailed photos. When repairing equipment, I don’t really like to disassemble plastic parts, they can be damaged, but your screenshots help a lot. For my studies, I am writing an essay comparing the reliability of laptops from various manufacturers and the complexity of their repair, maybe it will be useful for someone to check the essay for plagiarism here essay checker, when comparing different manufacturers, I understood why people love Apple so much. The minimum number of failures. Of course, repairing it in an official service is not cheap, but with the help of such detailed instructions, you can do it yourself and save a lot.
The screwdriver bit to use on these case screws is not named, but I found that my "CR-V 1.2" did the job nicely.
The driver for the screws inside the case are named, as "T5".
-
-
-
バッテリコネクタに付いている透明なプラスチック製のプルタブをつかみ、Airの前端に向かって引っ張り、ロジックボードからバッテリの接続を外します。
The clear plastic tab is missing on mine. Whoever worked on my laptop before me seems to have ripped it off. Now what?
mjmorawski - 返信
My plastic tab pulled off the connector. I worked the connection apart using two spurgers, slowly backing it out side to side.
I don’t see my socket on logic board, how can I fix it
QUYNH PHAM - 返信
-
-
-
スパッジャーの平面側先端を使って、I/Oボード上のソケットからI/Oボードケーブルのコネクタを上向きに跳ね上げます。
Be really careful when reconnecting the I/O board cable connector. The deep connector has a tendency to bend the pins with very little force applied. If this is the case, check to see if the gold pins are bent down, you may only see one row of gold pins vertically, or none.
They can be lifted with a flat head screwdriver bit. Gently slide the bit under the pins, this may need a small amount of pressure depending on how far they are bent down. Lever the pins back to the vertical position.
I found attempting to insert this connector was easier while holding the MacBook on a slight angle to see down the pins as I aligned the connector.
Another way to tell if the I/O connector cable is in place correctly is to run an Apple Hardware Test. Hold down the letter D while booting the mac and follow the prompts. If no issues found, you're all good.
A common error for a misconnected I/O Connector is 4SNS/1/C0000008:TS0P--124. This means the system cannot read the palm temperature sensor. Fix the cable and you're good
This is ridiculous.
From this point, skip ahead to step 18. There is no need to perform steps five through 17.
I am glad I saw your comment. This saved me a lot of time and allowed me to miss many points of failure. thanks.
-
-
-
スパッジャーの先端を使って、ファンケーブルのZIFソケット上の固定フラップを持ち上げます。
It is not necessary to remove the fan cable.
It's certainly necessary to remove the fan cable, as you won't be able to remove the fan in Step 10 if you don't!
If you break the ZIF socket, it could be a bad day.... It happened to me. Not one to throw in the towel, I fashioned a hold-down with a length of paperclip held in place by the nearby screw. So far, it is working like a charm. Hopefully, it continues to work and this helps some other poor soul.
I also haven't removed the fan cable. No need for this step IMHO. Just let the fan on the side instead of completely remove it.
Trouble putting the cable back in the ZIF socket?
Get some electrical tape and cut it down the the width of the ribbon cable fold over one end to create a pull tab. Now place the tape onto the ribbon to give yourself something to pull either in or out as needed. Then you can peel off the tape.
Don't forget the unlatch the connector first!
Source: Re-connecting fan ribbon cable
Adam Banko - 返信
The hardest part is to put the fan cable back in the ZIF socket.
(Why do people say you don’t have to unplug the cable? that makes no sense)
after putting the cable back in the fan is very loud, can someone help?
Be very careful when locking the ZIF connector during reassembling. This was my first time seeing a ZIF connector, the retaining flap plastic bounced when I was reassembling the I/O board ( I didn’t pushed so hard though) and a struggled nearly 1 hour to reassemble it. Same connector, be careful. It was a nightmare, thank god it didn’t broke!
I see comments suggesting not to remove the ribbon cable. This would work. Simply flip the fan like the page of a book, from right to left, thereby getting it out of the way while you remove the i/o board. Flip it from left to right when you reinstall. This approach would save some frustration, as it is a challenge to reinsert that tiny ribbon into position.
If you do remove the ribbon, reinsert it before repositioning the fan. That will give you more play as to fiddle with the ribbon.
-
-
-
ファンの上部にゴム製ガスケットを留めている接着剤を剥がします。
Note how the “ears” of the gasket are routed
Where can I purchase a replacement gasket? It’s missing after the repair place opened my computer
-
-
-
上部ケースにファンを固定している次の3本のネジを外します。
-
3.6 mm T5トルクスネジー1本
-
2.7 mm T5トルクスネジー1本
-
3.6 mm T5トルクスネジ(短頭)ー1本
So far great
When reinstalling, start all three screws before tightening down. There’s some play in these holes, and you will have trouble lining them up if you tighten one down first.
-
-
-
上部ケースからファンを持ち上げて、ファンのリボンケーブルをソケットから引き出し、Air本体から取り出します。
Would like more detail about removing the fan cable. Looks like it just pulls out to the right. I thought I ripped it off.
On re-installation of fan cable cable no tool required - just wiggle it in from from side/above (side force aided by bend of cable)
Super easy - my first computer repair..hope all is well
The ribbon connector held in the socket by a tiny square on top, which enters a square hole in the top of the socket. An xacto blade used to pry the top of the connector gently up will help release the connector.
Question: Is the ribbon connector a part of the fan, so that the new fan has its own ribbon connector? Apologies if this sounds trivial, but I could not tell from the wording/picture.
So I did the replacement according to this guide, with a replacement fan purchased from iFixit, and the fan would not spin even under heavy load! I took out the fan, and noticed that there was quite a lot of resistance when I spun the blades manually. It turns out, the fan was slightly squashed flat near the vent so that the resulting friction prevented the blades from spinning free. I un-squashed the fan, re-installed it, and the fan is spinning! The moral of the story is to make sure the blades can spin free when installing a new fan.
On reassembly, I found it hard to reinsert this ribbon cable, so did step 11 again. I disconnected the I/O board, connected the fan and snapped the retainer down on the ribbon cable, then undid step 11 (ie. I connected the I/O board again). As others have said, a brilliant step-by-step guide, and slloeing comments is a great idea too.
nice! Congrats!
Luis -
-
-
-
ロジックボード上のソケットから電源ケーブルを引き抜いて、I/O ボードの接続を外します。
You can skip the following five steps if you are just trying to remove the logic board—the I/O board can stay put, and it won’t hinder logic board removal.
-
-
-
I / Oボード表面と平行にカメラケーブルをAirのヒンジ側に向けて引き抜いてソケットから切り離します。スパッジャーの先端を使って、コネクタをソケットから押し出します。
Use the corner of the flat edge of a spudger to push alternately on the metal ears to help disconnect the cable.
And when reinstalling, push the metal ears from behind to snap the connector back into the socket
In my model (model identifier: MacBookAir6,2), the camera cable connector was found located on the logic board.
-
-
-
-
スパッジャーの平面側先端を使って、I/Oボード上のソケットから左側スピーカーケーブルコネクタを持ち上げて外します。
Don’t use a spludger!!!!! Use tweezers or a super thin flat head. Spludger is too thick…
Well, dangit. I used a spludger, and now I’ve got two gold wires just hangin’ out. Think it’s salvageable?
If you have 2 ‘gold wires’ hanging out (assuming that you’re referring to the connectors and not bare wires!), you’ll have to inspect them under ‘high’ magnification (40x loupe would do) and make sure the tabs are propped out so that when you plug them back into the connector they’ll grab the connector (and don’t slip out when you attempt to plug the connector in). Inspect the connector to see what orientation to insert the connector plugs in. Mate the tabs on the plug with the surface opening on the plastic connector housing.
I used a pair of tweezers. One (tweezer) end under the plastic connector, then squeezed the other (tweezer) on top of the plastic connector. Gently wiggled up and down and the connector easily popped out.
-
-
-
スパッジャーの先端を使って、マイクロフォンリボンケーブルをI/Oボードに留めている固定フラップを跳ね上げます。
-
スパッジャーの先端を使って、I/Oボード上のZIFコネクタから音量ボタンのリボンケーブルを取り外します。
This is throwing me for a loop. It won't fit back in. Are the volume and mic cable the same cable?
Use the tip of the spudger on the plastic ear at the back of the connector (the ear is on the battery side), to push the connector out of the socket.
Be very careful when locking the ZIF connector during reassembling. This was my first time seeing a ZIF connector, the retaining flap bounced ( I didn’t pushed so hard though) and a struggled nearly 1 hour to reassemble it. It was a nightmare, thank god it didn’t broke!
I found it was easier to perform removal of the cable until step 16 when I was removing the I/O board.
-
-
-
I/Oボードを上部ケースに固定している4.0mm T5トルクスネジを1本外します。
On reassembly, it's good to line up the screwhole in the corner of this board with the hole below it, so the fan screw can be replaced properly.
-
-
-
ロジックボードに一番近い端から I/Oボードを慎重に持ち上げて、上部ケースから取り出します。
Be careful when reassembling the I/O board. The USB and headphone jacks should be oriented well, otherwise USB dongles won’t fit even if it looks well adjusted.
-
-
-
バッテリーを上部ケースに固定している次の5本のネジを外します。
-
6.3mm T5トルクスネジ 3本
-
2.4mm T5トルクスネジ 2本
Be careful when screwing in again not to overtighten, the plastic of the battery breaks easily with tightening.
Mike Dacre - 返信
-
-
-
スパッジャーもしくは指先を使って、トラックパッドのリボンケーブルZIFソケット上の固定フラップを持ち上げます。
-
ソケット自体ではなく、ヒンジ状の固定フラップを持ち上げてください。
Disaster strikes. I pulled away the socket itself (just like it says not to). Is there any possibility to re-connect it, or did I just ruin the whole logic board?
-
-
-
スパッジャーの平面側先端を使って、ロジックボード上のソケットから右側スピーカーケーブルのコネクタを外します。
To snap back in, place speaker cable connector directly on top of socket and press down with your finger or tool.
This has to be done very gently. I only applied a mild lift and the socket broke off from the board. I had to say good-bye to the right speaker. :-(
Read my comment about using tweezers for the left speaker cable connector. But for some reason, the right connector was a little more tight and took more effort than the left speaker cable connector.
-
-
-
スパッジャーの先端を、ディスプレイデータケーブルのロックに付けられた黒いプラスチックのフラップ下に慎重に押し込んで、ロックを上方に持ち上げてソケットから外します。
-
ロックをソケットから離しながら、スパッジャーの先端と指を使って、ソケットからディスプレイデータケーブルをゆっくりと外します。
Regarding the second photo on step 22, I believe the placement of the spudger is incorrect. If the second photo's purpose is to demonstrate the placement of the spudger described in the second bullet--"...use the tip of a spudger and your fingers to gently remove the display data cable..."-- then such placement could lead to damaging the connector. View this annotated screenshot to see what I'm trying to convey: https://www.evernote.com/shard/s4/sh/1f5....
I agree, I used tweezers to pull it gently and it worked beautifully
Agree. Use tweezers.
sdcsoup -
You should place the tip of the spudger on top of the connector and push out. At first I had the tip of the spudger on the bottom and tried to push up and that was incorrect.
-
-
-
スパッジャーの平面側先端を使って、アンテナケーブルコネクタをAirPort/Bluetoothカード上のソケットから持ち上げて、外します。
-
-
-
ドライブをソケットからまっすぐ引き抜き、ロジックボードから外します。
Warning: there may be adhesive keeping the SSD in place. i got 1 with, and 1 without, both slightly different models (but still the same model name, A1466 )
divinity76 - 返信
-
-
-
ロジックボードを上部ケースに固定している6.3mmT5トルクスネジを6本外します。
Please Please Please remember to re-attach your antenna cables if you are replacing the upper case with a new or refurbished one. They have a way of slipping under the logic board.
These screws are easily stripped. If you accidentally push too hard, you will strip the screw when re-attaching. If that happens, get a pair of needle nose pliers and gently work the screw out taking care not to damage the board.
These screws are actually 3.6 mm T5 Torx. Please fix :)
I’ll second this observation.
sjosefw -
When putting the logic board back, make sure the speaker wire isn't trapped under it
I have not replaced a display on the A1369 but have done many A1466 which is a newer 13” model. They seem really similar and its not clear why one needs to remove the logic board to remove the display. The antenna cables on the A1466 dont have to rest under the logic board but can be tucked in the hinge crevice. Cant this same thing be done with the A1369?
-
-
-
左側クラッチのヒンジとアンテナケーブルリテイナーを上部ケースに固定している内側の4.9mmT8トルクスネジを2本外します。
These are T9-sized torx screws, not T8.
This is good to know. I think I need to order a screwdriver set - all I have is the pentalobe and one other that came with my SSD replacement kit.
I also had T9 screws on my device.
I found it helpful to loosen the 3rd screw of the hinge already a TINY bit. The screws are quite tight so it´s easier to loosen them while the case is lying flat on the surface. This procedure comes in handy in Step 34 where you have to hold the case perpendicular with one hand, while unscrewing this screw with the other hand.
wolfgang07 - 返信
Mine were T8 screws, but I was able to use a T9 torx with pressure and that worked.
Mine were T8 and my T8 bit worked fine.
-
-
-
アンテナケーブルのリテイナーをわずかに押し出して、上部ケースにヒートシンクの先端を固定している3mm T5トルクスネジを外します。
When I was re-assembling, the screw hole of the heat sink didn’t align. I applied a mild force then the edge of the heat sink broke off from the rest, losing the contact to the case. I am hoping the Air would work for a while during the test run (if it ever works) but I would buy a replacement heat sink for regular use.
-
-
-
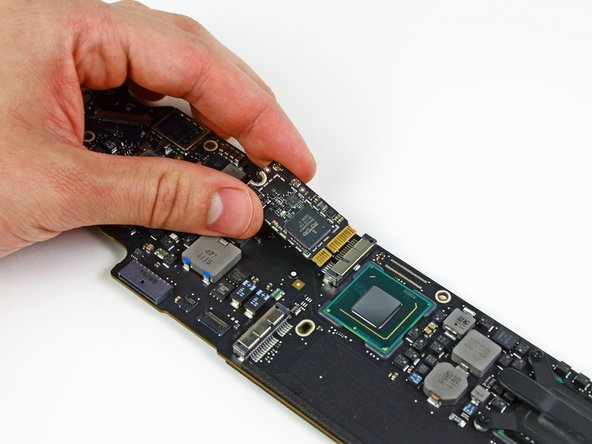
慎重に上部ケースからロジックボードアセンブリを取り出します。ケーブルが絡まっていないかご注意ください。
On reassembly, as you seat the board in place, make sure the keyboard backlight cable is not trapped under it.
Removal of logic board and all the steps leading up to it I found unnecessary. They may be good for some but I really didn't need to dismantle the laptop as much as this guide shows to get the display off. Just my opinion, of course.
-
-
-
ロジックボードからヒートシンクを取り出します。
Arctic Silver's application guide http://www.arcticsilver.com/intel_applic... shows mobile 15 processors for 2nd generation, recommending a spread technique. But the 3-7th gen i5 only lists vertical line technique. I can find the actual processor model used in the 13" mid-2011 MBA (Core i5-2557M, found here: http://www.anandtech.com/show/4528/the-2...), but no way to correlate that to 2nd gen, 3d gen, etc.
I'm going to go with spread because it seems generally safer for laptops, but if anyone can confirm: What generation is the Core i5-2557M; and if it's later generation (3- on), is it really vertical line vs. spread?
Allen, it's been a while since you did the repair. Have you had any problems with overheating? Or anything else that might be caused by spread vs. vertical line?
Talon -
i’m looking for a CPU under the heatsink. is that integrated onto the mobo as well??
-


デバイスを再組立する際は、これらのインストラクションを逆の順番に従って作業を進めてください。
デバイスを再組立する際は、これらのインストラクションを逆の順番に従って作業を進めてください。
52 の人々がこのガイドを完成させました。
以下の翻訳者の皆さんにお礼を申し上げます:
100%

Midori Doiさんは世界中で修理する私たちを助けてくれています! あなたも貢献してみませんか?
翻訳を始める ›

9 件のコメント
Those connections are scary small! The speaker connections in particular are very fragile and hard to get under to lift off. One of mine came apart, but it could be reassembled by first placing the plastic connector in the socket and carefully connecting the metal terminations into it. Be careful to orient the slot in the wire termination so it is vertical to interface with the lug in the socket, if that happens to you.
I had the dreaded "3 beep" (memory failure) problem and ordered a new logic board. Only when I had the old board out did I realize there was a compatibility problem- different board versions, connectors did not match. Since I was stuck anyway, I baked my old board in the oven (325 for 10 minutes) and reassembled it all so I would not lose any parts. I was surprised to have it boot up with the old (baked) board!
I hate these lazy Haynes Manual type of articles that just tear down a product and give zero insight to the actual assembly. It's the type of knowledge that is just enough to be dangerous. Countless of times I've encountered that assembly IS NOT reverse of disassembly, where a specific tool or technique is required that is not covered in this lazy style of articles.
9 times out of 10, disassembly is the easy part and assembly the hard part.
I did not find that to be an issue with this guide, reassembly was quite easy and was just the reverse of assembly. The whole thing took by less than 90 minutes beginning to end.
Mike Dacre - 返信
I feel that almost all assembly steps don't need repeating( a follow up reassemble step). In my opinion, assemble/reassemble steps involving a ribbon/flex cable and ZIF socket would be helpful, especially for newbies. Thats just one techs opinion. All that said, I feel the author did a fantastic job and I had no trouble removing/reinstalling my logic board and components. Thank you A. Goldberg and keep up the good work.
Great guide! I wish I had found this before I followed the ‘tear down’ guide; hopefully I didn’t break anything doing it that way. The I/O board camera connector was the worst — it really requires quite a pull to release. It would be ideal to have a close-up showing exactly where to put the spudger tip to push. Also, the speakers were rather well glued down, but eventually did release. Pointing out where the glue point is (in the notch just before the bend on the right=hand one) would have helped me.
Good guide. I swapped my logic board with it.
However, It may be improved by changing the order of the steps to get more space and carefully work.
1. Remove the battery
2. Remove the hard drive and airport card
3. Remove the left speaker (at your right when working) to access more easilly to the connection board.
4. Disconnect the connection board from logic board
5. Remove the fan
6. Work on the connection board
7. Removing right speaker helps during reassembling (a small rubber pad is under the logic board at the top left) and ease the ribons access to plug into zif connectors.
8. Work on the logic board
This may help to reassemble as this provide more room to connect small connectors and provide better access to ribons
Step 28 seems useless if you are working quietly
As a hint I used some dessert plates to hold the screws for each part. This avoids mixing them altogether
Does this guide work with a 2017 macbook air? Searching for a guide and haven’t found one. I’ve seen a video on youtube where they kept the battery, is it possible to keep it ?
excellent guide, very informative, I did not change anything but just put apart every single piece to eliminate water from a computer from a neighbor, as I was told tea was spilled on it and the owner left it on rice -probably worsen the situation. I found water (and rice) on several components including battery, motherboard and chasis. several chips were with sulphate but after cleaning with isopropil alcohol and brush carefully, the computer started and worked!!
thanks iFixit, with some education from your posts, I`ve been able to save many macs and other stuff from trash bin, good for your economy and the planet, win-win!
Pulling the fan cable out was terrifying but you actually just pull on the cable itself. No way to get any leverage at the connector to dislodge it. Did come out easily but like I said, scared me!
allison - 返信
Draai de schroefjes voorzichtig los en leg ze op een stabiele plek neer en let erop dat de schroefje een verschillende lengte hebben.
bwgvanderveer - 返信
I thought I could replace my 256 Gb SSD with 512? regards
ola m - 返信
Do you have good Test Point Voltages? It appears there are silver colored Test points on the I/O Board. I am working on a water spill and trying to troubleshoot if both the I/O board and the Logic need replaced.
andrew - 返信
It's probably not necessary but may be a little safer to completely discharge the old battery before replacing it.
Larry Smith - 返信
tell a model that was not inferior to the speed of the one in the laptop.
Thank you
ilyabuhov - 返信
Do i need to order tools separately to replace the battery i just ordered?
anne uhlir - 返信
im looking for a Logic Board for a
Apple - MacBook Air® - 13.3" Display - Intel Core i5 - 8GB Memory - 128GB Flash Storage (Latest Model) - Silver Model: MQD32LL/A
Any help is appreciated.
Jamie Comstock - 返信
P5 pentalobe screwdrivers are too big! The correct size for these screws are p4 pentalobe. P5 pentalobe was just able, with difficulty, to turn some of the screws. If the screws were at all tight, my p5 was unable to get them out, and started to strip the screws. A p4 screwdriver fit better and removed the screws with ease. (I was using high quality Wiha brand screwdrivers.)
William Skinner - 返信
I had same experience (with MacBook Air 13-inch Mid-2012) … had to get P4, which worked swimmingly
eric -
Very simple installation. The screwdriver heads were exactly what we’re needed, one head for the outside case screws, the other for the screws holding the battery in place. The computer started right up. Now to see how the battery holds up, but I have a good feeling about this!
Dennis Eaton - 返信
My P5 and the T5 worked perfectly with my early 2015 Air 13”! And it is super fast! Thank you iFixit!
Pennny Beach - 返信
The supplied kit and instructions worked perfectly!
Nikolay Andreev - 返信
Comments that the P5 pentalobe are too large are absolutely spot-on. There is no way the P5 pentalobe bit I have will work with the MacBook Air without destroying the screws. Hard target search for P4 pentalobe bit in progress…..
joemoog - 返信
Bonjour j’aimerais changer mon SSD de 128 Go pour en mettre un de 512 Go. Je ne sais pas ce qu’il faut prendre car il faut qu’il soit compatible avec le macbook air A1466. J’aurais vu un Samsung Evo 970 500 Go mais si je ne me trompe pas, il faut un adaptateur.
Merci pour votre aide.
chicco33 - 返信
oui, vous aurez besoin d’un adaptateur, pour completez le changement.
Dan -
The tool kit should include tweezers for re-inserting the battery connector.
Andre Clement - 返信
P5 pentalobe worked perfectly for me. Instructions were spot-on. Antenna connections were a bit fiddly to refit but got them in ok.
michaelquinnell - 返信
Maybe the problem some are experiencing is that the designations are confusing (blame Apple rather than iFixit). the P2 is also known as PL1. The P5 is also known as PL4. The P6 is also known as PL5. So it is possible to mistake the P6 (PL5) for the P5 (PL4), meaning it (P6-PL5) will be too big, while the P5 (PL4) will be just right. Sort of a 3 Bears explanation, but it is very confusing.
Thomas Lewis - 返信
To add to this. In searching for the P5 screwdriver to buy in UK, as far as I can tell, it is also known as
Pentalobe 1.2(mm)
also
P4 = 0.8
P6 = 1.5
Just unscrewed the back case of MacBook Air 13” mid 2011, with no problems using Pentalobe 1.2
nijafe -
I have not replaced a display on the A1369 but have done many A1466 which is a newer 13” model. They seem really similar and its not clear why one needs to remove the logic board to remove the display. The antenna cables on the A1466 dont have to rest under the logic board but can be tucked in the hinge crevice. Cant this same thing be done with the A1369?
Sean Love - 返信
Did mine today - but new battery wasnt charging. Went back in and noticed the battery connector cable was not quite 100% “seated. It was sticking out by less than a millimetre! - you need to give it quite a firm push in to get it seated properly. Otherwise - all ok .
John Brennand - 返信
Just installed on a MacBookAir6,2 (13-inch, Early 2014).
Was very easy.
New iFixit battery looks great so far:
Jonathan Cross - 返信
can you tell me which size of screwdrivers you’ve used to crack it up, please? I have the same model and size,
hawk_lpc -
Screw P5 Pentalobe 1.2
Mario Verlent - 返信
Install went flawlessly. Only challange was reattaching blue tooth antennas. Those sockets are so tiny.
Joel Sebastian - 返信
Installation was a little challenging at first because the instructions on this site did not perfectly match my model (late 2013 to early 2015).
Found this video on YouTube which described the procedure perfectly https://www.youtube.com/watch?v=Lue6lVWh...
Also the Ifixit kit I received was well put together with everything I needed and more. The calibration went perfectly and I am very pleased. Will buy again!!
Donald Niamath - 返信
Gently pulled out connector of old battery, then pressed and held the power switch for 1 minute. Unscrewed and removed the old battery. Pressed and held power switch for 1 minute again. I know from previous work that this helps drain charge from spontaneous recharging as the dielectric recovers. Gently “fine tuned” leads from new battery to connector till connector stuck out at right angle to the edge of battery. Held the battery by the edges and let the connector slide into the socket. Set the battery down and put the screws in all the way. Then checked that the connector was completely seated before tightening the screws. The laptop come on immediately and showed 98% charge and registered normal (checked in “About this Mac”. Very happy to this point. Now for calibration.
Amir Zaidi - 返信
Thank you very much for the guilde. My MBA2011 had reborn !
Billy Wong - 返信
Allow for electrostatics, otherwise you may cook components on the logicboard /motherboard (like I did with one of these!)
See great advice: Electrostatic Discharge
Fletcher Cole - 返信
… und wenn du eines von diesen wirklich kleinen Schräubchen vermisst: bevor du den Boden aufkehrst oder mit einem starken Magneten absuchst, schau mal am seitlichen (magnetischen) Ladekabelanschluss nach … ?
... and if you miss one of these really small screws: before you sweep the floor or search it with a strong magnet, take a look at the (magnetic) charging cable connection on the side … ?
Blatt - 返信
Fot All People ha ing trouble finding their SSD
DONT PRESS CMD +R + POWER
instead press
OPTION+CMD+R +POWER
I just installed Monterrey with WD black sn 770 SSD in m'y macbook air 2015
Albert - 返信
IFixit just had me submit "my story" re. fixing my MacBook Air 2013.
This repair was NOT difficult. The battery is enclosed in a plastic frame. It is NOT glued in like the newer models of Apple laptops. And unlike older laptops, the battery is not totally enclosed in a plastic housing. So once you remove the screws holding the batterie's frame, you can remove the battery.
Follow the instructions. Read the comments. Also read the comments re. installing a new battery.
Good luck. - Eric J.
ECJohansen - 返信
On the back of the laptop, notice that each screw is angled a little bit inward, aiming toward the middle of the laptop. Keep your screwdriver lined up with the screw (angled a bit outward as seen at 01:23 in the video: https://youtu.be/tToAwO6f-SY&t=83). This will help you get a good bite on the screw to get it out and avoid stripping the head of the screw.
Use the same angle when putting each screw back in. If the screw is in line with its hole it should not feel like you are fighting to screw it in. If it does, check your angle and back up a little; you should feel the screw fall into line.
Rich Garella - 返信
IFixit just had me submit "my story" re. fixing my MacBook Air 2013.
This repair was NOT difficult. The battery is enclosed in a plastic frame.
shrhh - 返信