はじめに
このガイドを参照して、MacBook Air 13インチ Late 2020(M1) Touch IDセンサーを交換します。
Touch IDセンサーを交換後、Touch IDは機能しなくなります。ご注意ください。 MacBookのオリジナルTouch IDセンサーは工場生産時にロジックボードのT2チップとペアで製造されています。Appleの独占キャリブレーション手続きを経なければ回復できません。他モデルのMacBook Airから取り出した正規品Touch IDを移植しても同様です。
Touch IDセンサーを交換するには、Touch ID機能を保持するために、ペアで製造されたロジックボードをインストールする必要があります。
必要な工具と部品
-
-
MacBookにBig Sur v11.1以降がインストールされている場合、オートブートを無効にできないかもしれません。通常通りに作業を進めることができますが、裏蓋を開けたらすぐにバッテリーを外すようにしてください。
-
P5ドライバーを使って、次のネジを外します。
-
7.9mmネジー2本
-
7.3 mmネジー2本
-
2.6 mmネジー6本
-
-
-
指先をディスプレイと下部ケースの間に挟んで、下部ケースから上向きに引き上げます。
-
下部ケースを取り出します。
-
本体を正しい位置に揃えてしっかりと押し込み、下にある2つの隠しクリップをはめ込みます。カチッと装着音がして固定されます。
-
-
-
バッテリーコネクタ上のメタル製ロッキングアームを、スパッジャーの平面側先端でこじ上げてラッチを外します。
-
メタル製のロッキングアームを真上に持ち上げて、バッテリーコネクタをロジックボードのソケットから外します。
-
上手く接続できない場合は、コネクタの後ろ側、ケーブルがついている方を先に所定の位置に押し込んでから、コネクタの先端をコネクタが平らになるように押し込んで所定の位置に収めて下さい。
If having difficulty in flipping the bar up, place the machine vertical and not that there is a small “locking nib” that the bar has to clear. You may have to give the bar honest persuasion to clear the nib.
The bar can lock backwards making it very hard to even see let alone move. Great care is needed to shift it. I had to use two thumbnails, one on each side, then once flipped forward it takes more push than I expected to clip it in place. Ensure the plug is fully seated first !
-
-
-
T3トルクスドライバーを使って、オーディオボードコネクタカバーを固定している1.4 mmネジを3本外します。
-
T3ビットが少し緩く感じる場合は、代わりにT4ビットを使用することもできます。
-
-
-
-
スパッジャーの先端をスピーカーケーブルの下にスライドして、まっすぐ上にこじ開けて接続を外します。
Man, that's toit! Couldn't give us a little play in that cable Apple?
maccentric - 返信
Traduccion a Español: ¡Tío, eso es! ¿No podían darnos un poco de juego en ese cable Apple?
Traducción a Español: ¡Tío, eso es! ¿No podían darnos un poco de juego en ese cable Apple?
-
-
-
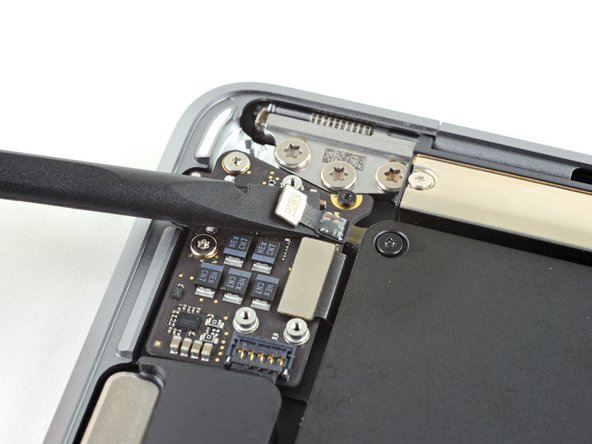
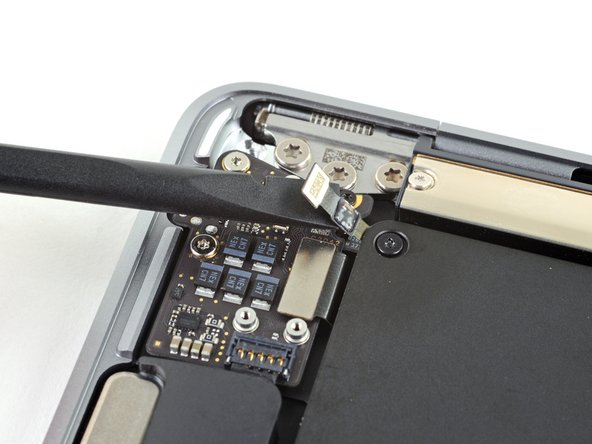
スパッジャーの先端を使って、Touch IDケーブルをまっすぐ持ち上げて、オーディオボードから接続を外します。
-
スパッジャーをTouch IDケーブルの下にスライドして、オーディオボードから外します。
-
-
-
T3トルクスドライバーを使って、Touch IDセンサーとブラケットを固定している1.6mmネジを6本外します。
-
-
-
Touch IDセンサーブラケットを取り出します。
-


オリジナルのパーツと交換用パーツをよく見比べてください。交換用パーツに付いていない残りのコンポーネントや接着シールなどは、インストールする前に新パーツに移植する必要があります。
デバイスを再組み立てする際は、これらの手順を逆の順番に従って作業を進めてください。
修理が完了すると、電源に接続するまでノートパソコンの電源が入らない場合があります。
e-wasteを処理する場合は、認可済みリサイクルセンターR2を通じて廃棄してください。
修理が上手く進みませんか?まずはベーシックなトラブルシューティングを試してみるか、このモデルのアンサーコミュニティに尋ねてみましょう。
オリジナルのパーツと交換用パーツをよく見比べてください。交換用パーツに付いていない残りのコンポーネントや接着シールなどは、インストールする前に新パーツに移植する必要があります。
デバイスを再組み立てする際は、これらの手順を逆の順番に従って作業を進めてください。
修理が完了すると、電源に接続するまでノートパソコンの電源が入らない場合があります。
e-wasteを処理する場合は、認可済みリサイクルセンターR2を通じて廃棄してください。
修理が上手く進みませんか?まずはベーシックなトラブルシューティングを試してみるか、このモデルのアンサーコミュニティに尋ねてみましょう。
9 の人々がこのガイドを完成させました。
以下の翻訳者の皆さんにお礼を申し上げます:
100%

これらの翻訳者の方々は世界を修理する私たちのサポートをしてくれています。 あなたも貢献してみませんか?
翻訳を始める ›


4 件のコメント
Servus! Angenommen, der Stecker hat sich beim Sturz nur gelöst und man steckt ihn wieder drauf. Kann man dann Touch ID wieder nutzen? Ode muss man immer das Logicboard tauschen, sobald der Stecker abgelöst wurde? Grüße
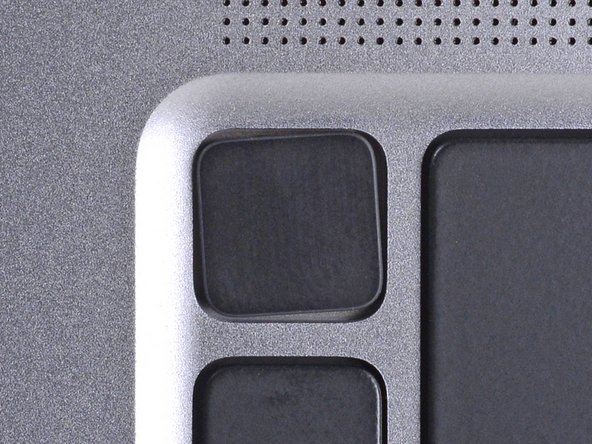
Is it safe to remove the power button without going through the back? My touch sensor isn't working and I think something's blocking it. I simply want to remove the power key to clean... and put it right back in.
No, the 4 screws holding the bottom of the button are on the inside, so you have to follow this guide to check your issue.
Anyway to turn on my 2019 macbook pro with a broken touch id flex cable?
ESD safe mat, plugged into ground, with a wrist strap, also grounded, are the best best to protect the logic board.
Robin Ray - 返信
Re-Assembly Tip: Before putting the screws back in, snap the lower case on and test to make sure the MacBook powers up. When I first re-assembled, I became very nervous I did something wrong because it would not power on. It turns out I just needed to plug the laptop into a power source for it to power up (despite having a good charge before disassembly). It was the perfect way to test the new USB-C ports!
Austin - 返信
Big points to this one, especially for mentioning needing to plug the laptop in. The bottom case needs to be screwed in and laptop needs to be plugged in before it will boot.
Bayden Yazalina -
Wiha 4PL driver for these screws.
Greg Worrel - 返信
Printing out all the images from this Ifixit guide prior to starting and using duct tape help me keep track of screws.
raju midjdeya - 返信